Chapter 10
Tiny Room Stories: Town Mystery Guide
This is our full walkthrough of chapter 10 in Tiny Room Stories: Town Mystery. We have every step detailed with images and codes which can be revealed if you need them.
Read below for a full description with hints and solutions, or you can also watch the video walkthrough.

"After setting off for the address found at the warehouse, you reached a large mansion. Apparently the mayor sent the last shard to his house."

The house is locked so first head down the path to the left to the swimming pool.

Tap on the pergola structure at the back with the sun lounger and then collect the long pole.
Back up and tap on the pool to get an over head view. Use the pole on the green lilo to move it towards the side, you can then collect the red key from on top of it.
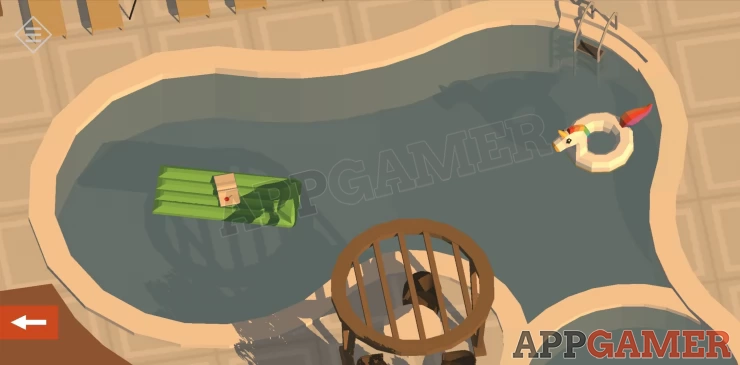
Back up and rotate the view to see the front of the pool house. Use the red key on the door top open it and go inside.
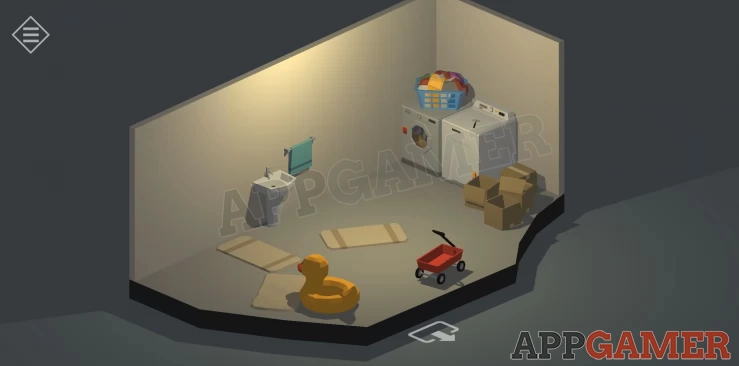
Tap on the washer and dryer to view them and collect a Hammer from on top. Exit the pool house and return to the front of the main house. You can now use the hammer on either of the ground floor windows to break and enter.

Enter the left window into the kitchen.
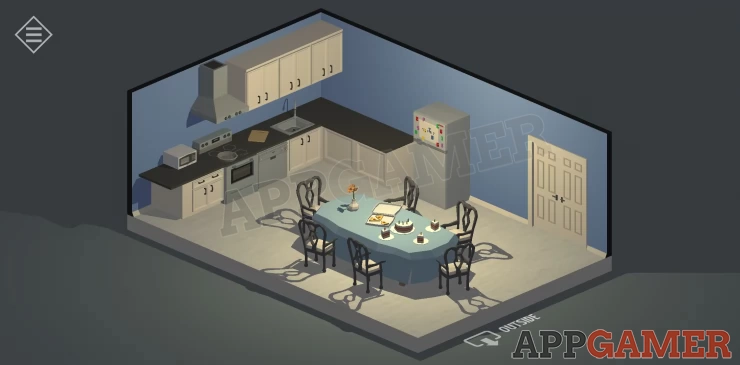
Check the lower left kitchen cabinet to find a pumpkin. Tap to turn it and see the carved face.
Check the top left cabinet and tap to move the jars to find a small weight.
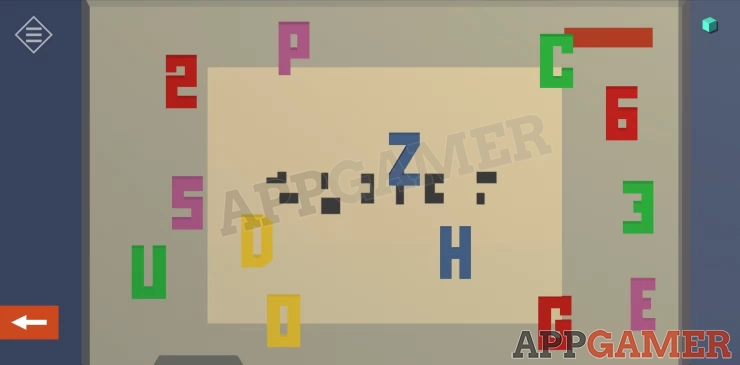
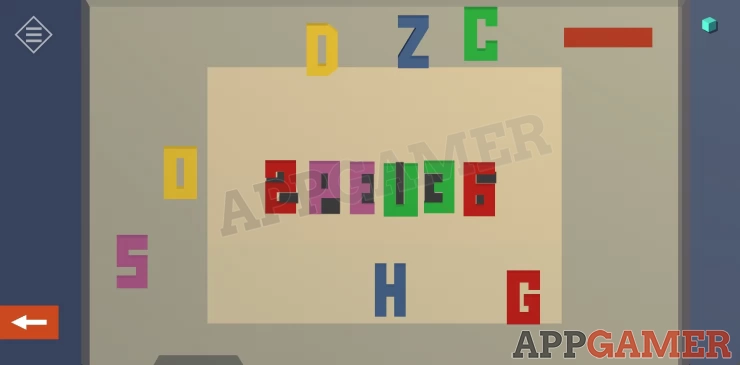
Tap on the fridge to view the magnetic letters and some dark shapes. Select and move the letters to match the shapes to find a code.
Show
The door is locked so exit back out the window and now enter the house through the other window on the right. of the door into the guest room.
Tap on the sofa and then move the orange pillow to find another small weight. Rotate the view to see the low unit by the open window. Tap to view this and open the center doors to find another small weight.
Next open the door on the right to collect the TV remote. Then exit out into the hall.
Rotate the view to see the front door and tap on the alarm panel to the right. Enter the alarm code to disable the locks and thankfully the alarm noise.
Hint: The code is found in the fridge puzzle above.Show
Code: 2PEU36Show
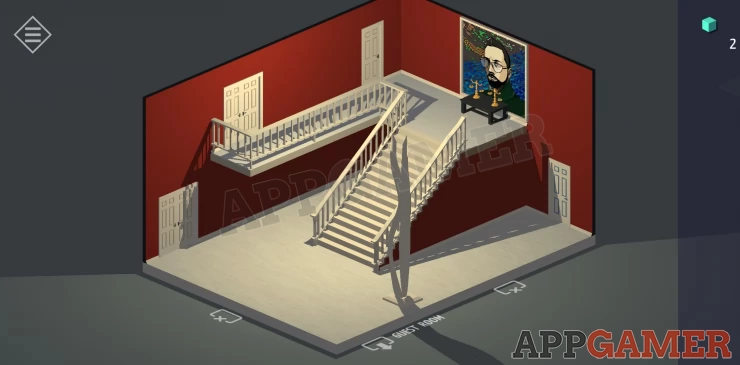
There are 3 rooms upstairs that you can now access. On the upper left balcony go into the left door to find a pink bedroom.
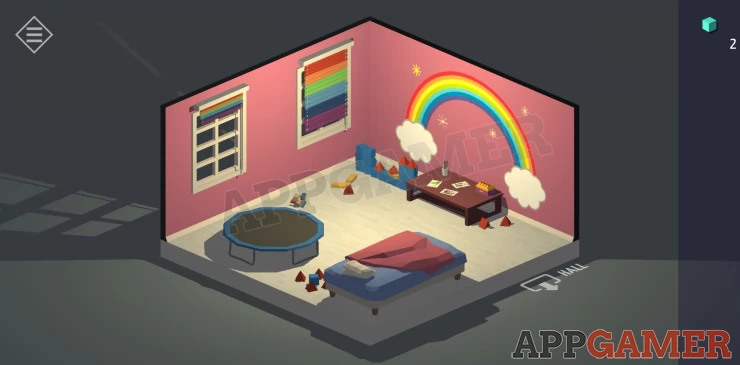
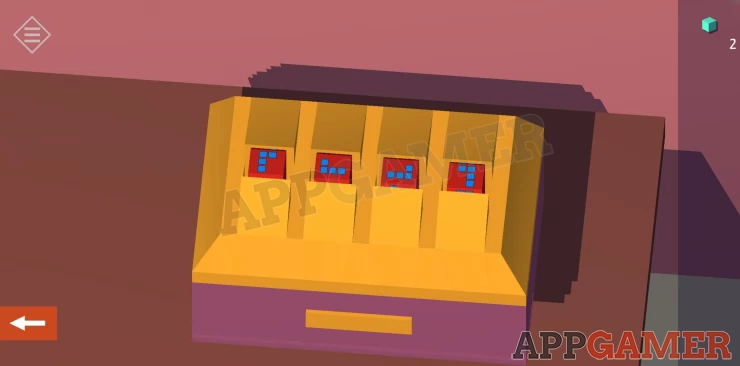
To one side is a set of blocks and a table, tap to view this closer and notice the block layout. Then tap on a box on the right of the table to see a combination lock. There are 4 dials with blocks on them in different shapes.
Set the combination to open the box.
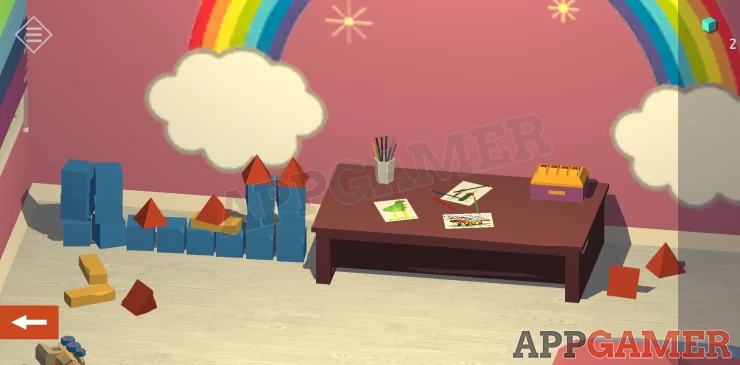
Hint: Set 4 shapes that will fit together to match the blue blocks next to the table.Show
Solution: Show
Open the box and collect a treasure map and a fourth small weight.
Exit the room and go into the main bedroom on the opposite side of the building.
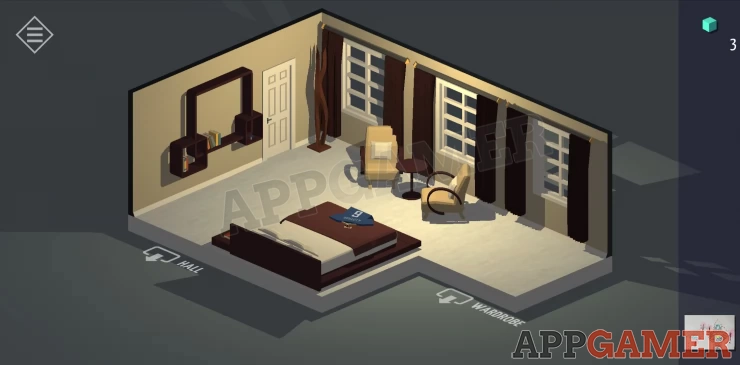
Rotate the view to see a bookshelf and top on this to view it and find a blue key on the shelf. Then look around the room, Note the shirt on the bed with the number 6. Tap on the bed and then on the book on the side table. The book is actually a hidden code entry pad.
Open the door to the wardrobe and go inside to find 4 more shirts hanging up and one more on an ironing board. Use the shirts to figure out the code for the keypad.
Hint: you have six numbers but you need to figure out the order they go in. Look carefully at the hangers.Show
Solution: The hangers have markings on them from 1 to 6 rings. The one on the bed has 3 rings. In the wardrobe there are 5 other hangers with one missing a shirt which is on the ironing board.Show
Code: 7 9 6 2 1 5Show
The drawer opens and you can collect another red key.
Go back down stairs. There are 2 locked doors at the back under the stairs, use the blue key to open the one on the right and enter the wine cellar. There is nothing here to collect although you can play music on the speaker. But take a note of the lower shelving and the shapes made by it.
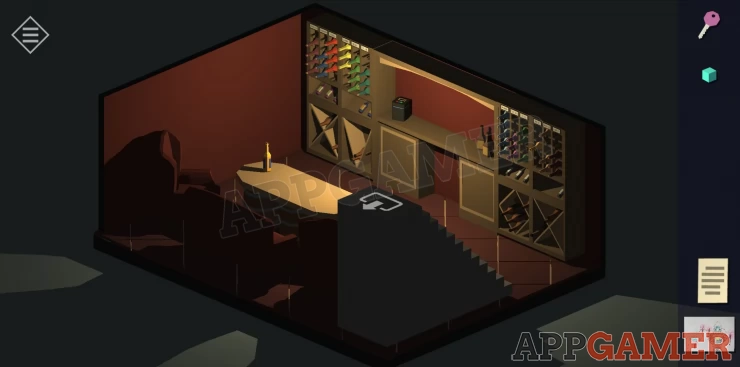
Exit this room and now tap on the door on the other side of the stairs to find a keypad entry, this keypad requires 6 symbols.
Solution: the wine cellar shelves and cabinets show 6 shapes. X, Inverted triangle, Square, Square, Diamond, XShow
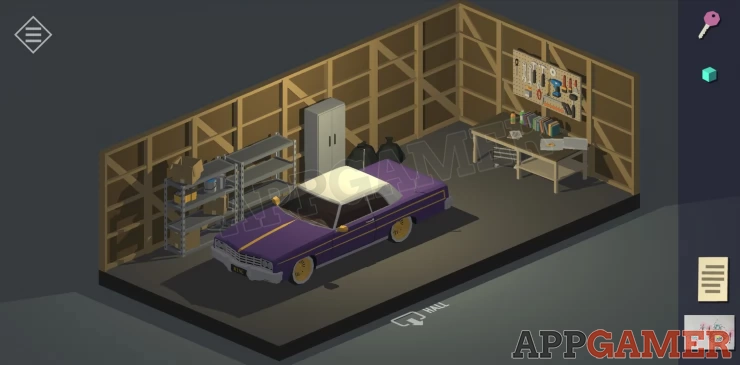
Open the door and enter the Garage.
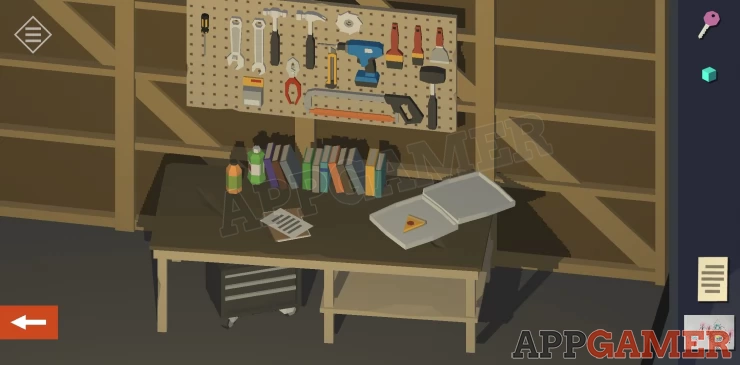
Tap on the tool rack at the back and collect a screwdriver. Tap the trolley under the back to move it and collect another small weight. Then tap the paper on the table to view a note about the DVD player.
Return to the guest room and use the red key on the locked door at the back. Enter the study.
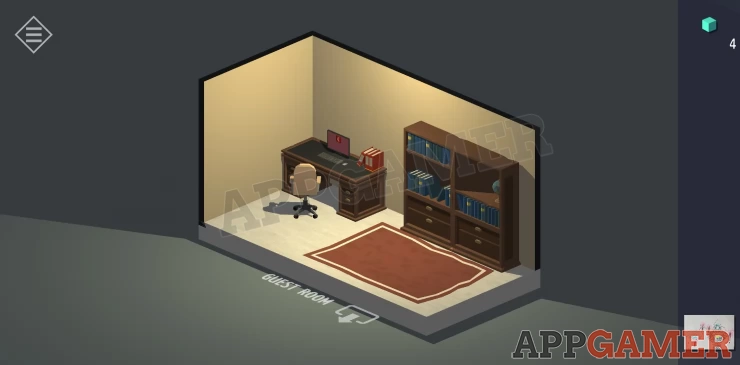
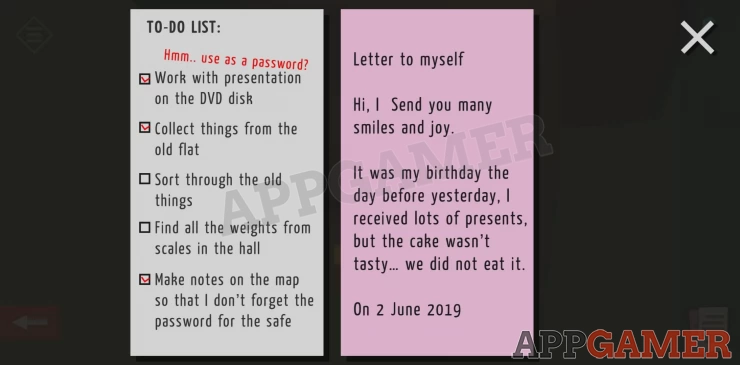
Tap on the desk and check through the drawers. On the right open the top drawer to find a purple key. Then below it flip through the files to find a sheet of notes with a To do list. On the left use the screwdriver to open the top drawer and collect a DVD.
Next check the computer screen. There is a log in here and an image of 2 sets of scales, one of the inverted. Notice the pattern of blocks.
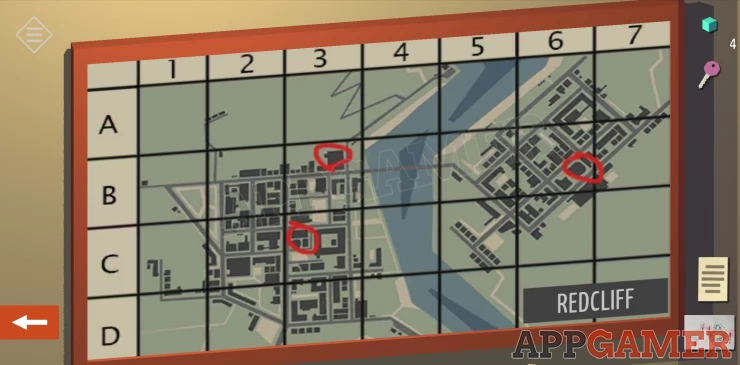
Rotate the view to see the town map. Notice the 3 areas circled in red.
Return to the guest room use the TV remote on the TV to view it. Use the number code from the paper found above to access the DVD channel. The DVD will show you 2 slides with maps and numbers. We will need these later.

Go back to the Garage and rotate the view to see the back of the car. Use the purple key to unlock the trunk and collect a shovel. Note also the box of items with an address on it and the license plate on the car. K1NG

Now exit the building back to the parking area. Check the Treasure map you found earlier that is in your inventory. The map show a path to a location with an X next to a tree. Locate that tree and tap on it. You will move in and be able to use the shovel to dig there.

Open the box you find and collect another small weight and a note from a child about their birthday.
We can now go back inside and approach the large picture at the top of the stairs.
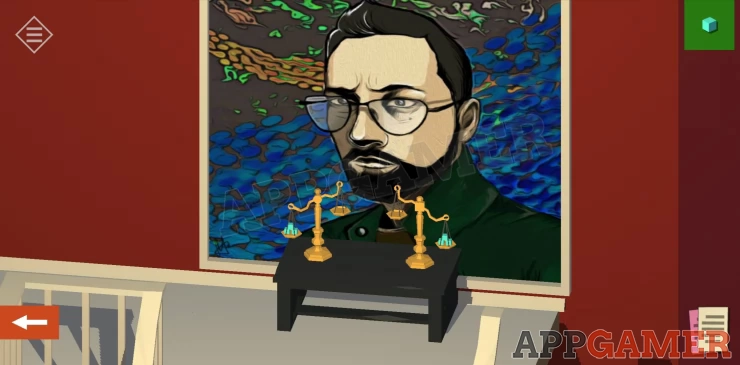
There is a set of scales with 1 more small weight to collect. You should now have 7 weights. Use the clue from the scales image found in the computer above to place them on the scales in the following pattern
left to right: 3 0 1 3Show
A panel will open and you will find a safe with a code entry.
The note we found earlier let us know that the safe code can be found from the notes on the map. The map is on the wall of the study. We need to use details from the DVD image to work it out though.
Hint: The DVD image lets us know that the note format has changed from letter/number coordinate pairs to number pairs and is read with the horizontal axis first.Show
Solution: Check the map in the study and get the 3 pairs of co-ordinates replacing the ABCD letters with 1234 numbers.Show
Code: 323362Show
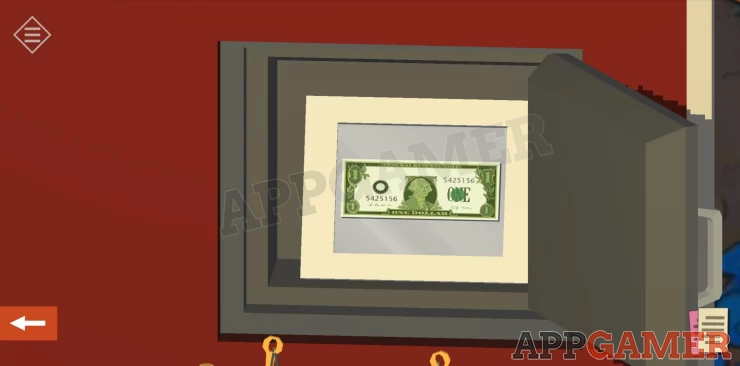
Open the safe and collect the dollar bill inside.
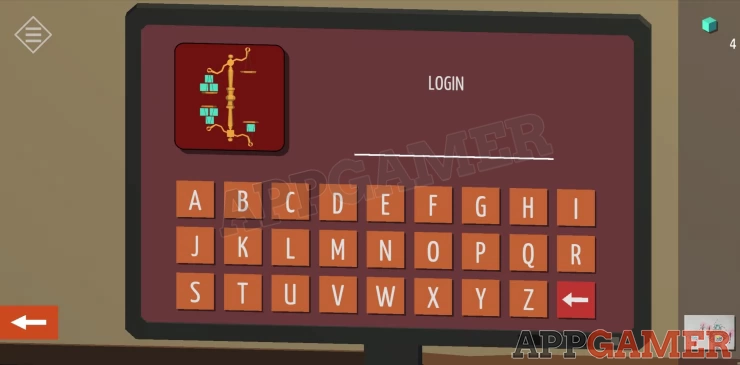
Return to the Study once again and tap on the computer screen. The login name is a 4 letter word that we have found a clue to above.
Hint: The vain mayor likes his car.Show
Code: KINGShow
We do not have the password though but we can use the 'Forgot your password option'. Tap on that.
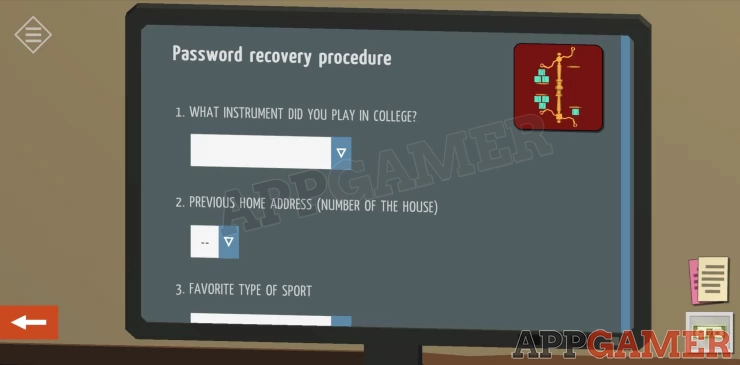
The form to fill in asks for information that we have seen clues for around the house. Try to fill it in, the solutions are below:
Solutions: 1, Instrument in the bedroom wardrobe - Guitar 2, Previous address on box in the car trunk - 12 3, Found in the garage - Football 4, Check the wine cellar for the wine with the least full bottles - Merlot 5, Dated note from the daughter said her birthday was 2 days earlier - 31 May, 2012 6, Check the items and drawing in the daughters bedroom - No Fairy 7, Check the bathroom in the main bedroom. - Gold 8, Serial number from the dollar bill from the safe - 5425156Show
Show
Show
Show
Show
Show
Show
Show
Show
This will unlock the computer, You can now see a mail about the experiment and access the Panic Room control. Tap this to open the Panic room.
Back out from the computer and view the large book case to the right. Noticed that 6 books have yellow markings on the spines. These books can be pushed in to open a secret. You need to discover the correct order to press them. If you make a mistake the books reset and you start again. This is trial and error.
Solution: There are 2 books on the top shelf, we call them 1 and 2 and then 4 books on the lower shelf 3, 4, 5 and 6. Press them in this order: 3, 6, 2, 1, 5, 4Show
This will open the bookcase and find the open panic room doors behind it. Tap to enter an elevator and use the control to descend to the panic room.
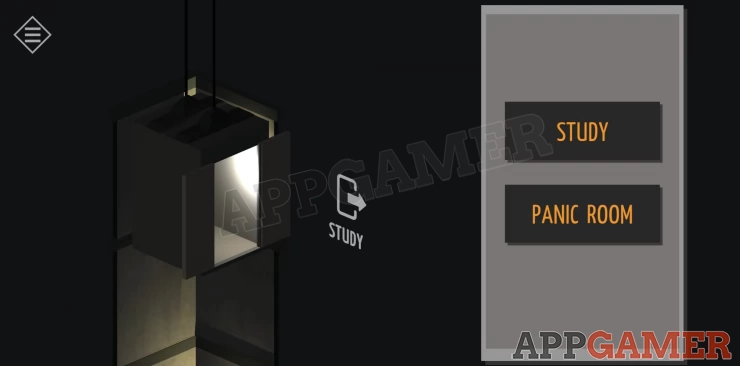
In the room it seems there has been an explosion. Rotate the view and collect a briefcase from the chairs, then use this on the shard on the floor to collect it. You can now tap the elevator exit to leave the building. Tap on the trunk of your car to open it and place the briefcase with the others. Time to leave.

That is the end of chapter 10. If you have any questions about the rest of the game please head to the Answers Page and leave a review for the game on the review page.
We have questions and answers related to this topic which may also help you: Show all