Chapter 4
Tiny Room Stories: Town Mystery Guide
This is our full walkthrough of chapter 4 in Tiny Room Stories: Town Mystery. We have every step detailed with images and codes which can be revealed if you need them.
Read below for a full description with hints and solutions, or you can also watch the video walkthrough.

Underground
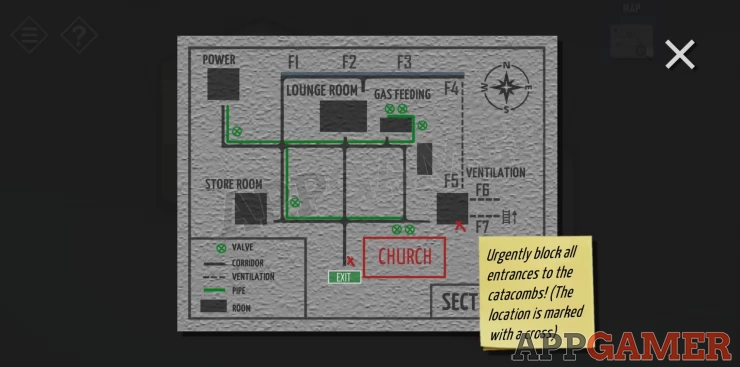
On this level you have access to the map you found in chapter 3. You can tap it at any time to view it.
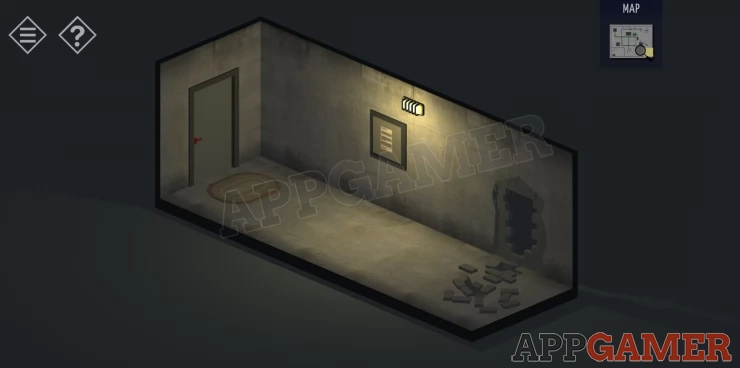
On the wall in the first corridor you will find a memo letting you know that there will be riddles/puzzles required to access each room. Not too surprising really.
Tap the door mat in front of the door at the end of the corridor. Underneath is a Red key to collect. Use the key to unlock the door and pass through.
You are now in the passages that you can find on the map.

First move to the right to find 3 red valve wheels on the wall. Tap them to turn them both fully off (3 taps needed)
Now move back to the left from the entrance and find a door to the Storeroom.
This door is locked and has a 4 key pad sequence to open it. This is not too hard to figure out as each pad will remain lit when you tap in the right order. If you need help the code is:
Bottom Right, Top Left, Bottom Left, Top RightShow
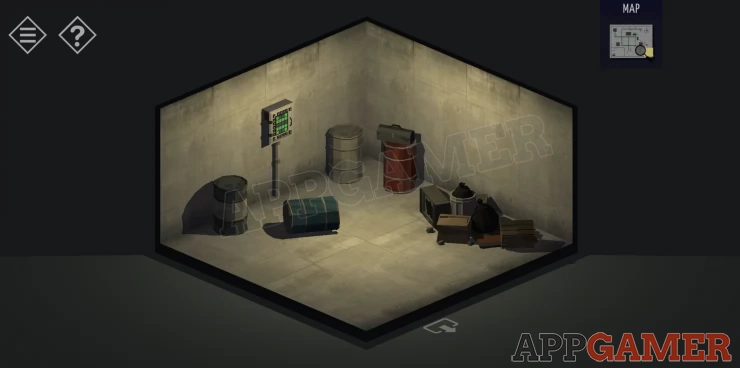
In the room locate a toolbox that is on a barrel. Open it to find Matches for you to collect.
Then on the back wall is a lock box with a pattern of squares on it.
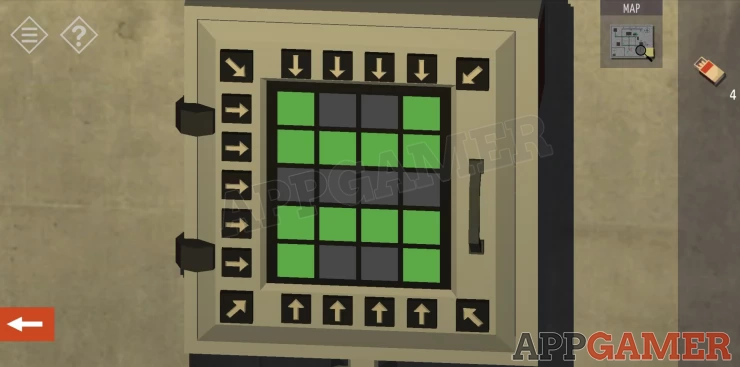
This is a puzzle. You must tap the arrow button to the side and below to change the squares that the arrow points to. The aim is to flip the squares so that they are all green. This may take some practice but isn't too hard.
Solution: Tap each of the 4 vertical down arrows. Then tap each of the 4 diagonal arrows.Show
Once done you will be able to collect a Black Key
Exit the room to the corridor and find the red valve on the opposite wall. Tap to turn this off (3 taps)
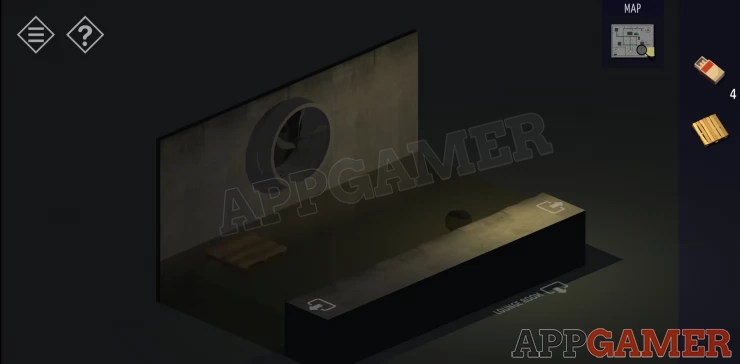
The key you found is for the Lounge Room, you cannot get in via the lower door on the map as it is blocked. Move to the back corridor to the F2 position to find the back entrance. Use the key to open the door.
Inside you can move the furniture blocking the other door to give you access back to the other corridor.
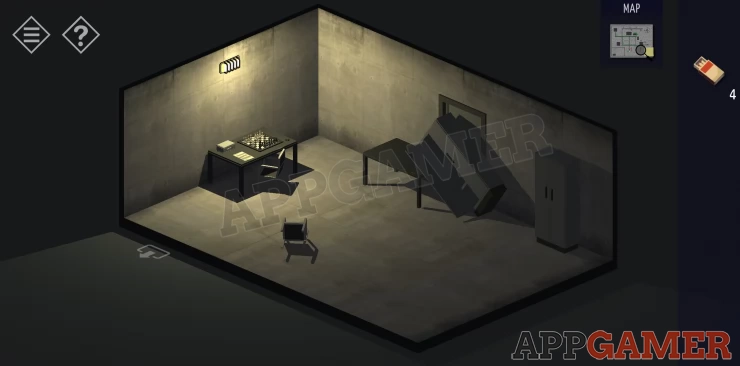
In the room you can find a chess board on one table and a locked box with an 8 digit combination or letters and numbers. The clue to opening this is the chess board. You need to figure out the sequence of 4 moves that lead to the state of the pieces on the board. A knowledge of chess helps.
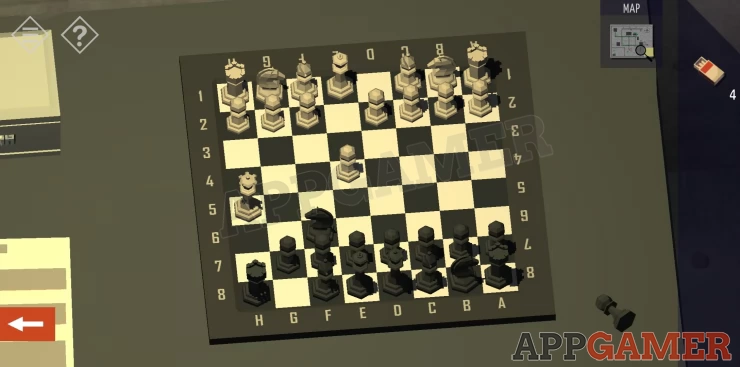
UPDATE the game has been updated to include some chess instructions to help you on the paper on the table and a changed solution.
Hint: Note the positions that the pieces have moved to. Including one that has been taken. Show
If you have trouble the code is: E4 H5 H5 F6Show
You can now collect a Blue Key
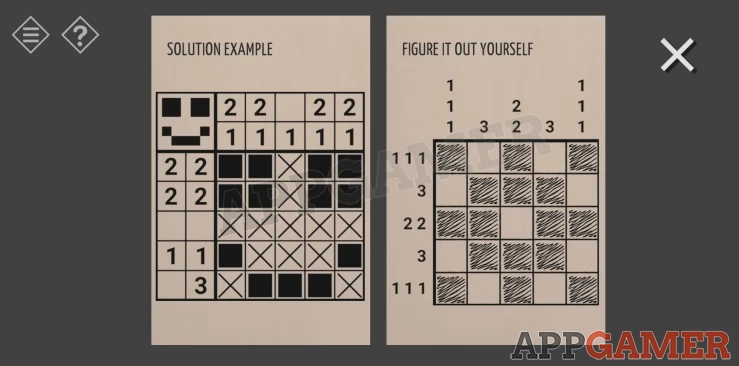
Rotate the view to find a table with sheets of paper and a pencil, you can collect these and they are a puzzle to complete.
Use the numbers to the top and left to tell you where to shade in the squares to make a pattern. This will be useful.
Solution: Show
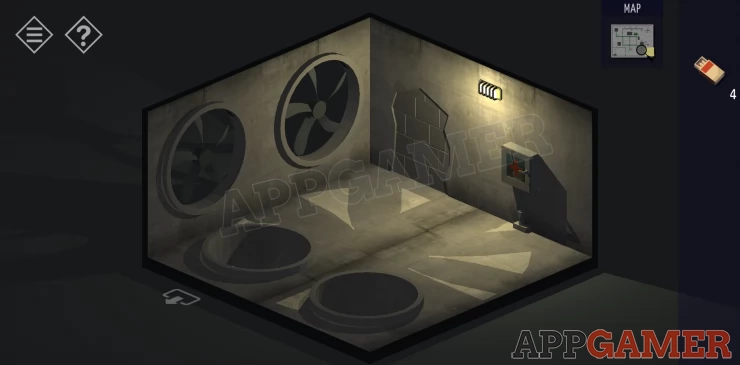
Exit the lounge room by the lower (previously blocked) door to make your way to the Gas Feeding room. This room has a 5x5 keypad on the door. You need to enter the pattern. Tap each square to light it and use the clue above.
Enter the Gas Supply room and turn off each of the valves. Rotate the view to find a cupboard which you can open and collect a Valve Wheel.
Move along the corridor to the Power room. A gas leak is on fire here and blocking the door. Use the valve wheel to attach to the nearby pipe and tap it to turn off the gas. If you have already switched off the other 6 valves then the gas will now be off. If not then you need to check the guide above or follow the pipes in the corridors to find the other ones.
You can now enter the power room.
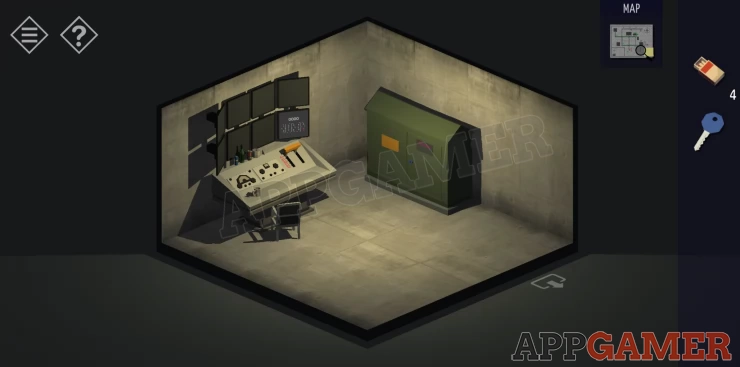
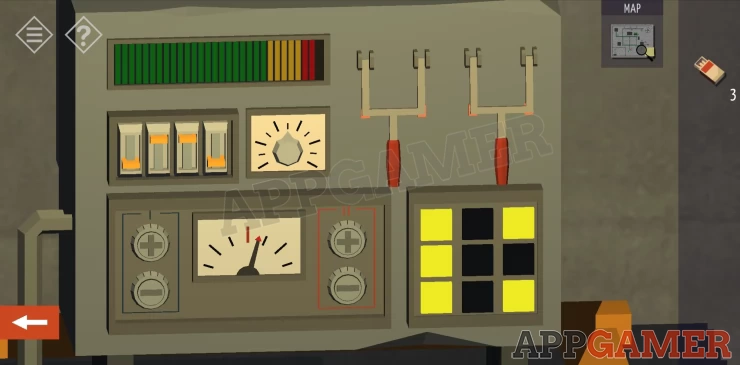
In the room is a control console that doesn't work and a code entry with 4 items sat on in (cans bottle, toilet roll.
On the left wall are 2 grey cabinets and rotating the view will show you 2 more grey cabinets. Opening each cabinet will reveal various items in each.
To proceed you need to enter a code to unlock the console.
Hint: Open each grey cabinet and count the number of items of each type that are the same as those on the desk. There may be other items in them that do not match, ignore these.Show
Hint 2: Remember to also count the ones on the deskShow
Code: 4958Show
You can now adjust the power switch to turn off certain fans. Adjust the setting until Fan 2 (F2) is off.
Move to the back corridor, to the F2 position. You will see that the fan is not moving. Move along to the F3 position in the back corridor. It is dark but you can find a pallet on the floor.
Return to F2 and place the pallet in the water then tap the other floating pallet to move it in a line with the first so that you can make a bridge to the fan.
Tap on the fan to view and you will see a red handle for you to collect.
Return to the power room. On the other wall is a green locked cabinet with a blue key hole.
Use the blue key to unlock this. Inside are 3 power boxes, 2 are on and the third does not have a switch handle.
Use the handle you have collected to turn on the 3rd box.

You can now return to the back corridor but before you leave the power room make sure to set the console switch to C2 to turn off fan 4 and fan 5. You can now make your way along the back corridor to the end F4 position.
Tap Fan 4 to move though and exit the vent through fan 5 into a small room with several fans. In this room is another blocked door way that you need to find a way to break.
Rotate the view to see the door which is barred but you can now open and a First aid wall box. Open the box and collect a Yellow Key .
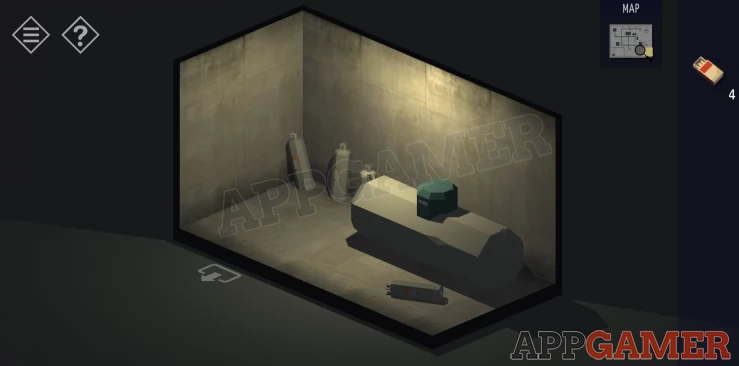
You can now exit this room and move up on the map to the small unnamed room next to the Gas Feeding room. Use the key to open the door. Inside are several gas tanks. All appear to be empty but rotate the view to find a red tank behind the large cylinder. Collect this.
Next return to the Power Room and toggle the switch to make Fans F6 and F7 turn off.
Return to the small fan room and place the gas tank in front of the blocked doorway. You need to use the matches to light the cylinder. But they will not light with the large fan above your head still moving.
Tap on Fan F7 to enter the tunnel behind it. look to the left to see a red ladder. Go up to the large fan control area.
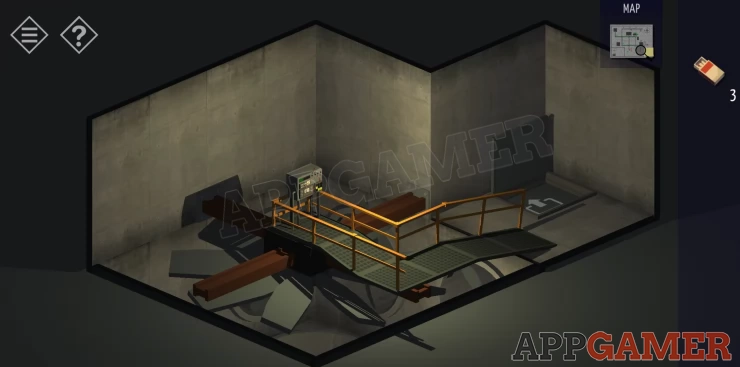
Tap the control box near the center. You cannot turn the fan off but by trying different switches and dials you can increase the speed (shown on the top left) until it overloads. You need it to fill the bar. Keep trying different combination. The hint below is almost done.
Hint: Show
Once done return to the lower room and use the matches on the Gas Tank. This will explode and let you exit the room through the hole.
You are now in a dark chamber and cannot see anything. You still have matches though. tap them and use them to light a small torch on the wall to the left.
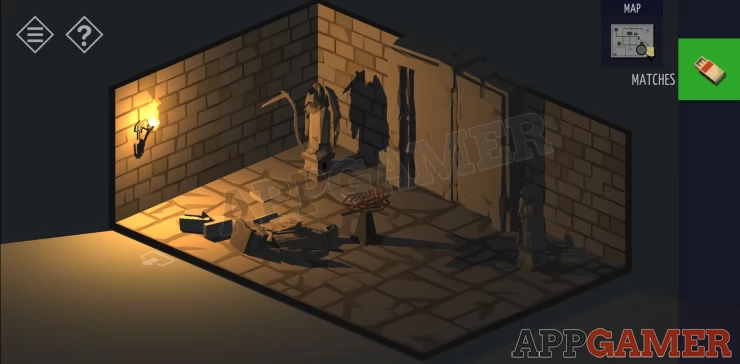
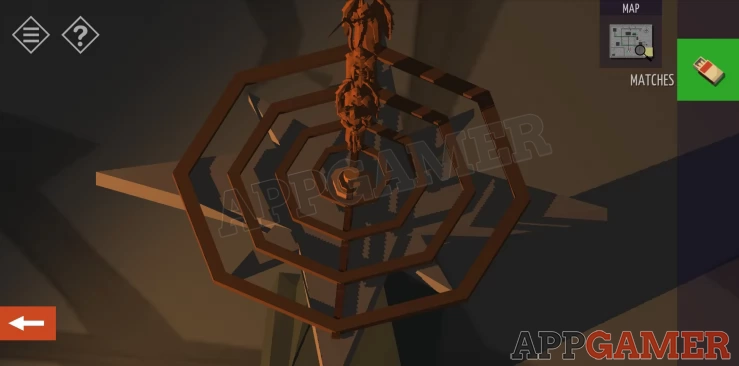
The room has a large door, with a statue on either side and a small display in the middle. This has a compass puzzle dial with 4 rings that can be moved. You need to align each ring in the right place.
Check the back wall view to also see pieces of 2 more broken statues.
Hint: You can tap to view and rotate each of the intact statues to see Letters on the base.Show
Hint 2: Check the letters below each statue and work out which of the small figure on the rings match the status. Move that figure to the compass position indicated on the statue. Show
Solution: Outer ring - North 2nd ring - West 3rd ring - South Inner Ring - North EastShow
The dial though is upside down as it would have been viewed from the door. So you will need to reverse the positions, North is at the bottom and west is on the right.[/spoiler]
You can now enter another dark room. Use the matches again to light the fire in the center.
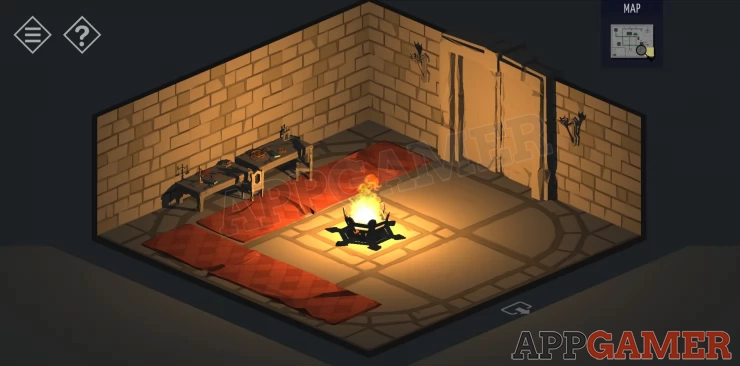
In the room are some tables with item on it that you can see but not take. Rotate the view to the left to see a painting on the wall and tap to view the small table below to view it as a clue to your next destination. Collect the Pass from the table.
On the wall with the closed door are 2 torch holders. Tap these to move them and open the door. You can now exit back into the church basement corridor and then tap to exit the church. It is raining.
Tap your car to complete the chapter.
Read on to view Chapter 5 to investigate the mountain. If you have any questions please check the Answers Page.
We have questions and answers related to this topic which may also help you: Show all