01. Home Base and Land Expansion
Boom Beach Guide
As the game begins we are given a base area that is situated on an island in the sea in a temperate region and that island has a restricted amount of open and useful space.
A wide stretch of sandy beach presents the potential landing zone for any enemy attack. Along the south edge of that beach is the ocean - while its north edge borders a grassy field upon which our base is constructed - what there is of it anyway.
An open stretch of green grass field is laid in a strip, with the beach as its south border, a forest of trees and rocks as its north border, and to the west an impassible tall mountain.
To the east there is a series of rocks and cliff-like surf area that restricts any attack from that direction in terms of landing troops - and this is where we have created a protected harbor and piers at which our Landing Craft can be tied up, filled, and serviced, and where our Gunboat is kept tied to a pier.
The initial kit that we start with is:
- Headquarters (Level 1)
- Sawmill (Level 1)
- Residence (Level 1)
- Gunboat (Level 1)
- Landing Craft (Level 1)
The game then kicks you in the seat of the pants to get you started, having you place a Sniper Tower (a very basic defensive position), then the enemy attacks and you get your first taste of combat as you defeat them and at the same time learn just how vulnerable your base is.
That is a good lesson since it drives home the point that you need to do something about it! And that brings us full-circle to the point of this hint and tip...
- = - = - = - = - = - = - = - = o|o = - = - = - = - = - = - = - = -
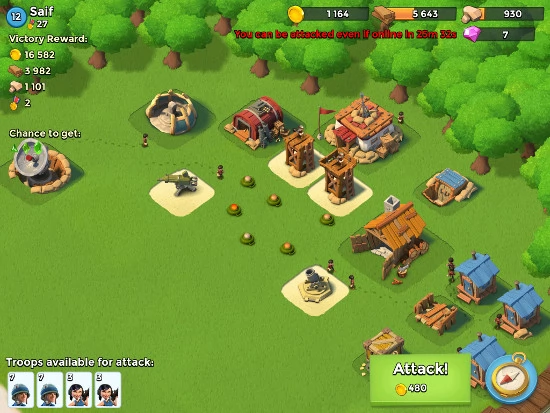
The image above is a player-created base - you should easily recognize the layout as it is based upon the standard from the start - and the player has made some pretty basic mistakes - can you spot them?
The marked-up image below makes the mistakes clear - the Red Line shows the pair of Sniper Towers side-by-side and too close. A single round from the Gunboat naval cannon aimed directly in the middle of the two Towers will deliver 100% of the direct and splash damage to BOTH of these towers.
The Yellow Mark-up shows that the Mines are too close together and placed in an area that the invading units can easily avoid by having their LCs land on the far left side of the beach during the initial landing.
That curving path will not even require the player to direct the troops using Flare Shells because the proximity of the nearby structures will automatically cause the units to follow the demonstrated curve (Blue Line) as they head for the back of the base.
These two tiny errors and one major one make taking the base oer vvery simpe!
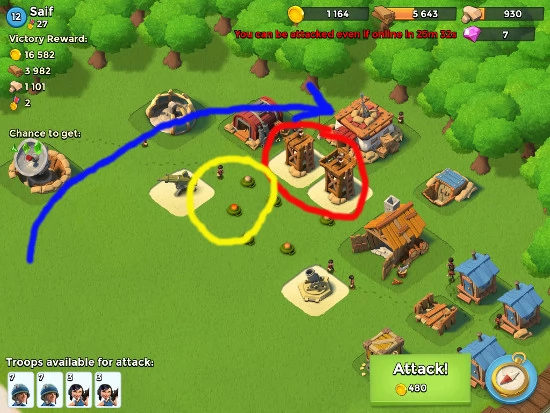
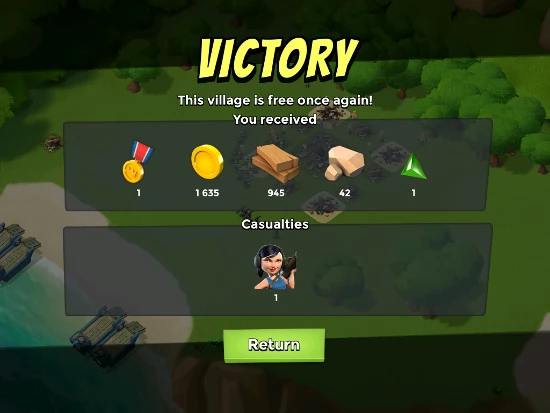
The opening salvo for this invasion was three well-placed shots that were aimed casually between the pair of Towers, the result being that before any of the troops even got their feet wet, both Sniper Towers had been destroyed!
- = - = - = - = - = - = - = - = o|o = - = - = - = - = - = - = - = -
The process of actual base expansion requires us to reclaim useable grassy field from the forest - which means cutting down trees (which are an excellent source of wood/lumber so bonus!) and removing rocks (a source of stone so bonus-bonus!).
Unfortunately the system of natural and built-in brakes that are a major element of game design here now makes its presence known.
Rocks: Cannot be removed at this stage. To do so we both need to know HOW to remove and make use of stone, and that means having upgraded our Headquarters (HQ) to a minimum of Level 6, at which point in addition to having available the technology to make use of rock/stone we also then have the skill and knowledge of the handling of it. So we have to temporarily wait on that...
Woods and Trees: This is a good news / bad news situation. The good news is that the basic tree types that line the first few meters of the forest are simple and ones we already know how to deal with. They are Mangrove Trees and we can cut them - as long as we can afford to cut them - by paying with gold coins (600 Gold Coins will clear a tree and net us 300 Wood/Lumber Units from a tree).
The problem we rapidly run into however is the next few layers of Tree, which are NOT simple Mangrove but different types of Mangrove, each with its own set of requirements for dealing with. The following will be of general interest to you:
Tree and Thicket(1) Young Mangrove Tree: HQ Level 1
(2) Mangrove Tree: HQ Level 2.
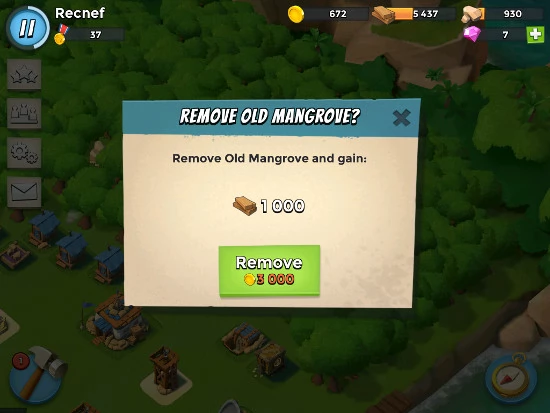
(3) Old Mangrove Tree: HQ Level 5.
(4) Sturdy Mangrove Tree: HQ Level 9.
(5) Ancient Mangrove Tree: HQ Level 10.
(6) Mangrove Thicket: HQ Level 11.
(7) Mangrove Grove: HQ Level 13.
Rock and Stone(1) Stone: HQ Level 6.
(2) Boulder: HQ Level 13.
As you can see a lot of the success for actually clearing away the land that we need for building our base will require success in upgrading our Headquarters Building.
That being the case, this tip/hint is to put in the effort towards getting the HQ upgraded and, as the funds are available, selectively pruning away whatever of the natural resources you can clear - being sure to have suitable and appropriate storage available so that you have someplace for these new resources to GO.