Axie Infinity Combo Cards List
More Axie Infinity
Axie Infinity is a play-to-earn game where players use a team of creatures called Axies in battling other players or clearing adventure stages. Players can earn SLP which can be converted to Ethereum, and finally, exchanged to real money should they wish to. In this article, we will showcase some useful combos that you can consider to increase the chances of winning in PvP and PvE.
Performing combos (playing 2 cards or more) is an important part of Axie Infinity’s combat. Some ability cards have effects that only get activated specifically when comboed with other cards. These effects may range from bonus damage, inflicting nasty status ailments, destroy/gain energy, etc. Combos may need some time to set up since you’re at the mercy of drawing the necessary cards. Since the ability cards of a defeated axie is removed from your deck for the duration of the battle, it’s always great to have other combos available for your remaining axies.
In this page, we will list down some of the popular card combos. Take note that this is not a complete list by any means! We’re just highlighting some great card combos that you can consider doing, especially if your axies have access to these ability cards. The combos are listed in no particular order.
Double Anemone
Cost: 2 Energy
First, the axie needs to have two Anemone parts. Thanks to each card’s effect, you’ll recover 100 HP with one card’s effect. If both are used, the axie restores 200 HP, while providing 60 shield. This improves the axie’s survivability, and can even be extremely problematic to the enemy axie in 1v1 situations.
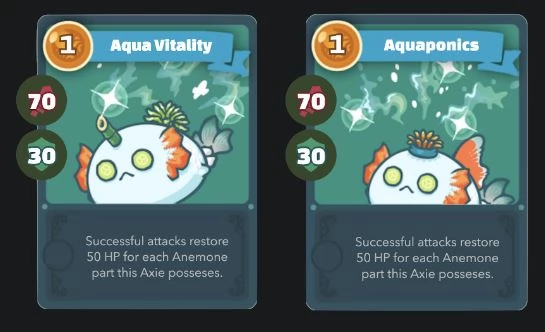
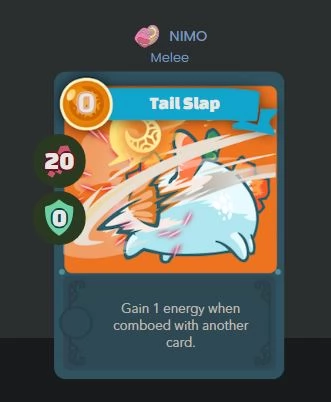
Another card that you can include in this combo is Tail Slap. This 0 energy cost card will also replenish 1 energy while dealing some damage. If you happen to have 2 Tail Slap cards added to this combo, you’re basically playing this combo at 0 cost since the 2 energy gained by the Tail Slap cards pays off the energy cost of the double anemone cards.
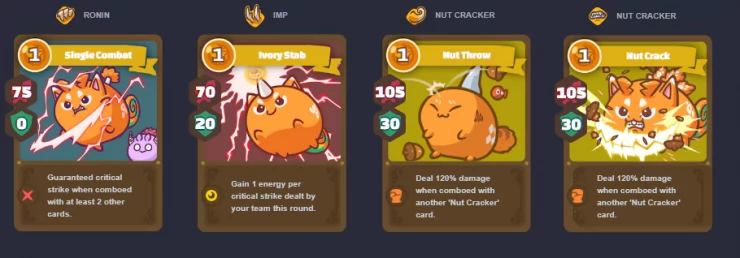
Beast Strike
Cost: 2, 3, 4 Energy
This set of cards can reach their full damage potential if you can play all four cards displayed above. However, depending on the situation, you can still reap the benefits of their 2 or 3 card combos. Here are some examples:
* Nut Throw + Nut Crack (2 energy) - Each card deals 126 damage used together in a combo.
* Single Combat + Single Combat + Ivory Stab (3 energy) - The two SC cards deal guaranteed critical strikes, which will proc the Ivory Stab’s effect and replenish 2 energy.
* Single Combat + Nut Throw + Nut Crack (3 energy) - SC deals guaranteed critical strike, while NT and NC deals 126 damage each.
* Single Combat (x2) + Ivory Stab (x2) (4 energy) - Each SC card will deal guaranteed critical strikes while each IS card replenishes 2 energy from the previous critical strikes, allowing you to gain a total of 4 energy back in this full combo.
* Single Combat (x2) + Nut Throw + Nut Crack (4 energy) - This is the full assassination combo, which can kill almost anything in one turn. Each SC card will deal guaranteed critical strikes while NT and NC deals 126 damage each.
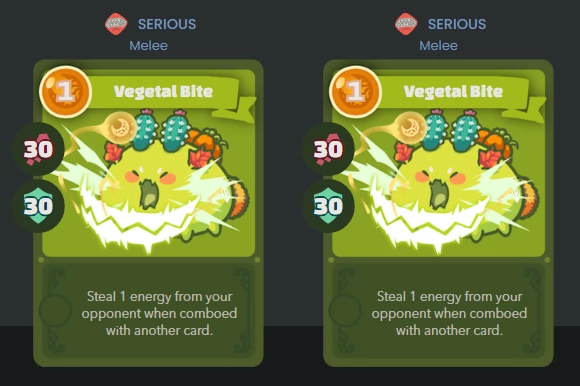
Vegetal Bites
Cost: 2 Energy
This combo is simple and easy to pull off, while also having great utility. The energy steal effect can be quite useful, making your enemy lose 2 energy while you gain 2 energy in return. The combo also gives your axie a 100 HP shield. The downsides are these cards are usually installed on Plant axies which are incredibly slow so they’ll take damage first from the faster axies before they can use this combo or if the opponent has no energy left.
Stun Shutdown
Cost: 3 Energy
These two cards are some of the best defensive cards because of their potential to shutdown the enemy’s combos with stuns. Chomp can apply Stun status to an enemy but will require 2 additional cards as part of the combo. You can play another Chomp or mitigate this by playing 0 cost cards if you have them. These cards also offer decent shield value to help protect your axie even further.
Blackmail Bomb
Cost: 2-3 Energy
This is best used in a Bird Burst build. Eggbomb deals high damage while applying Aroma to the axie’s self. Aroma is a status effect that allows opposing axies to focus their attacks on the affected axie. Use Blackmail next to deal damage and transfer all debuffs from the user to the target, especially Aroma. If you want to take out the faster midlane/backline units, you can also use Dark Swoop as a starter of the combo.
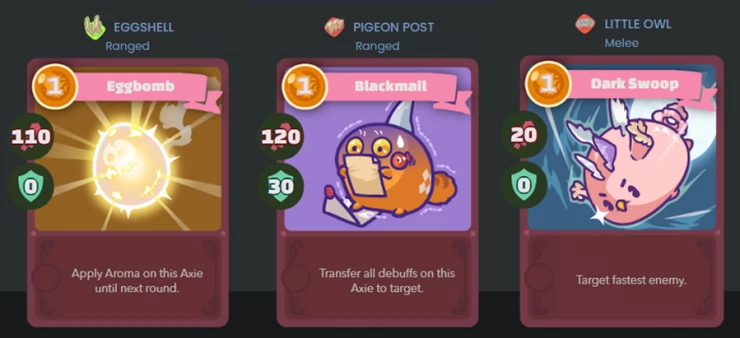
The main downside of this combo is that if the targeted axie gets knocked out after using Eggbomb and before you can use Blackmail, the Eggbomb’s Aroma effect will linger on the user, making it vulnerable to the enemy’s focused attacks.
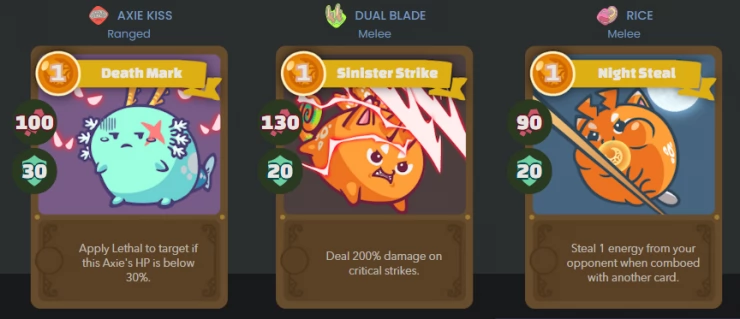
Death Strike
Cost: 2 Energy
These two beast cards can easily wreck enemies in the right situation. First, Death Mark applies the Lethal status to the target if the user’s HP is below 30%. This itself is pretty situational but an important part of the combo. Lethal is a status effect that guarantees a critical hit on the next attack. Follow up with a Sinister Strike for 200% more damage. If you have extra energy or if you want to make sure, you can also follow up with Night Steal to steal energy and further disrupt the enemy’s next turn.
Sleep Reaction
Cost: 2 Energy
Soothing Song is a bird card that applies Sleep status to the target. The targeted axie’s shield will be ignored, leaving it very vulnerable to a follow up attack. Allergic Reaction is a great follow-up card for Soothing Song (or any other cards inflicting status-effect) since it can deal bonus damage to debuffed targets.

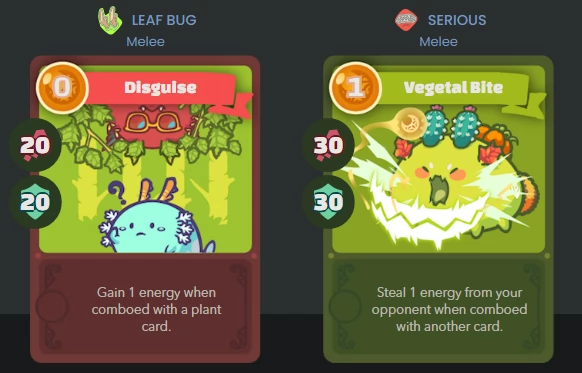
Disguised Bite
Cost: 1 Energy
Disguise is a 0 cost bug card that allows you to gain 1 energy when comboed with any plant card. Vegetal Bite is a perfect plant card since it allows you to steal 1 energy from your opponent. This combo has very good utility, giving you 2 energy, making the opponent lose 1 energy, while dealing a bit of damage and gaining a bit of shield for the user. Like other energy-stealing cards, the major downside is that Vegetal Bite won’t work if an opponent has 0 energy left.
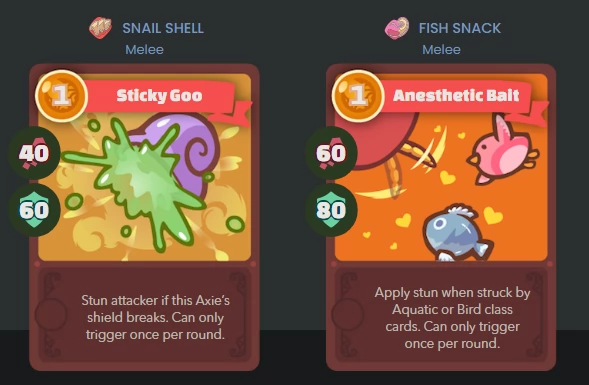
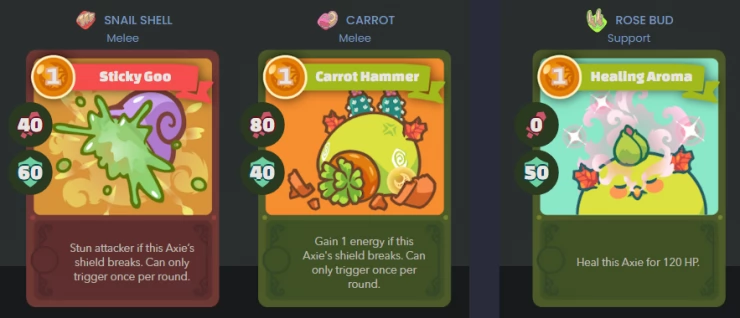
Sticky Carrot Aroma
Cost: 2-3 Energy
These three cards work incredibly well together, even with the combination of two cards. Here are some examples:
* Sticky Goo + Healing Aroma (2 Energy)Sticky Goo is a Bug Card that stuns the attacker if the shield breaks while Healing Aroma is a Plant card that heals 120 HP to the user. When used together, these cards grant 110 shield to the user. If an attacker breaks it, it will get stunned and its combo interrupted. Finally, any damage that exceeds the shield value will be healed relatively well by Healing Aroma.
* Sticky Goo + Carrot Hammer (2 Energy) Carrot Hammer is a plant card that gives the player 1 energy if the shield breaks. Pair it with Sticky Goo to get 100 shield; if the opponent breaks that shield, it will get stunned and you’ll also get 1 energy in return.
* Carrot Hammer + Healing Aroma (2 Energy) When used together, the axie will get a decent 90 shield; if that shield breaks, you’ll get 1 Energy and a good amount of HP healed.
* All three (3 Energy) - You have to be careful when using this combo since it can be counter-intuitive. All three cards give the axie 150 shield and you really want that shield to be broken to trigger the two cards’ effects. An experienced opponent will try to avoid attacking that shield directly if he can help it. However, if you pull it off, the combo offers high utility; stunning the attacker, gaining 1 energy, and healing the axie.
Hook Shuriken
Cost: 2 Energy
These two aquatic cards work very well together, especially when finishing off weakened enemies or trying to crack frontline defenders. Fish Hook deals damage while applying Attack+ buff to the user when attacking a plant, reptile, or dusk enemy (which are common choices for frontline tanks). Follow it up with the buffed-up damage of Star Shuriken afterward. If the Star Shuriken manages to fatally damage the defender, the card will prevent it from entering Last Stand, ensuring the kill.

—
This concludes our Combo Cards List for Axie Infinity. For more Axie Infinity content, please check out our other pages within this guide.
We have questions and answers related to this topic which may also help you: Show all
 Vhayste started writing free guides and walkthroughs in 2006 for several online gaming sites. He has written hundreds of guides covering games from a wide variety of genres across different platforms. He's an avid JRPG and mobile gaming fan, and regularly plays games on the PC, Steam Deck, PS5, and mobile platforms. He strives to continue making comprehensive and easy-to-follow guides for his readers.