Underground - Room 9
Spotlight: Room Escape Guide
Underground is the 9th room in Spotlight Room Escape. You have followed the clue found at the end of Room 8 to this underground bunker where you need to solve the puzzles to clear this level and find the next clue to take you to room 10.
In the first area tap on the box by the right wall. Collect a wrench from it. Then tap on the wall in front of you by the number 7 to find a pair of trousers hanging. Tap to collect a belt.
Tap on the floor to view it and then tap the papers to the left to find a key to collect. Tap also one of the floor tiles to lift it.
Move to the left area to see a generator on the right and some barrels. On the far left are some pipes on the wall tap these and use the wrench to remove a valve handle.
Back up and tap on the barrel to the left of the generator to move in. Use the key to open the door to the metal locker and collect a shovel. Next tap to collect a paper from the wall with some numbers. Tap on the wall behind the paper to open a panel. You don't have the item needed here yet though.
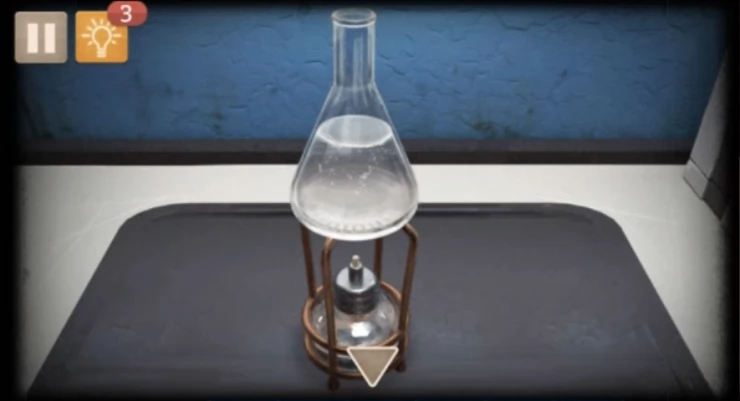
Back up and tap on the panel on the generator with the blue lights. This is a input where you need to set the numbers to start the generator, the paper and the formula shown drawn on the panel will help you get the values.
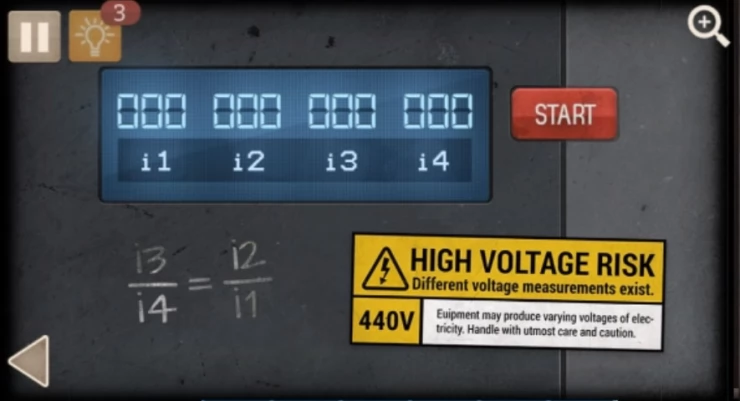
Hint: The total that goes at the top of the paper is the 440 V from the panel sticker. The 2 values below will add up to 440. The 4 values below that are what you need and will add up to the numbers above them. This will let you work out i3 and i4 is known. The other 2 can be worked out with the formula i3/i4 = i2/i1.Show
Solution: i1= 60, i2=180, i3=150, i4=50Show
Go back to the first area and use the shovel to dig in the earth under the floor tile. Find a key to collect. Go back to the left area and to the panel above the barrel and use the new key to place and turn.
Tap on the generator panel that is open near the middle to view. Use the valve handle on the bolt on the left to place it there. Then use the belt on the open panel with the cogs to place it also. Tap the valve handle to turn it.
Before you move on you should tap again on the valve handle to remove it and then put it back in the same place on the pipe where you first found it. Then tap it to turn it. This will be important later.
Go back to the first area to find that the wall is open and there is a passageway. Tap to enter. You are in a series of corridors with arrows to direct you, but there are multiple paths. Take the path on the left first and check all the possible corridors until to reach dead ends, At one of the dead ends you will find a blueprint on the floor to collect.
Back up and take the initial turn to the right. Then the next left to see 'Help please' on the wall. Then go left again and follow the corridor until you reach some steps, then go ahead into a laboratory room.
Tap on the notice board above the desk to see a paper with 4 clocks on it. Now move to the left view of the room to see the work bench with cupboards. Tap on the top left cupboards and collect 'Reagents' from the top shelf. Collect also a glass beaker from the bottom shelf.
Move to the cupboard to the right and open it to collect a hip flask.
Check the draws on the lower left. The top draw is locked. The bottom draw has a circular 'Component' to collect. Check the draws on the lower right. There is a lightbulb to collect and a bottle of lighter fluid.
Tap on the right area with the tape player and oscilloscope. Collect a keycard from the bench next to the oscilloscope.
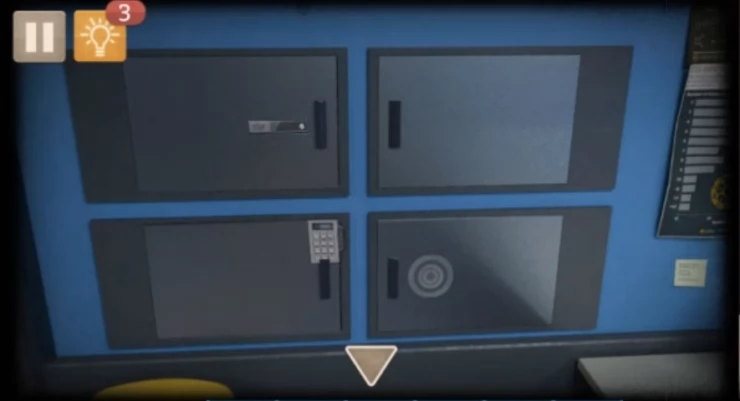
Tap now on the far left wall that has 4 panels. Tap the lower right one to view a dial and use the circular component on it. This dial can be moved and has a red line. The inner dial has a grey line. You can solve this puzzle with the clues above.
Hint: The puzzle dials are like a clock and the puzzle has the number 5 next to it.Show
Solution: The 4 clocks on the paper above in order have times of 11:15, 10:05, 8:45, 7:15, the time on each has gone backwards by an increasing amount. 1:10, 1:20, 1:30. Take the time back by 1:40 and set that on the clock. 5:35Show
Open this to collect a cable and a sheet with a chemical formula.
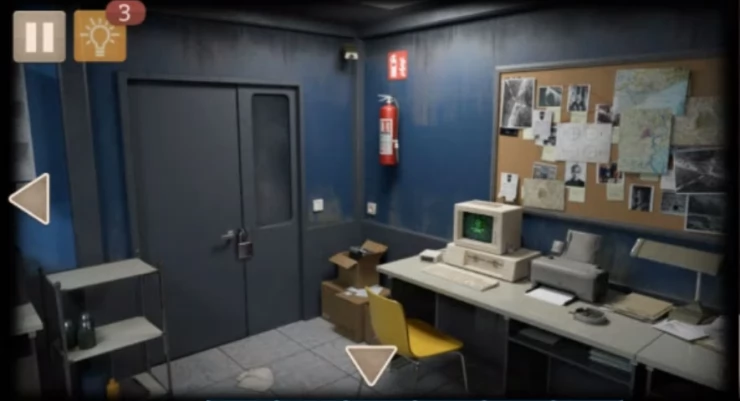
Go back to the first view of the room and tap on the computer on the table. Collect a lighter from next to the monitor.
Tap on the card reader to the left and insert the keycard. now tap on the computer screen to view a puzzle to solve. Move the square with the arrow keys you can hit 'Del' to back up.
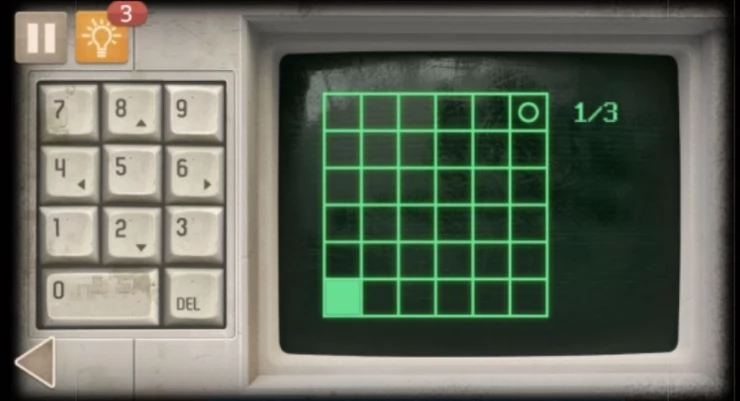
Solution: Fill the screen by moving with the arrow keys and reach the circle to end. Some squares will block your progress but you must fill all squares that are not blocked and end up on the circle to complete each level, there are 3 levels.Show
Hint: Moving around and making mistakes will let you find where the blocks are. Then back up and plan a good route around them. The puzzle doesn't resetShow
When you complete this puzzle a page will print from the printer. Collect this paper.
Collect again the keycard from the reader.
Go back to the workstation view and tap on the lower left draws to find the top locked draw. This has a blue LED code entry. Enter the code to open the draw
Solution: The code is on the paper you just printed, colour codedShow
Code: 7509Show
Collect from the draw a paper with 'instructions'.
Go to the 4 panels on the left wall again and this time tap to view the bottom left door. Use the keycard to insert in the code lock and then enter the access code for this.
Solution: This code is also on the paper you just printed, colour codedShow
Code: 7248Show
Open this door to collect a measuring cup.
Now go to the top left yellow cupboard in the room which has a lock on it also. It is a 4 digit entry. Notice the small flame symbol. Find the code for this.
Hint: The flame symbol relates to the lighter. Check it for useful markings.Show
Solution: The markings are roman numerals, get the numbers to use as the code.Show
Code: IX VII L = 9 7 50Show
Open the cupboard to collect a primus stove
Now return to the work bench, just to the right of the mat on the bench is a small chemical mixing station. Tap on this until you can use it and then select the reagents from your inventory and add them. This ads 3 reagents yellow, red and blue. You need to use this station to mix a formula according to the list you found earlier. You don't have all the colours listed though.
Solution: first mix the colours that you have to make the colours that you need, ie yellow and red to make orange.Show
Once you have all the colours needed add them all as needed. Once you have it you will collect a 'concentrated solution'.
Now back out so that you can see the water supply on the wall. There should be water in it. if not then you forgot a step above in the first area. Use the measuring cup here to collect water.
Now tap on the work bench mat to view it. Place the primus stove on the mat. Use the flask (alcohol) on the stove to fill it. Combine in your inventory the beaker with the measuring cup of water to put the water in the beaker. Then also combine the concentrated solution to add this as well.
Place the beaker on the stove. Combine the lighter and the lighter fluid. Then use the filled lighter to light the stove. he liquid will turn green. Collect the beaker which now has 'acid'.
Go back to the initial view and tap on the door with the padlock. Use the acid on the padlock to remove it. Enter the room which is dark. Use the lightbulb to replace the one that is there. Then back out of the room and tap the light switch to the right of the door to turn on the light. Go back in. On the desk is a box covered with th cloth. You can tap to remove the cloth.
Go back out of the room and turn the light off again. Now go back in and notice that there are glowing panels on the wall. These are roughly in the shape of numbers. Now repeat the process to turn the lights on again and enter the room.
On the bench to the back left is a small blue box. Tap this to view it and find a 4 digit code entry. Enter the code numbers as found above.
Code: 6248Show
Open the box to collect a 'Detail' item.
To the right of the blue box is a paper with come circles and lines drawn. Tap this to collect it.
Tap to the right of the desk to collect some 'iron working tools'.
Now tap on the green vice on the front left of the desk and use the detail item to place it in the vice. Use the tools on this to shape it according to the blueprint. Collect the new component.
Tap on the box in the middle of the desk and tap again to view the puzzle lock. Use the new component to fit into the central circle area.
You now need to solve this puzzle by tapping to move the small red lever on the right and rotating the dials.
Method: Tap the red dot to move it to the right, then rotate the big dial clockwise by 180 degrees. Repeat this again and the central circle lock will have rotated.Show
Next step: tap the red dot again to move it to the right. and rotate the top small dial clockwise by 180 degrees. Repeat this again.Show
Third step: tap the red dot again to move it to the right. and rotate the bottom small dial clockwise by 180 degrees. Repeat this again.Show
This should open the box. Collect a cassette tape and a key.
Go back out to the lab room and the left view and tap again on the 4 panels on the left wall. You can now tap on the top left door and use the key to open the panel on it. There is a 4 digit code entry now.
Hint: you can find the code from the paper just collected with the circles and lines.Show
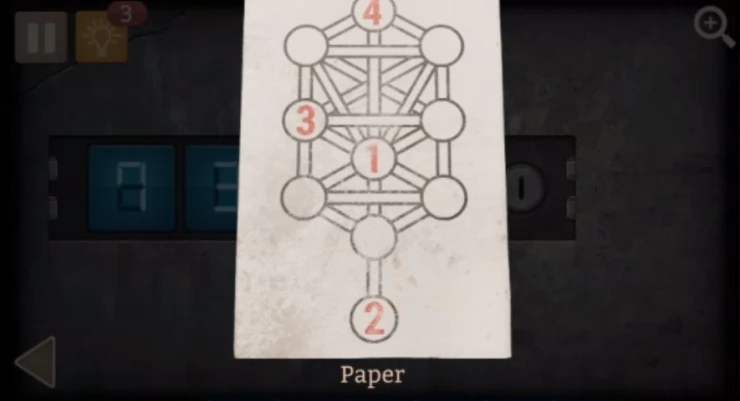
Solution: There are 4 numbers circles, take these in order and count the lines connected to them.Show
Code: 8153Show
Open the door to collect a 'tracklist'.
Tap on the tape player and oscilloscope on the right. Use the cable to plug in the oscilloscope. Then tap on the tape player and use the tape in insert it. Check the tracklist to see which track to play and select is on the tape player. 'Crow'. Tap the play button.
Now view the oscilloscope screen. there is a waveform. To gert the correct waveform check the instructions paper found earlier. Find the range of value for the Crow. 130-135 HzShow
Use the controls on the oscilloscope to set the numbers to these values.
When you have the waveform make a note of the values at the peaks and troughs. 2 - 5 - 4 - 6Show
You now need to back out of the lab room to the final corridor with the steps. On the right wall is a small panel with green number input. Tap this to view and enter the code. Notice the waveform shape.
Open this panel and collect the next clue to Room 10 - The canyon. You have completed room 9.
If you have any questions for this room or any of the other levels please head to the Answers Page to ask it there.
See this video from AllGamesWorldHd for a walkthrough of this level.

We have questions and answers related to this topic which may also help you: Show all