Hermit - Room 8
Spotlight: Room Escape Guide
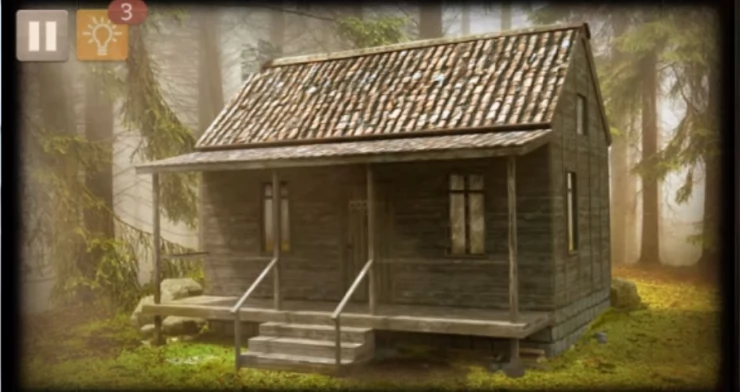
Hermit is the 8th room in Spotlight Room Escape. You have followed the map found at the end of Room 7 to a cabin in the woods where you need to solve the puzzles to clear this level and find the next clue to take you to room 9.
First tap on the front door to view this notice the cards on the front door and remember the details. 3 Ace of Clubs = 240. Back up and tap on the ground to the right of the front steps to view closer and then find and collect a small rock from under the porch and a piece of chalk from on the porch. Back up and tap on the window to the left of the door. Use the rock to break the glass and open the window to enter.
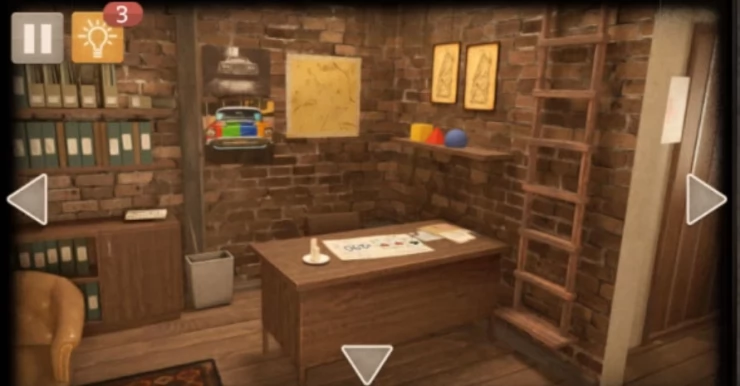
Inside there is a desk, tap to view this and see a second card pattern, Club, Heart, Heart = 290. Collect a ruler from the desk.
Tap the cupboard to the left of the desk and open the door on the right to collect a battery.
Tap the wall above and behind the desk to view some pictures. Tap the 'card' to the right with a map on it to collect that.

Tap on the ladder on the wall to the right of the desk to go up to a loft room. In this room at the picture on the wall by the window to move it and then collect from behind a 'Magnet piece'. Next tap on the cupboard doors to the left and then you need to use the ruler to catch the lock and open the doors. Inside is a locked safe with a fingerprint scanner. Collect from the lower right a roll of blue tape and from the middle of the bottom shelf a green cylinder.
Go back downstairs to the desk view and tap on the shelf to the right of the desk to view 3 shape blocks. Use the green cylinder to place this on the shelf with them. Tap each one to lift it and see a different shale below.
Yellow Cube > circle
Red Pyramid > diamond
Blue sphere > triangle (downwards)
Green Cylinder = square
Back up and look to the left side of the room to view a fire place area with a table and chairs. Tap on the firepace itself to view the hearth. Collect from it a playing card. and a metal poker.
Tap the wall above the fireplace to view the clock and photographs and notice another card pattern, there seems to be a card missing here though, use the card you just found to add to it: Heart, Spade, Spade = 395. Collect a scalpel from the mantelpiece.
Check the clock, there is something unusual about it.
Tap the barrel in the bottom left corner to view that area there is a red lock box here and a locked cabinet. Use the scalpel on the barrel to cut the rope off the out side and collect it. Tap on the red lock box to see a number pad entry with the logo C-Locks. You can open this with a 4 digit code.
Hint: C-Locks is a clue that tells you to get the code from the clock.Show
Solution: 4 numbers are mixed up on the clock face, use theseShow
Code: 5487, the order is the numbers clockwiseShow
Open the box to collect a screwdriver.
Now move to the locked cupboard to the left of the red box. This has a keypad entry with arrows on each key. To the right is a cover which you can use the screwdriver to open. Once opened use the battery from your inventory to place in it. You can now solve the puzzle.
Hint: Each key has a number of arrows that tell you now many moves to make in a direction to the next key to press. You need to finish with a key that will land you on the red light.Show
Solution: Start with the single arrow to the top left of the red light, follow the arrows and tap the buttons until they are all activated. If you make a mistake tap all the buttons to complete and it will reset to start again.Show
Open the door to collect a wrench from the top shelf and also tap the bottom shelf to view a book with some number translations.
Backup and tap on the bottom of the book case in the back right corner and tap the padlock on the bottom doors. This has a 4 shape code entry to solve, the clues are above.
Hint: the 4 coloured blocks can be arrange in a colour order seen in a picture.Show
Code: Diamond, Square, Triangle (downwards), CircleShow
Open the doors to collect a puzzle fragment. Also collect the chain from the floor.
Tap on the ceiling to view a hatch to go up to another loft room. There is no ladder though and you cannot reach it. Use the rope on the hook in the hatch and then tap again to climb up.
From the floor by the boiler collect the basement door handle.
Go back downstairs to the desk view and then look to the right to see a small kitchen. Go in the kitchen and check through the cupboards. Top left by the door you can open and collect a bottle of glycerin.
Bottom cupboards, under the sink collect a sheet of paper with a number/square pattern.
Lower right collect a mortar and pestle and from the draws collect a cup with a squares pattern on it.
The top right cupboards has another playing car on it but with the answer missing, tap the left door to close it and see the rest of the cards. Spade, Club, Heart = ?
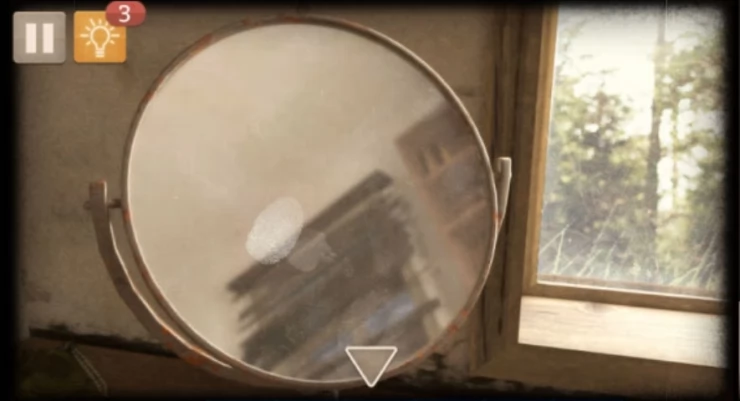
Tap on the sink to view that and collect a shaving brush. While at the sink use the cup on it to fill the cup with cold water.
Combine the pestle and mortar with thew chalk in the inventory to make chalk dust. Then tap on the small mirror to the left of the sink to view it. Use the dust on the mirror and then use the shaving brush as well to brush the dust and reveal a finger print. Next use the blue tape on the finger print to collect it (tap twice).
Go back up the ladder to the loft bedroom and use use the fingerprint tape on the sensor that is in the cupboard. The locked box on the bottom shelf is now open. Collect a second puzzle fragment.
While at the finger print sensor use the wrench on the loose bolt art the top to remove it and collect a 3rd puzzle fragment.
Return to the desk, view the desk top and tap on the top right draw. There is a code entry. The number to use here can be worked out from the cards seen above.
Hint: The number is the missing answer from the cars on the kitchen cupboard.Show
Code: 330Show
Open the draw to find a fourth puzzle fragment.
Go to the kitchen and top on the door to the left. You will see a code entry panel. Use the 4 puzzle fragments you have on this to place them in the top slots. Each has a symbol. With this and the map card you found earlier you can solve this puzzle.
Hint. The 4 symbols will let you find co-ordinates on the map to use in the code entry. The 5th one you will need to guess from the remaining symbols on the map.
Code: D2, A5, D5, G5, D8 The center one is the flag on the map.Show
Go into the back room and tap on the basement trap door in the floor. Use the handle to attach to tit and open it. Collect some Firewood and pincers.
Tap the shelves to the left and collect a weight, a lock piece, bank to the main view there is a small unit below the window with 2 locked boxes. On the right is a puzzle to solve with a maze. Use the magnet that you collected to place on the right side and activate the puzzle.
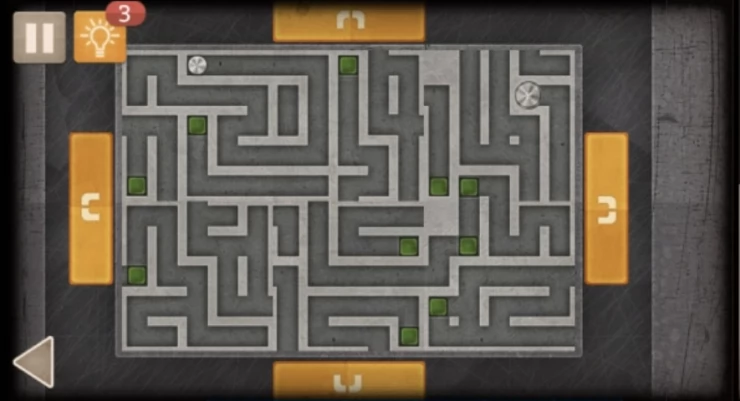
This is a very tricky puzzle. Use the magnets on either side to pull the small metal pin around the maze. You can tap on each section of the maze (6 sections) to rotate it, but you cannot rotate the section that the pin is currently in. You may move the pin around to touch and activate each of the green lights. Then finally move the pin to the hole that opens under the larger metal circle on the top right section.
Once you solve this open the box to collect a metal brush head.
Combine the metal brush head with the chain in your inventory and then also with the weight to make a pipe cleaning kit. Return to the loft room with the boiler that you access with the rope. Tap on the flue in the chimney to open it and use the pipe cleaning kit to clear it. Now return to the fireplace below and collect a key that have fallen out.
Back out and tap on the book case in the corner to view the books, tap in the middle shelf to view a book that has a keyhole. Use the key to open it, and collect from inside a packet of potassium permangenate.
Return to the fireplace and put te firewood in it. Then add the potassium and the glycerol. The fire will now be burning. Use the cup of cold water to put the fire out again. Then use the poker to disturb the burn logs and find a 'Strange Container' amongst the ashes to collect. Combine the container with the pincers to open it and collect a scrap of paper with a code on it. Make sure to collect the cup again from the hearth.
Return to the kitchen and tap on the sink, there is now hot water in the pipes. Use the cup on the sink to fill it with hot water and see a pattern emerge on the squares.
Now go back to the fireplace again. Tap on the back wall of the fireplace to view the bricks. You can tap on some bricks to highlight them. This is a puzzle.
Hint: Use the pattern from the cup and the paper in your inventory to tap the right bricks.Show
Solution: The pattern on the cup tells you which bricks need to be highlighted but the paper has numbers that will give you the order they need to be tapped in.Show
Once completed return to the back room. And tap on the safe box on the shelf below the window. This has a dial and a 4 digit code entry. Add the second dial from your inventory to this. You can rotate it. Use this and the scrap of paper to solve this code puzzle.
Hint: The paper has a cypher of A=N and some encoded text. Rotate the dial until A matches N and then use the letter combinations to decode the text string. The decoded text will match numbers from the book found earlier.Show
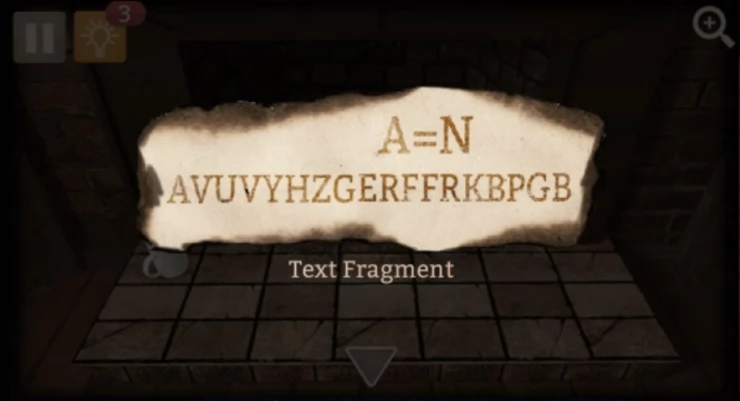
Code: Decoded text= NIHILUMTRESSEXOCTO = 0368Show
Open the safe to complete the level.
If you have any questions for this room or any of the other levels please head to the Answers Page to ask it there.
See this video from AllGamesWorldHd for a walkthrough of this level.

We have questions and answers related to this topic which may also help you: Show all