Hidden Escape: Murder Mystery Walkthrough
Hidden Escape: Murder Mystery Guide

Hidden Escape: Murder Mystery is a puzzle adventure game from Vincell Studios. Set around a Cruise ship reality show where you will need to find objects and solve puzzle.
As one of the contestants on a Reality TV show you will become involved in a murder investigation and will need to use your detective skills and puzzle solving to work out who is the culprit.
The game is set over 10 chapters and you can check though this guide for helpful hints and puzzle solutions to help you if you get stuck. We begin here with Chapter 1.
Chapter 1 - The Surprise Walkthrough
In Chapter 1 of Hidden Escape Murder Mystery Mallory has returned home from a long trip but finds herself with a locked house and a surprise.
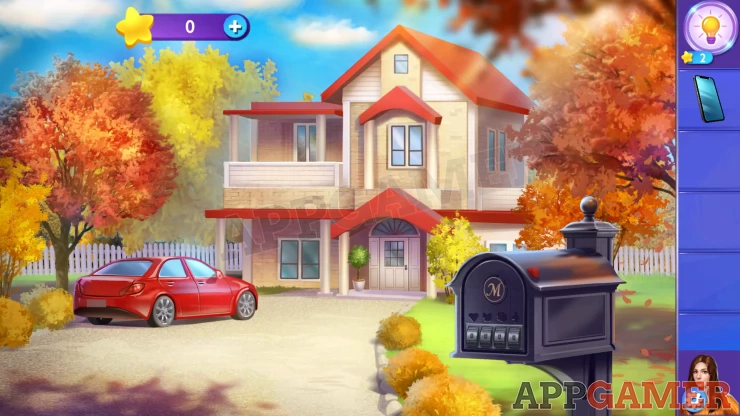
The chapter starts with a phone call from Triss, but the battery dies on your phone. You need to get into the house so first you must find the spare keys.
Tap on the plant pot to the left of the front door to view it and see the stones in it, this is a matching puzzle.
Plant pot stones puzzle
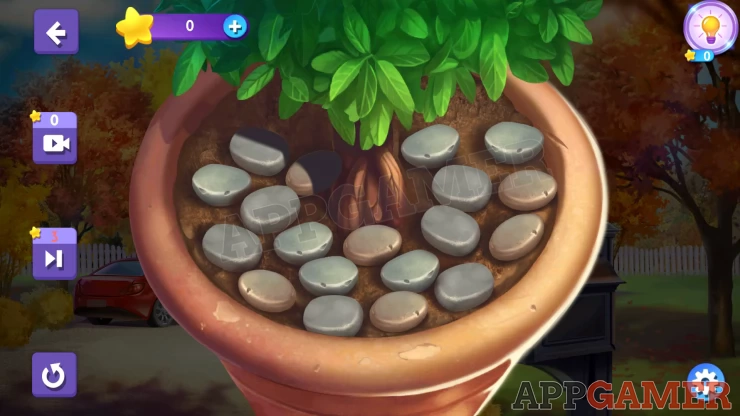
- Tap pairs of stone to turn them. Each stone has a pattern underneath.
- Find patching pairs to clear them.
- Clear all the stones until there is 1 left and tap it to reveal the key.
Use the key on the front door by selecting it and then tapping the door. You can now go inside.
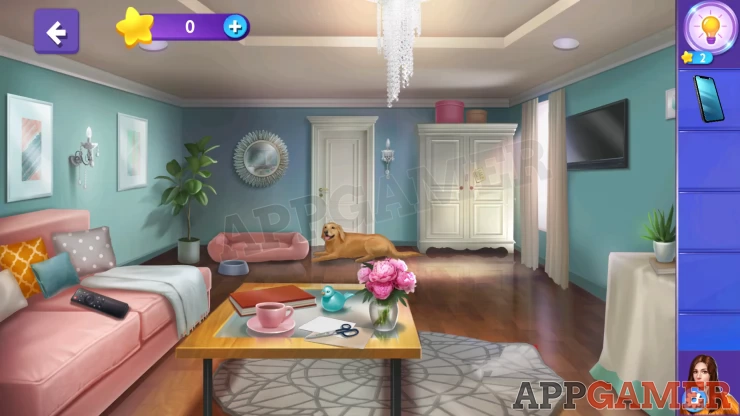
Collect the remote control from the sofa on the left and then tap on the rug on the floor to the right of the table to lift it and find a a red Postbox flag.
Next collect the scissors from the table and then tap on the table itself to view it. There are several clues here.
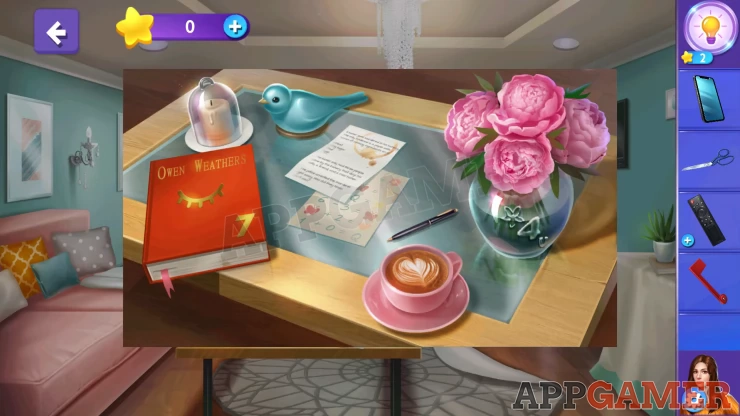
Collect the 2 papers from the table. These are the laptop clue note and the postbox clue note.
Tap the arrow on the top left of the screen to back up out of the house again. Then add the post box flag to the post box on the right, you can then enter the code to open it.
Post box Code
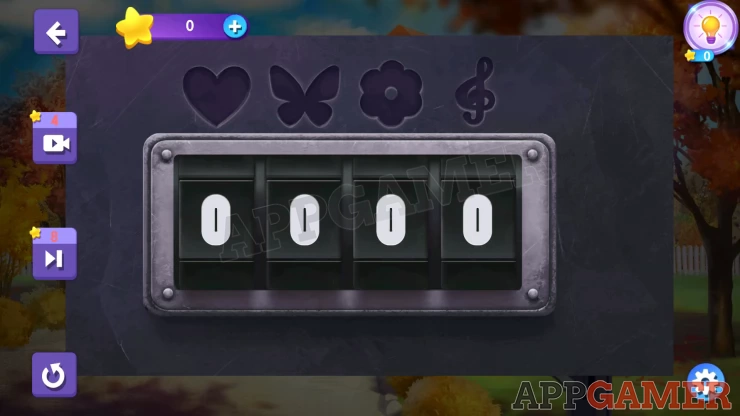
To get the code look at the 4 symbols above the numbers, then check the second note that you collected to find a clue for each symbol.
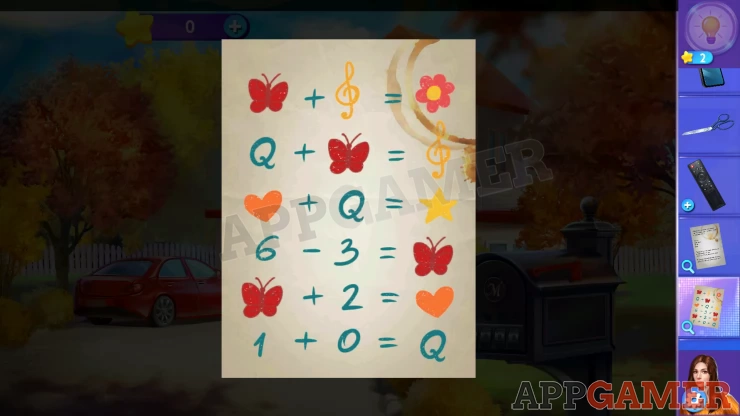
Start at the bottom to see that Q=1, then a little above to see that the butterfly =3.
Work out the rest of the symbols from there.
Code: 5374Show
Collect the Dog Food packet. Then select this in your inventory and then tap on the scissors to open the packet.
Go back inside and use the opened food packet on the dog bowl on the left. The dog will move.
Tap on the white cupboard on the right to see a note on the door with some clues. You will need these later.
You can now open the door that the dog was sitting in front of and move though to a bedroom.
Bedroom

First place the phone that you have in your inventory on the charging pad on top of the desk, next to the laptop. You now need to charge the laptop.
Now open the bottom drawer on the desk on the right to collect a laptop charger. Then add this to the laptop on the desk.
Tap on the laptop to open it and you will need to find the password as it has been changed.
Laptop Password
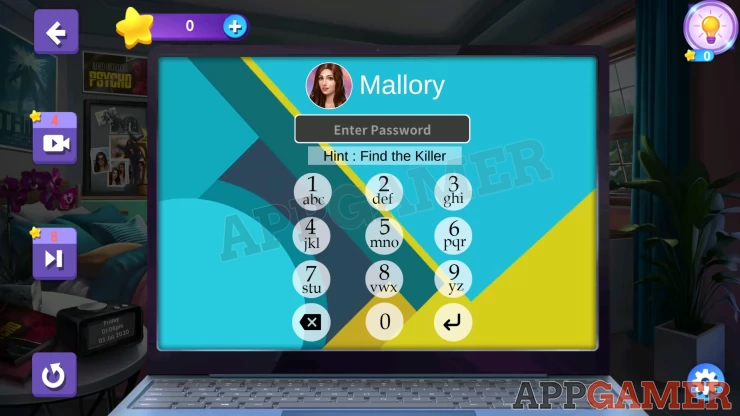
Note the Hint on the screen, "Find the Killer".
Now look at the laptop clue note that you have collected.
Note the clue and get the murderer from it
Hint: WIFEShow
Now view the laptop again and enter the code from the murderer hints.
Code: 8322Show
View the laptop again to see an application form for Sail me Away. A nice surprise.
Application Form
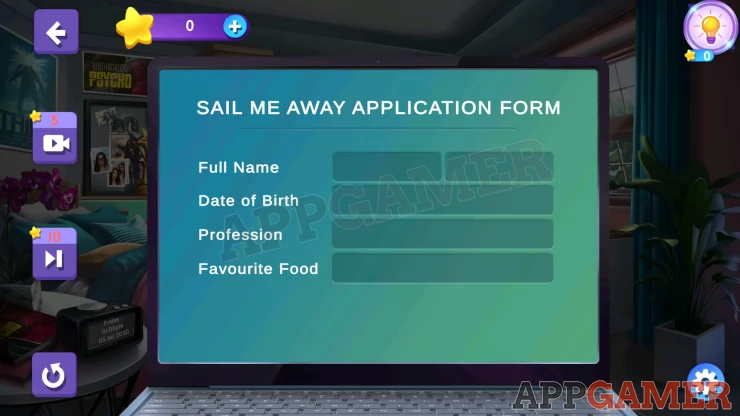
To fill in the form you need to get some details from clues in the room.
View the photos on the wall behind the bed to see your full name. And your Job.
View the phone that is now working and tap the camera icon to see photos. Find the one of your birthday to see that you were 24 yesterday. Then see the clock on the bedside table to see that the date is 3rd July 2020. This gives us your date of birth as 2nd July 1996.
Then check the next photo to see your love of Fettuccine.
Enter these details on the form and you will then receive a phone call from Triss.
After the call you will see an Access card on the floor by the desk. Collect this.
Now use the card on the wardrobe with the black handle. The door will open. Tap the Yellow suitcase inside to start a mini game.
Suitcase Hidden object puzzle
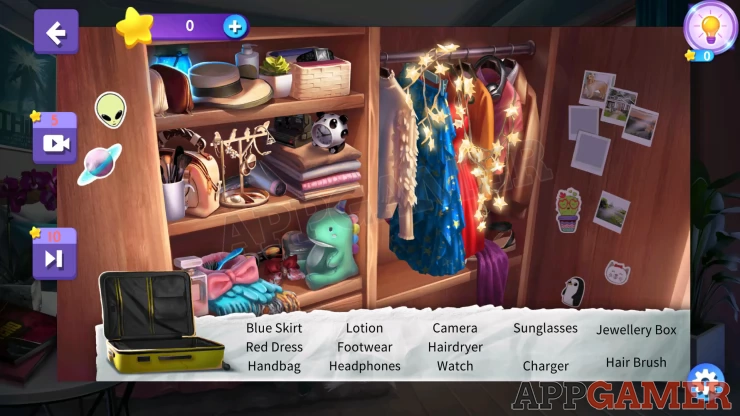
This is a hidden object game. Look at the list of items at the bottom and find them in the scene to pack the suitcase.
Once done you will collect the suitcase.
Before exiting the room look on the photo board on the left to see a number on there. (3) and then tap on the lamp on the right to see another number clue (8).

Now back out to the living room.
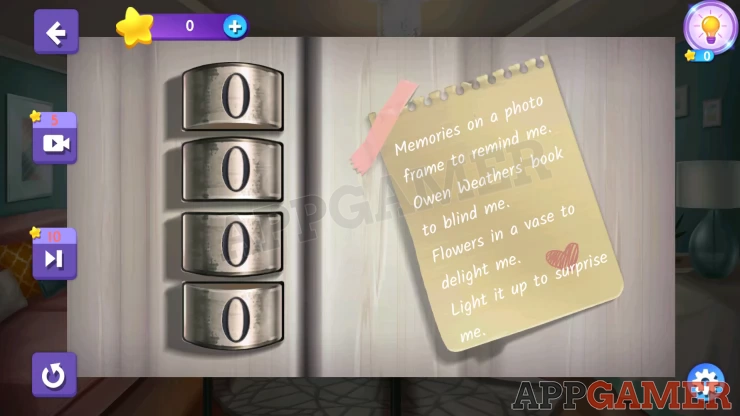
White Cupboard lock
Tap again on the white cupboard to see the note with the clues. We can now get the combination from these clues.
- Memories on a photo frame (number 3, on the board in the bedroom)
- Own Weathers' book (7, on the table in the living room)
- Flowers in a case (4, on the table in the living room)
- Light it up (8, on the lamp in the bedroom).
Code 3748Show
Collect the Batteries and the car key.
Now select the TV remote control in your inventory and you can add the batteries to it.
Then use the remote on the TV to turn it on. You will see the event promo and notice the co-ordinate on the ship.

Back out of the house and tap on the car. Use the car key to unlock it and the door and trunk will open.
Add the suitcase to the car and then tap to get in. You need to find the GPS
Car
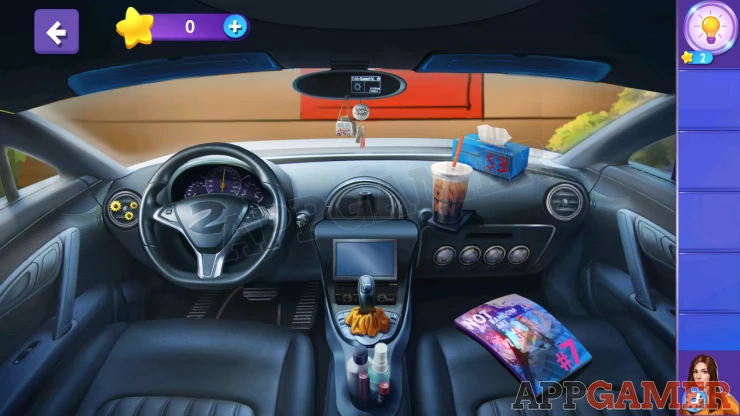
Tap on the passenger side sun visor to open it and collect a USB cable. Also note the number clue. Blue 6
Then notice 3 more number clues in the car.
Black 2 - steering wheel.Show
Pink 7 - MagazineShow
Red 3 - Tissue Box.Show
Glove Box
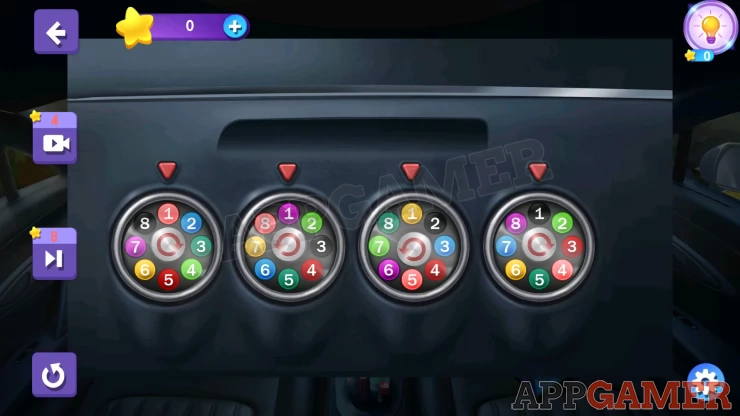
Now tap on the glove box to see the code lock puzzle.
Use the clues from above to set the 4 dials to the correct color / number settings.
Solution: Pink 7, Blue 6, Black 2, Red 3.Show
Collect a GPS Tracker from inside.
Place the GPS Tracker in the center of the dashboard. Then add the USB cable to it. Then tap the GPS screen to view it.
Enter the co-ordinates found previously.
34 59 20Show

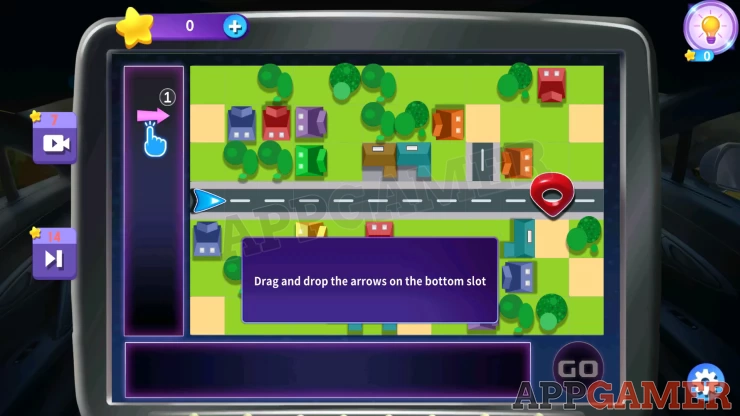
GPS route puzzle
You now have a mini game to set the route, you will need to drag direction arrows from the left to the bottom section to set the route to follow. Begin by dragging the single right arrow to the bottom, then tap go.
Second level
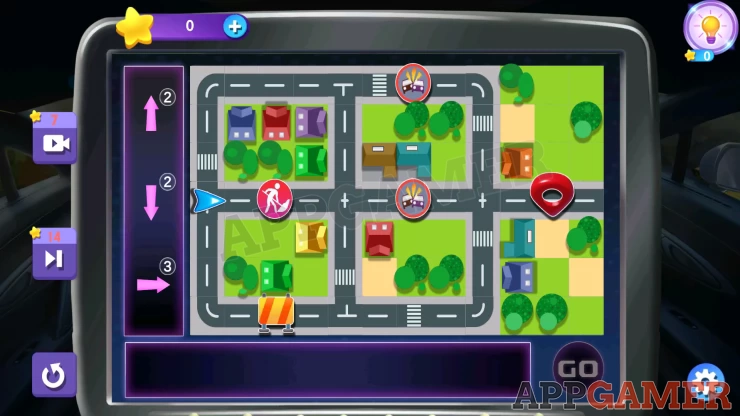
Reach the destination on the right by avoiding the blocked roads.
Solution: Up, Right, Down, Down, Right, Up, Right.Show
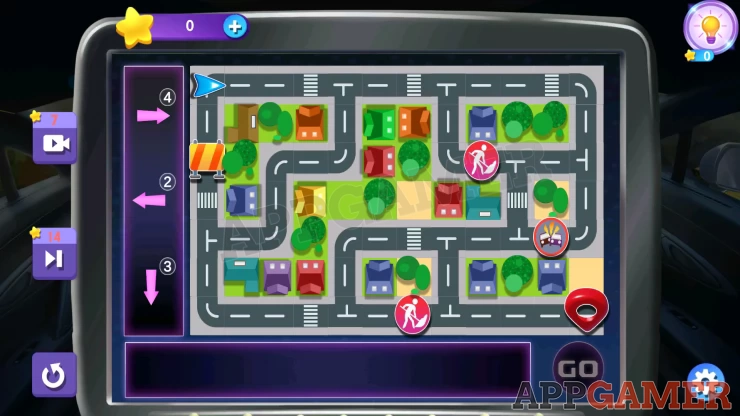
Third Level
Same again but more complicated
Solution Left, Down, Right, Up, Right, Down, Right, Up, Right, Up, Left, Up, Right.Show
Fourth Level
One more level to complete
Solution: Right, Right, Right, Down, Left, Down, Left, Down, Right.Show
This completes the GPS route setting and the Chapter.
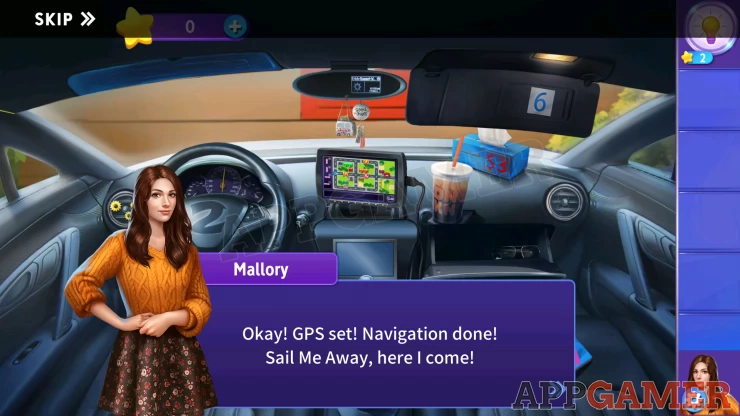
Move on to Chapter 2.