Scary Horror 2 - Chapter 3 - Liberation Walkthrough Part 2
More Scary Horror 2: Escape Games
This is Part 2 of our full walkthrough of Chapter 3 - Liberation of Scary Horror 2: Escape Games. A second Scary escape room game from developer Escape Adventure Games.
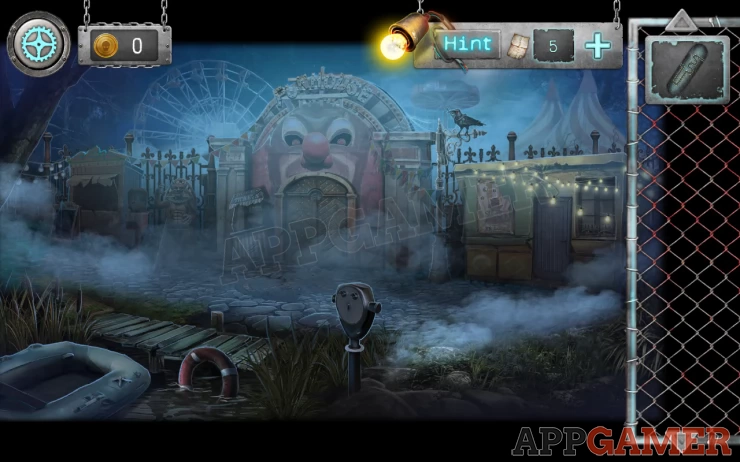
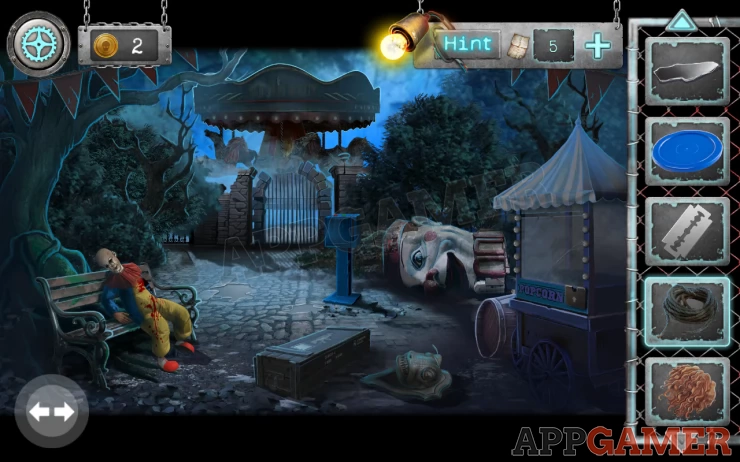
After crossing the Lake in the repaired boat you find yourself at an abandoned Amusement park. You need to look around for a watchman or a telephone to call for help.
Chapter 3 - Liberation Walkthrough Part 2
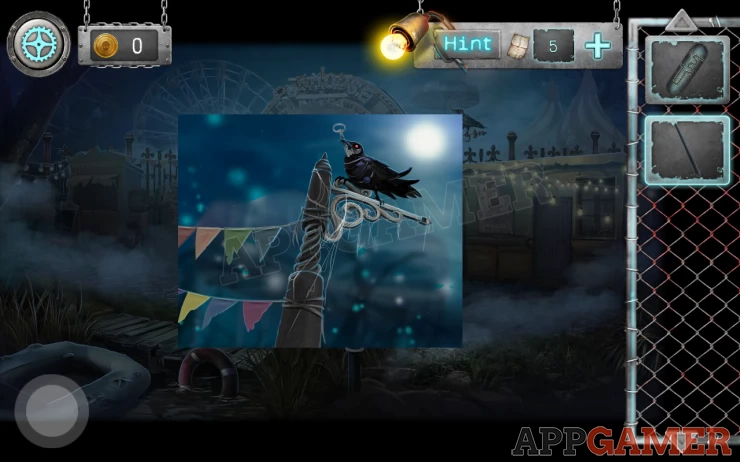
First collect a 'Long Cane' which is just to the left of the center doorway. Then view the crow on the post to the right. It is an animatronic. Use the Long can on the crow to knock down and collect the Key it is holding.
Next use the key on the building on the right with the lights on the outside, this opens the door and you can go in.
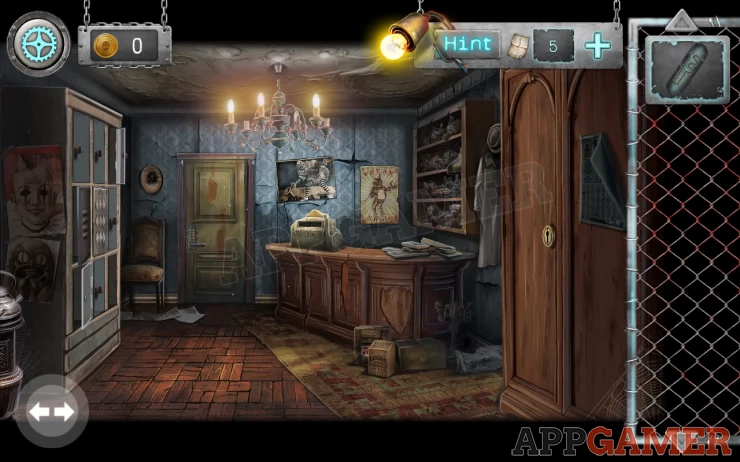
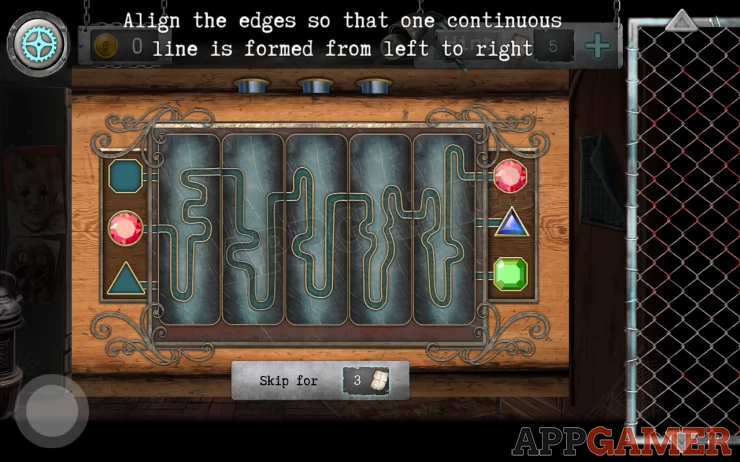
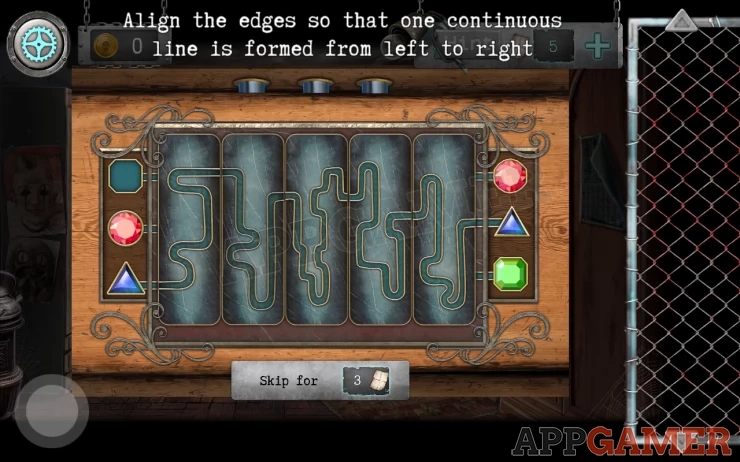
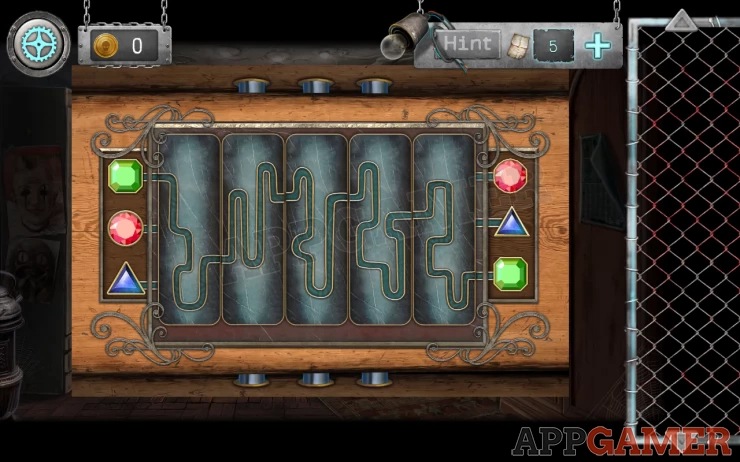
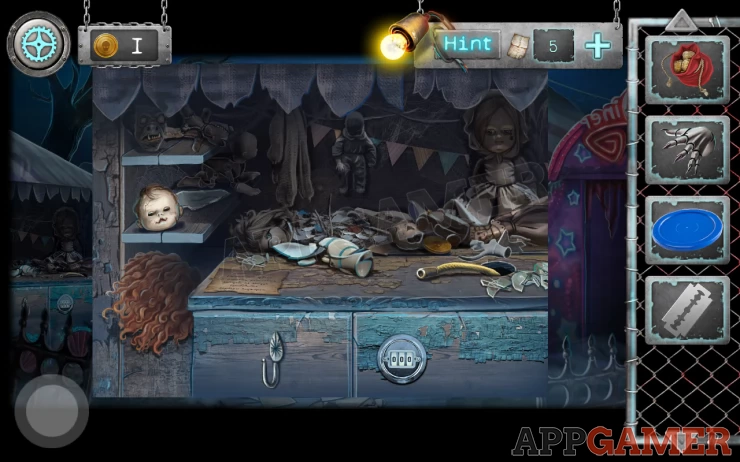
Tap on the cash register on the counter to view it.
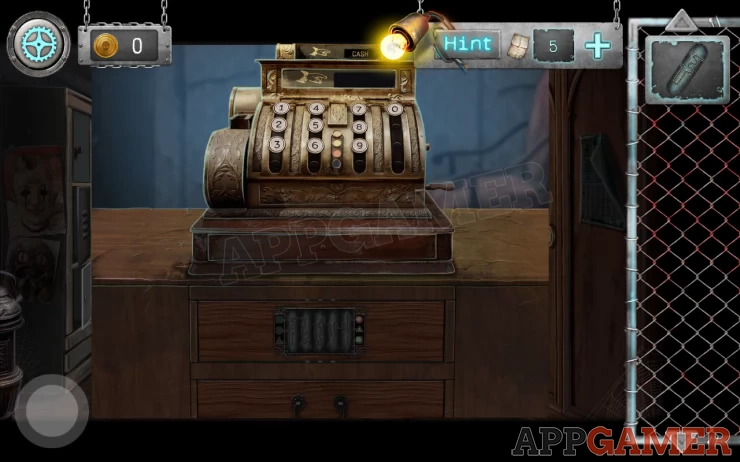
Then tap on the drawers below the register to see a puzzle.
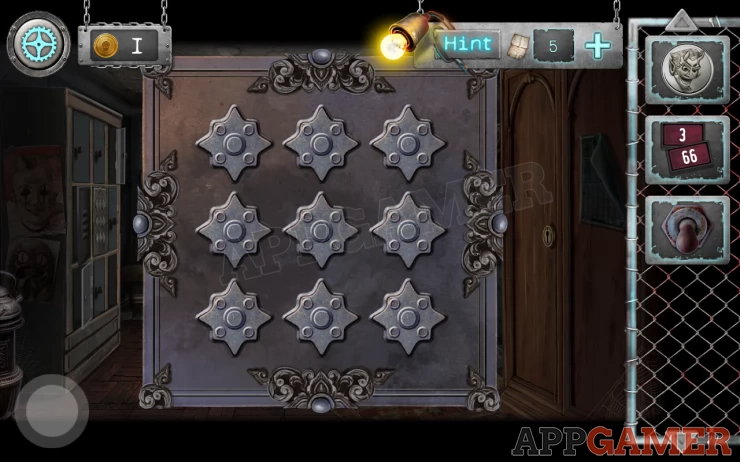
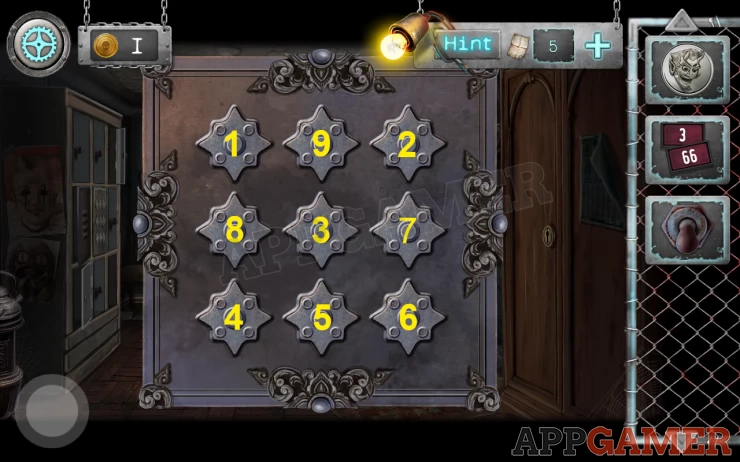
Counter Lock Puzzle
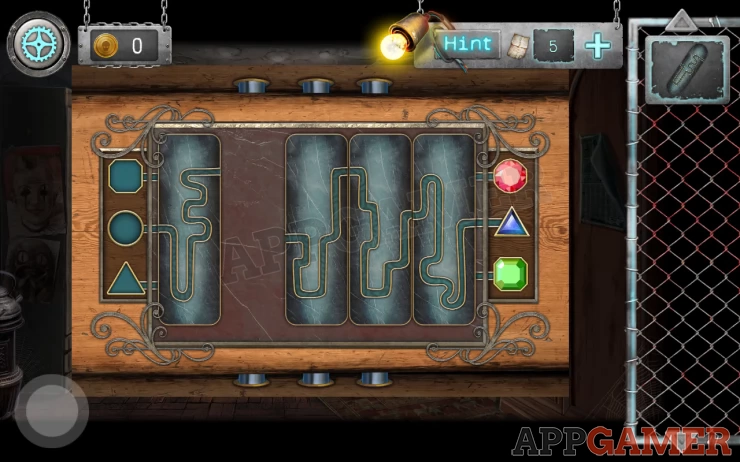
Add the Part of a lock that you have in your inventory to it to begin.
Tap the lock sections to change them and make a line from the left to the right for each of the 3 shapes
Solutions: Show
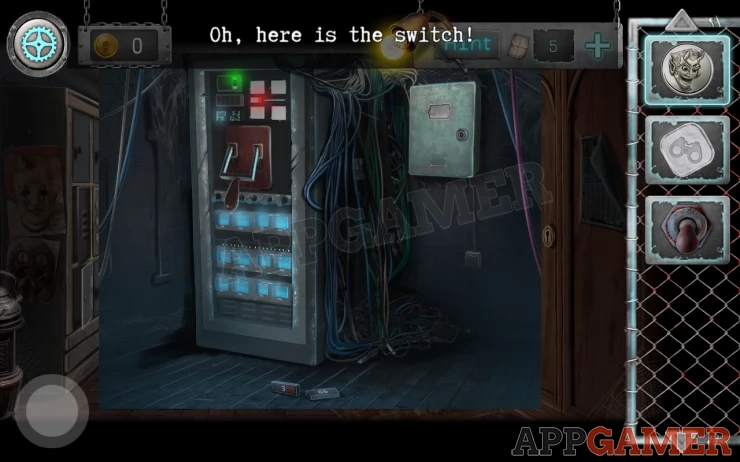
With the drawer open collect a Toggle Switch. Now view the shelves on the right above the counter.
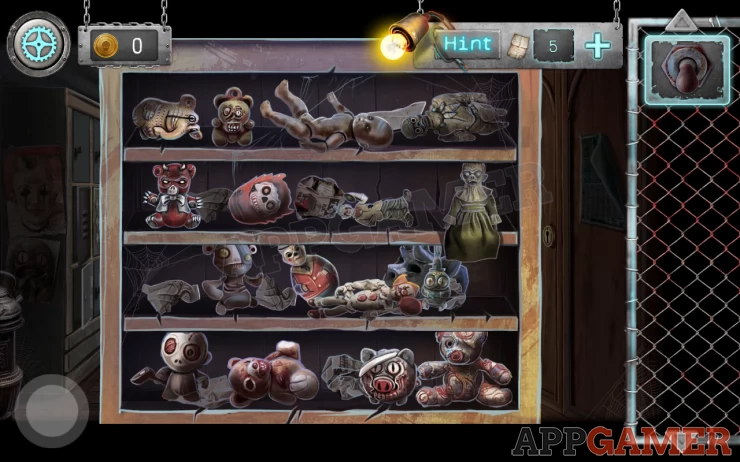
Move the items around to fond and collect a Gargoyle Head. Now exit the building and tap on the boat again, this will take you back to the other side of the lake, you need to return to the overgrown path with the statues.
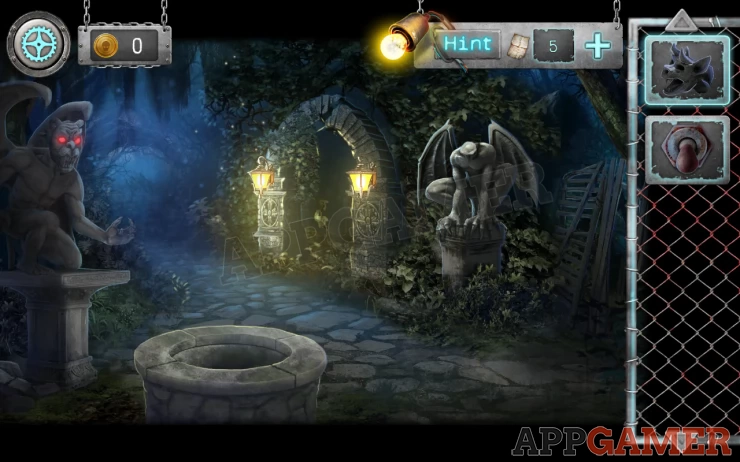
Place the gargoyle head onto the statue on the right. You can then access a puzzle at the bottom of the status.
Gargoyle Statue Puzzle
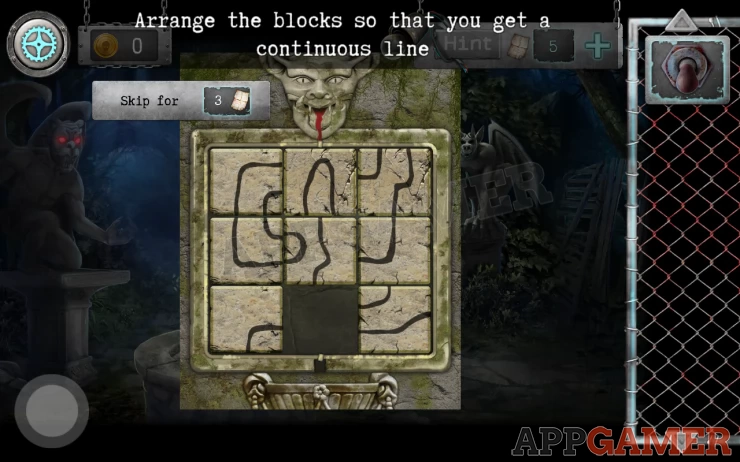
Slide the blocks around to arrange them with a single line from the top center to the bottom center.
Solution: Show
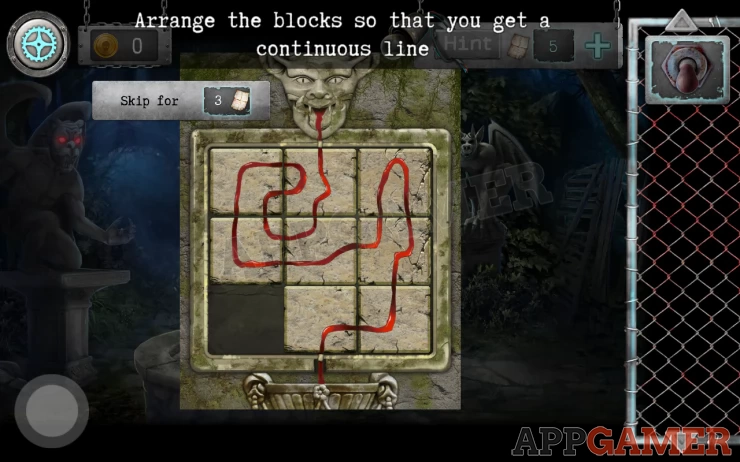
Collect a Piece of a poster from the gargoyles mouth. Then you can return to the boat and cross to the other side again. On the side of the green building with the lights is a torn poster, view this and add the piece to it to reveal 5 numbers.
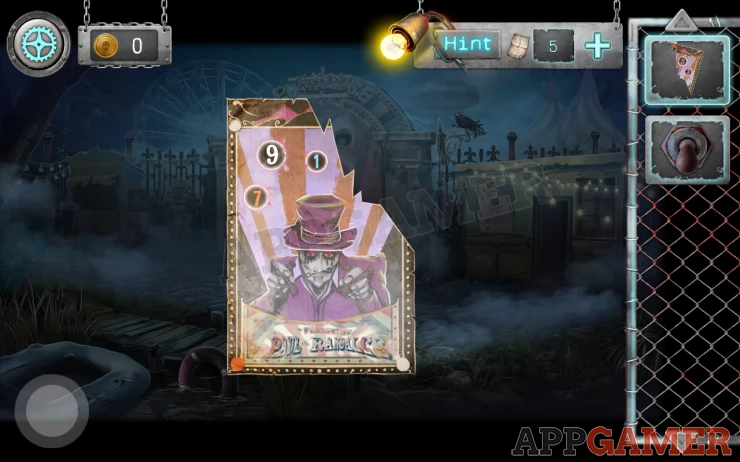
Then go back into the green building and view the cash register again. Look at the buttons.
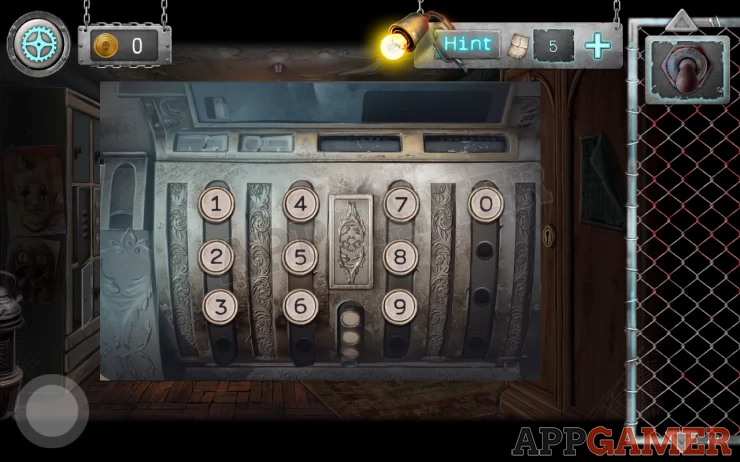
Enter the code from the poster
Code: 79153Show
You can now collect a Square coin and a Coin with horned profile from inside and also see a clue.
Show
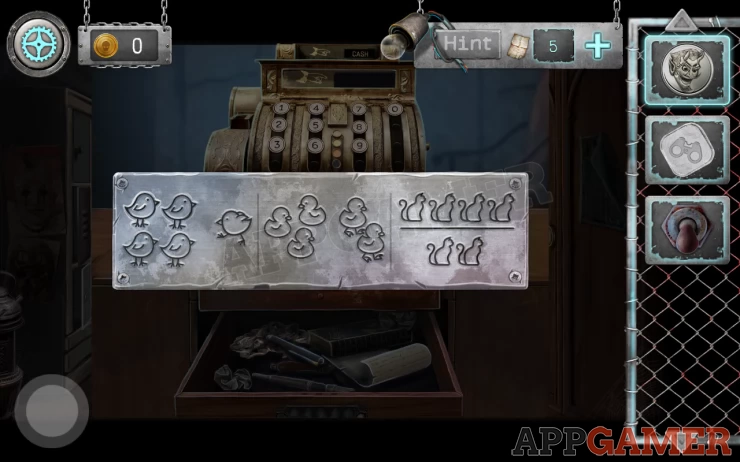
Next tap on the door at the back of the room to see the code lock.
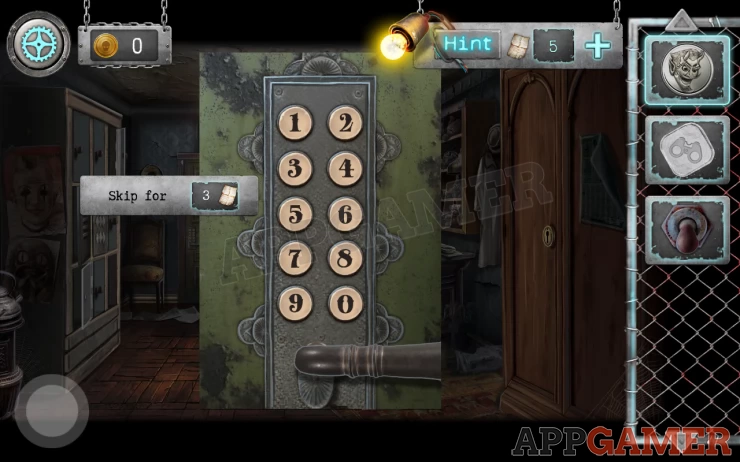
Use the clue from the register to open this.
Solution: there are 3 sets of animals, 4 chicks + 1 joining them, 3 ducks - 2 going away, 4 cats divided by 2 cats.Show
Code: 512Show
Enter the back room. Tap the switch to turn on the power. Then collect 2 number blocks from the floor.
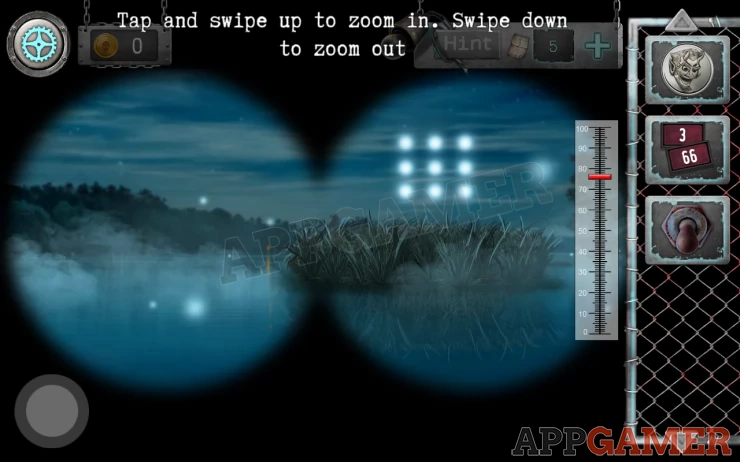
Exit to the outside and now view the viewing scope by the water.
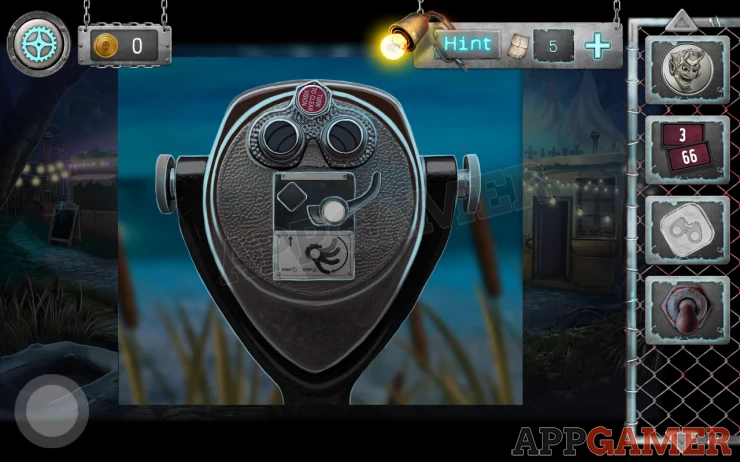
Use the square coin on it and tap the switch to activate it so that you can look through. Then zoom in until you see the set of 9 lights on the right. Watch the sequence that they appear in and remember this clue.
Now return to the green building and tap on the square lockers on the left.
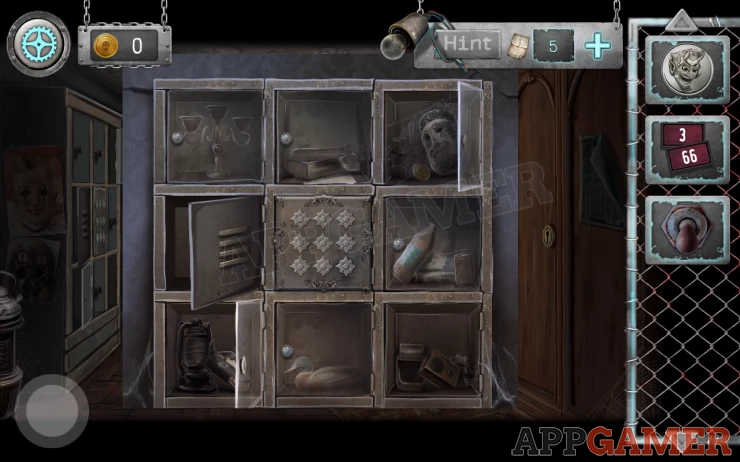
Collect a coin from the top right locker. Then view the one in the center.
Solution: Tap the buttons on the front in the same sequence as the lights in the sky.Show
Collect a Razor Blade and a Mysterious Cube.
Back out to the lake and use the boat again to cross to the other side. Go back to the overgrown Path. Then view the hand of the statue on the left.
Add the mysterious box to it and you will find another puzzle.
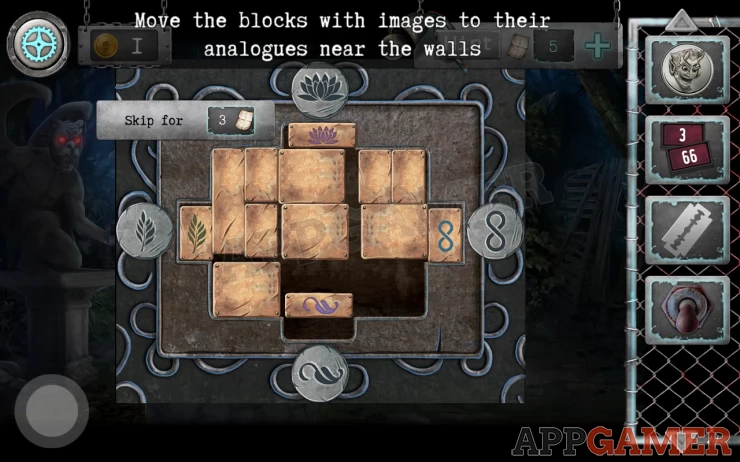
Mysterious Box Puzzle
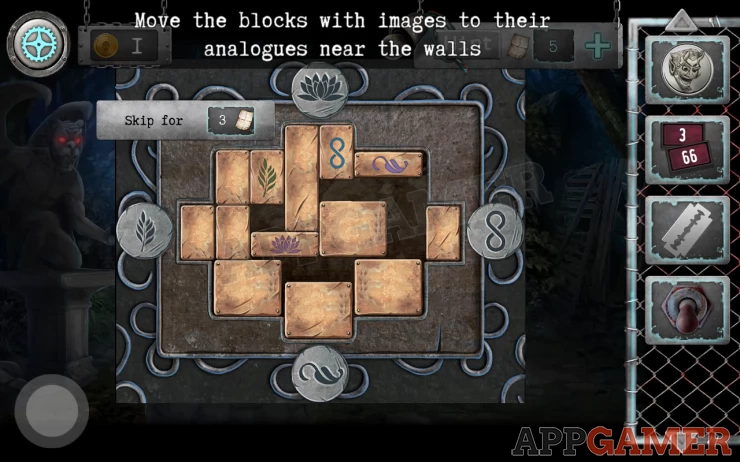
Slide the blocks around the grid.
Move the blocks with symbols to them next to the matching symbols on the sides
Solution: Show
Collect the Locker Key.
Now return to the boat and back to the other side of the lake. Tap on the machines to the left of the main entrance to view them.
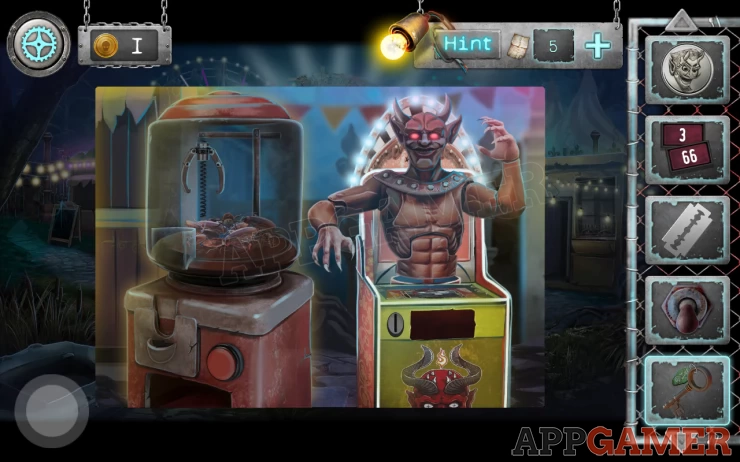
Then use the coin with horned profile on the devil machine on the right. This starts a mini game.
Devil Game
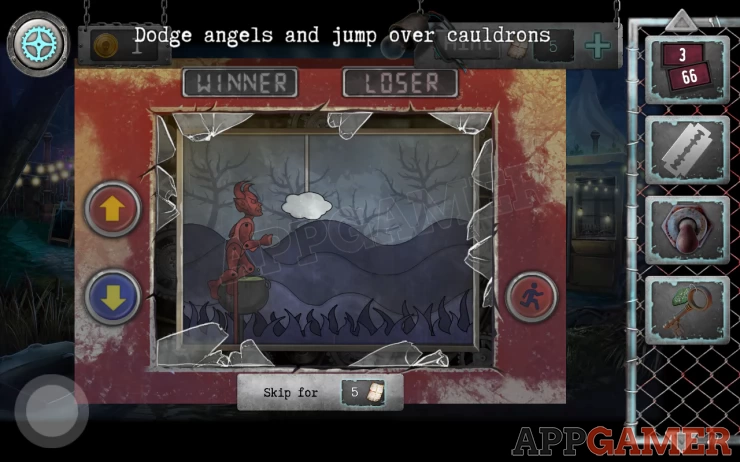
- Tap the red button on the right to make the devil run.
- The use the up and down arrows to jump over cauldrons or duck under angels. You can ignore the clouds.
- It speeds up as you go.
- Timing is important, don't jump too early.
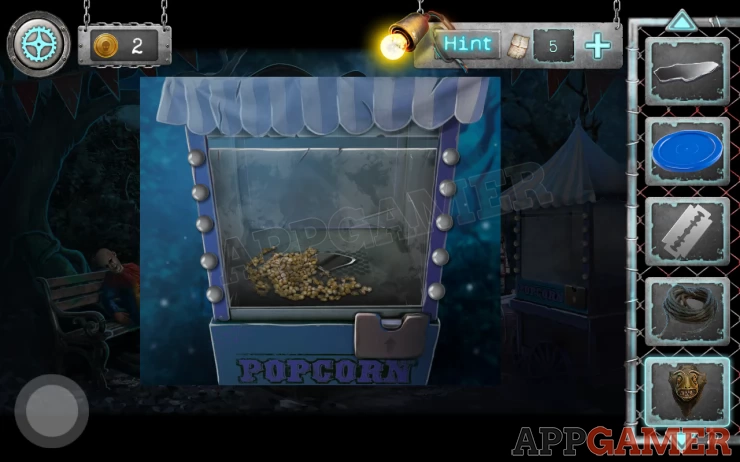
When you reach the end you will receive a pouch with coins. Use the pouch on the machine on the left to start it. Press the red button to use the claw to take items until you collect both a blue Puck and also some chewing gum.
Now go back into the green building and use the Locker key on the wooden cupboard on the right to open it. Collect a panel key from the coat pocket.
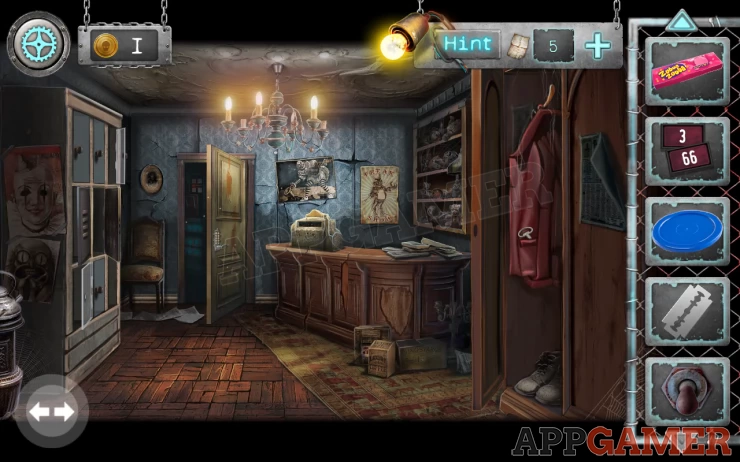
Then go back into the back room. Use the panel key to open the small wall box and look inside.
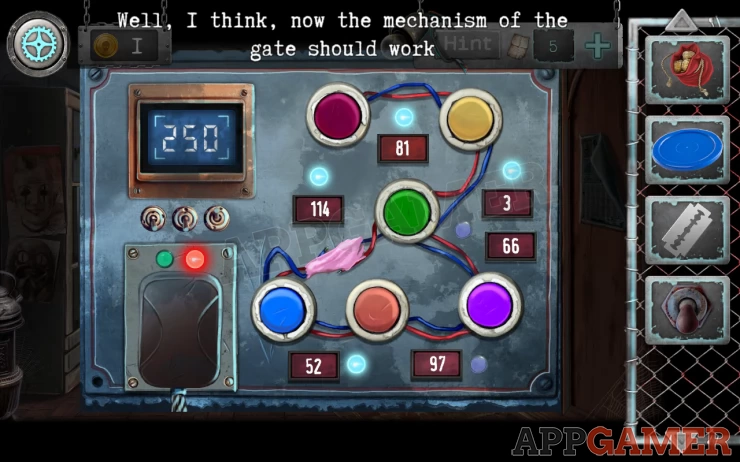
Power Box puzzle
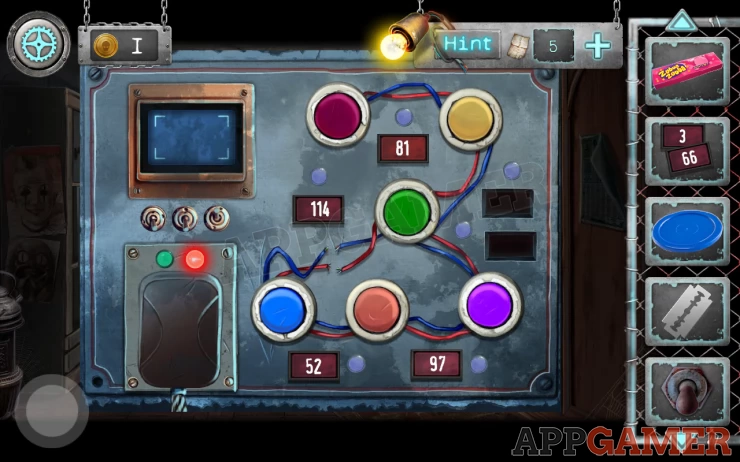
- Notice that the number 250 is flashing,
- Add the Chewing gum to the broken wires to fix them.
- Then place the 2 number blocks to start the puzzle.
- Tap on buttons to connect up cables and set the numbers. Find the right combination of buttons to get the displayed number to 250
Solution: Press all except the purple button bottom rightShow
Now back up and then view the main entrance for the amusement park, note the number clue on the left of it
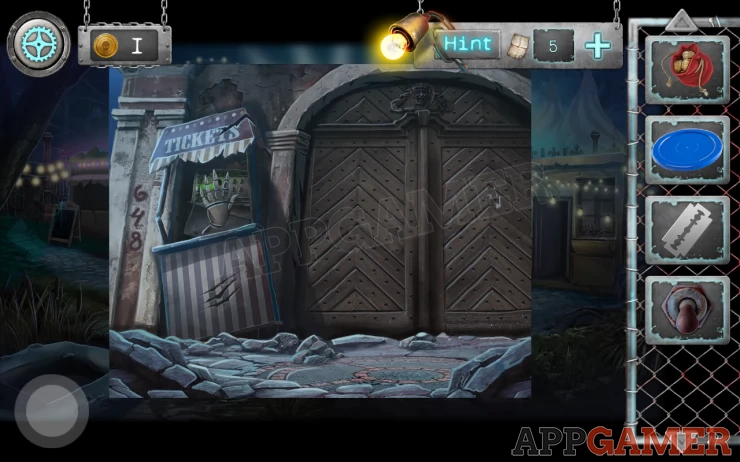
On the left is a Ticket Booth, collect the Mechanical hand from it and then view the switch panel inside. Add the toggle switch to it.
Toggle switch puzzle
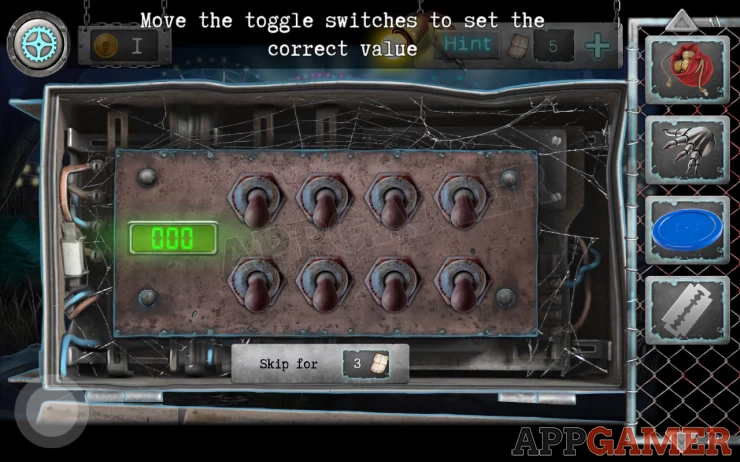
- Set the switches to control the value on the left.
- Find the correct combination to get the total to the clue value 648
Solution: Switch up 1 and 3 on the top, 2 and 3 on the bottom (others remain down)Show
Inside the Park
You can now enter the park.
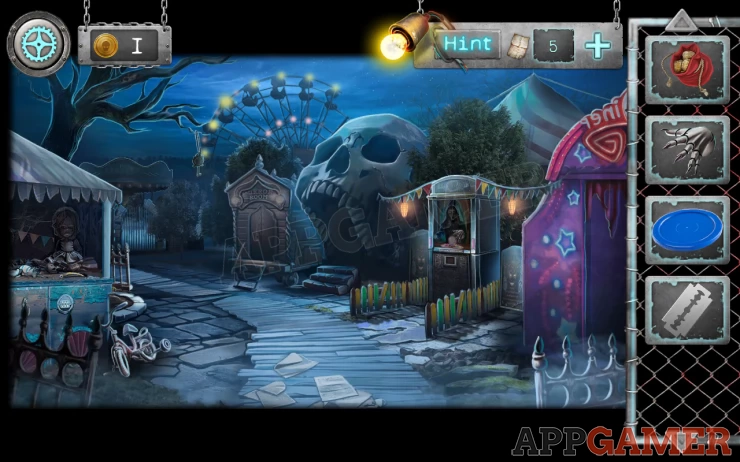
First view the display on the far left.
Collect the Ginger wig and Mirror Shard 1. from the shelves and also find a coin here. Then read the note for a clue.
Next tap on the tree in the distance on the left to view a second area. Then tap on the hanging clown mannequin and you will collect the rope.
Collect the Monster Head trophy from the ground and then view the blue popcorn cart on the right.
Use the pouch of coins on this to add one and fill it with popcorn, you can then collect another Mirror shard. Back up and now tap on the fortune telling machine in the center.
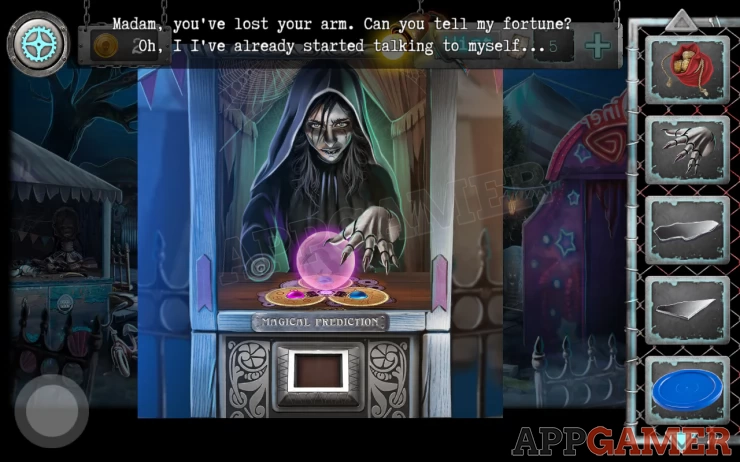
Add the mechanical hand to it and then the pouch of coins. This starts a puzzle.
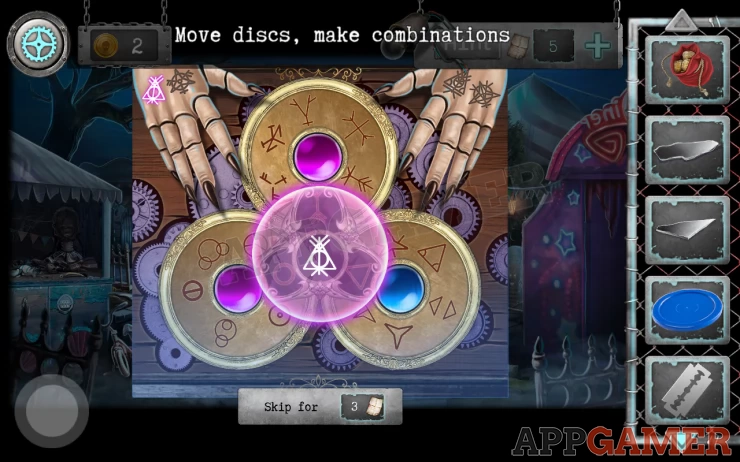
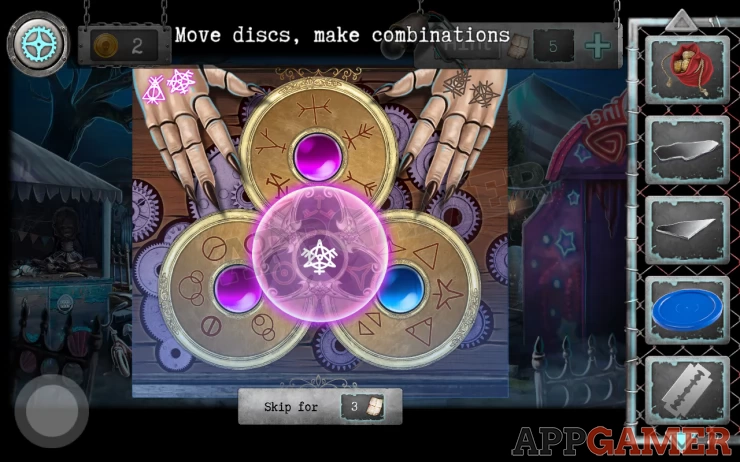
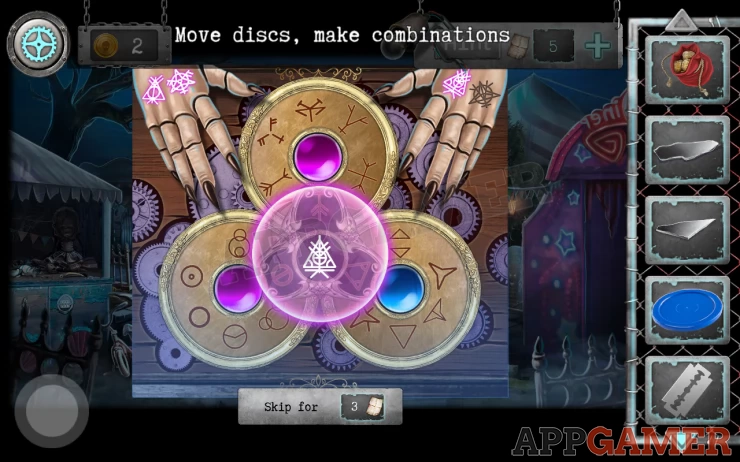
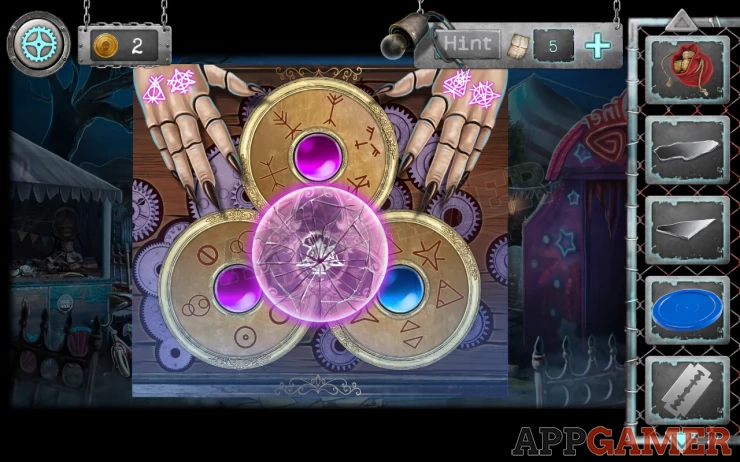
Fortune teller Puzzles
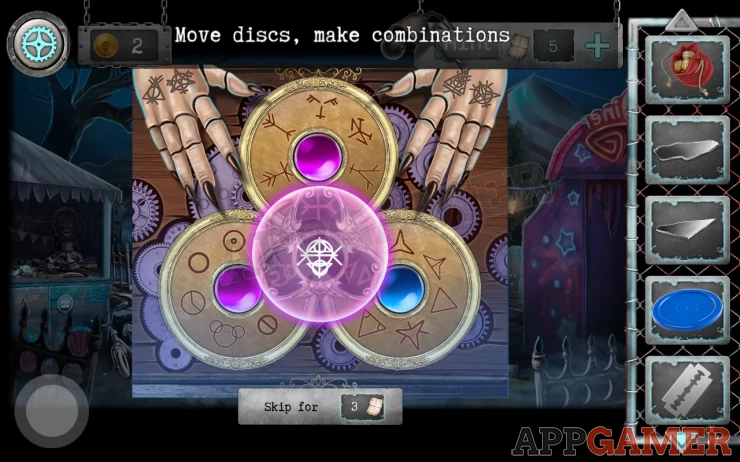
On the hands there are 4 symbols. These are the clues
The puzzle has 3 disks that you can turn, each has symbol parts on them.
Align the disks so that you combine the symbol parts to match the ones on the hands.
Solutions: Show
Once done the machine breaks and you will then be able to play a second puzzle.
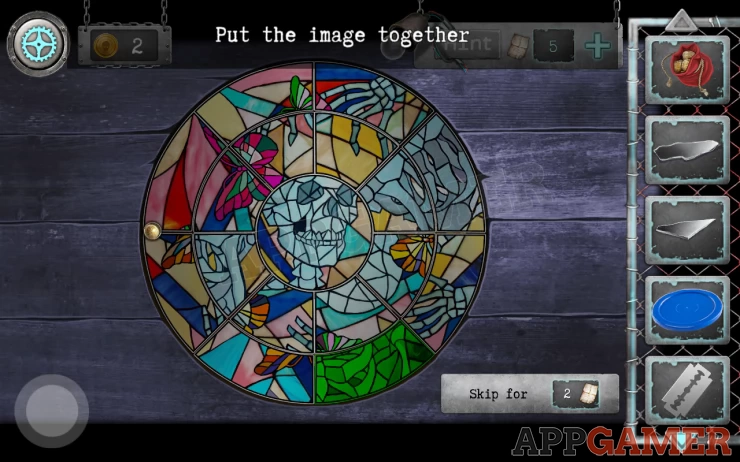
- Tap pairs of the same sized sections around the center to swap them.
- Arrange them to form a complete picture.
- When a piece in in the correct location it will turn green.
When completed you can collect a Key with a horse and a Door Handle. Now tap on the purple doorway on the far right to enter an arcade area.

Collect a packet of Balloons from the floor and then add the Blue puck to the hockey table and use the Pouch of coins on it to start a game.
Hockey Game
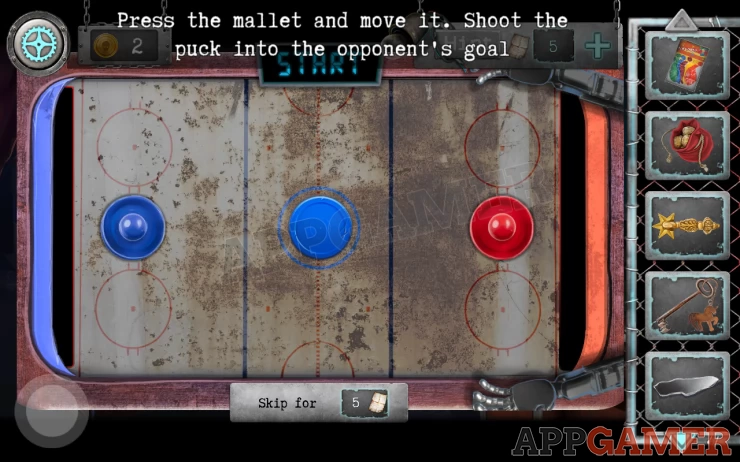
- Slide the blue paddle up and down and direct the puck towards the opponents side.
- You need to score 3 times in a row to win the game.
- This is not a game that plays well on older devices or ones with slower responsiveness.
Once you complete it you can collect a red Lever from below the table. Notice also a display of a key on the robots chest. This is a clue for later.
Next tap on the red bar stools on the right.
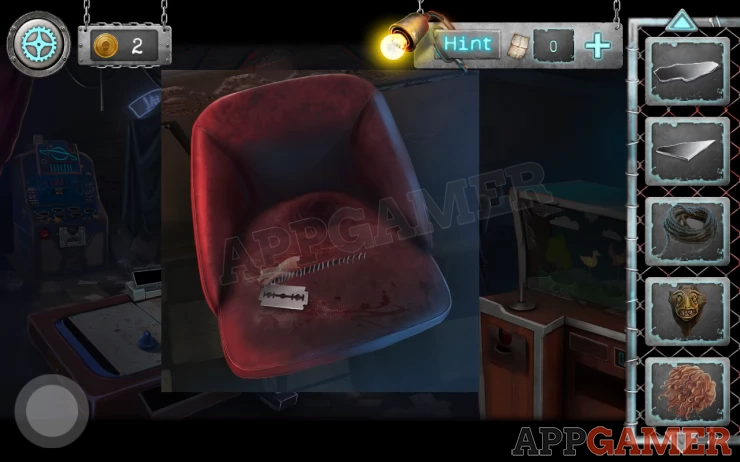
Use the razor blade on the stitching to cut it open. Then collect a Start Scheme and another Mirror Shard.
Next view the wall behind the bar stools to find a triangle puzzle
Triangle Picture Puzzle
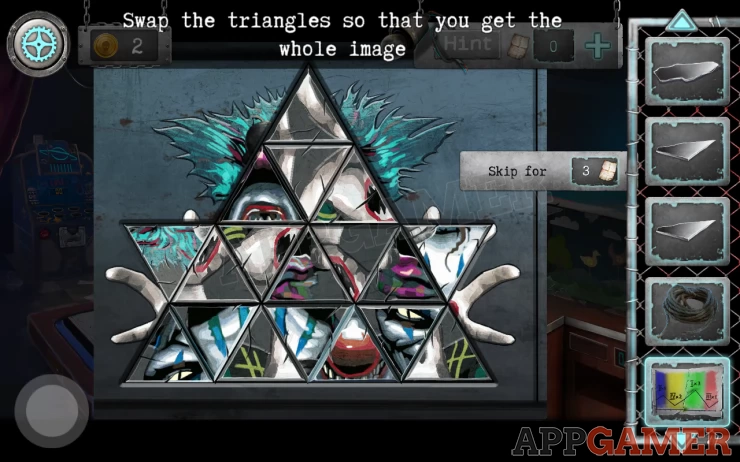
- Tap pairs of triangles that are next to each other to swap their positions.
- Arrange them to complete the image as shown below
Solution: Show
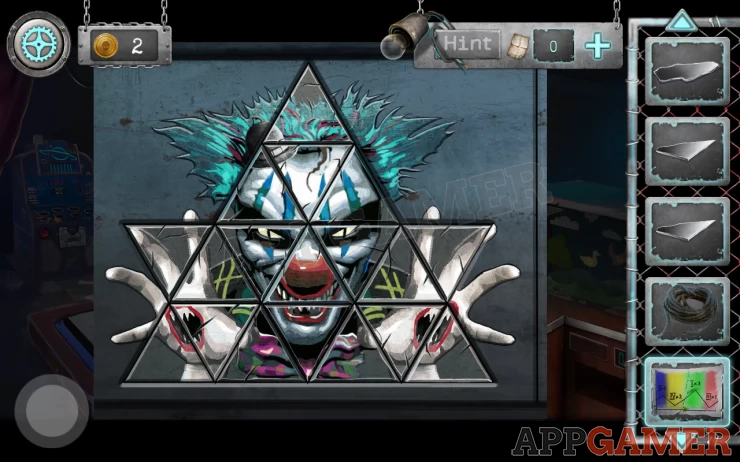
Then tap the puzzle to open a door and you can collect an Oiler. Now exit this room and head back to the tree on the left. There is a blue control box on the path in front of the gate.
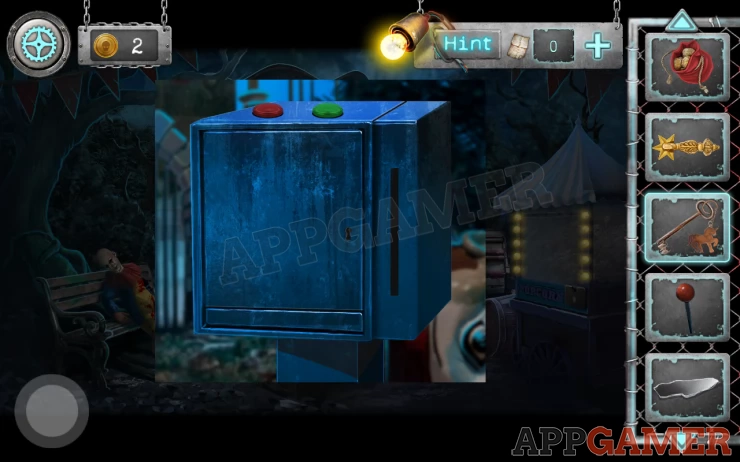
Use the key with a horse on this to open it. Then look inside and add the Start Scheme to it. And also add the red Lever.
Start Scheme Puzzle
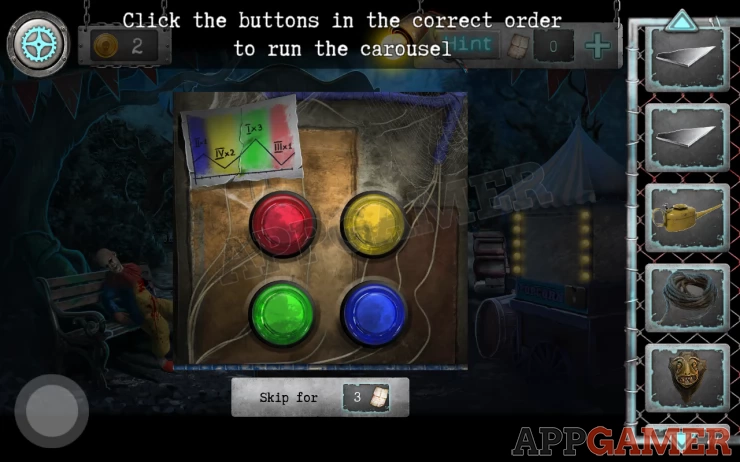
- The paper scheme has 4 colored sections that match the colored buttons.
- Each section has a Roman numeral and x a number.
Solution. Start with Green (Roman Numeral I = 1) and tap this 3 times. Then continue the sequence.Show
Code: Tap Green x 3, Blue x 1, Red x 1, Yellow x2Show
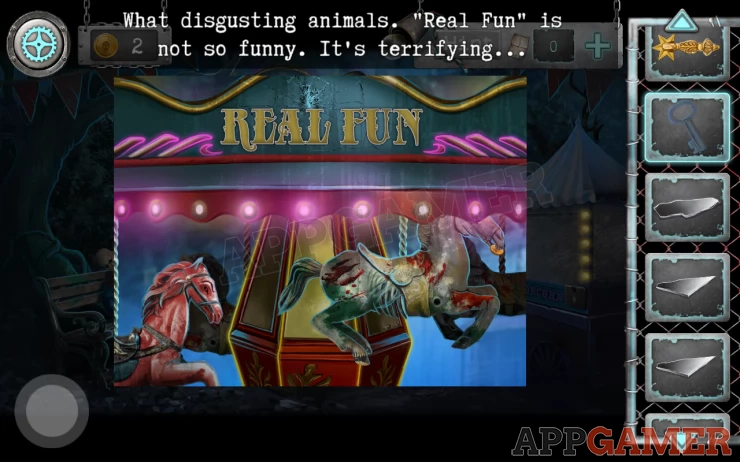
Then tap the lever to turn on the power and you can collect a Small Key. Then now see that the merry-go-round is working. Tap it to view the sign for a clue.
Next look at the gun case on the ground. You can use the small key to open the panel on the top.
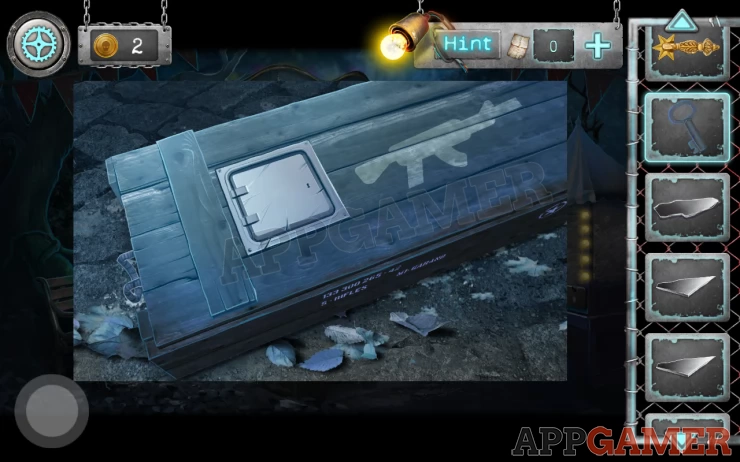
- You now need to enter a code word
- The clue is the sign on the merry-go-round.
- Follow the order that the letters light up in.
Code: FUNERALShow
With the case open you can collect a Toy Gun and a Start Button.
We will continue the guide in Chapter 3 Part 3
We have questions and answers related to this topic which may also help you: Show all