Lost Lands 9 Walkthrough
Lost Lands 9 Guide

Welcome to our Lost Lands 9 walkthrough. Titled as Stories of the First Brotherhood, this game is another in the popular line of Mystery escape room and puzzle games from Five-BN games. This game features beautifully designed environments and a diverse range of puzzles and hidden objects to find. All discovered though an immersive fantasy tale to follow.
The game is presented in 3 chapters. And our walkthrough is broken down into logical parts to cover each section of the game. It will help you locate the items you need, and give full solutions for the puzzles you will face. Please note that the game can be confusing at times as items that you need to collect may not let you pick them up until you have found a need for them.
This means that you will need to return to areas multiple times to find items. If you are unable to pick up any item that is mentioned in the guide then you may have missed tapping on an earlier scene or item that activates the need for the new item.
If you have any questions or problems playing the game please head to the Answers Page to post your question there.
Keep an eye out while playing for collection items and morphing objects, these are collectible items hidden around the scenes of the game. Most scenes will hone one of each in them to find.
Lost Lands 9 Chapter 1 Walkthrough - Unchildlike Mischief
In chapter 1 we follow the story of Folnur, as schoolboy who opens an ancient sarcophagus. Instead of going to school he plans to head to his shelter.
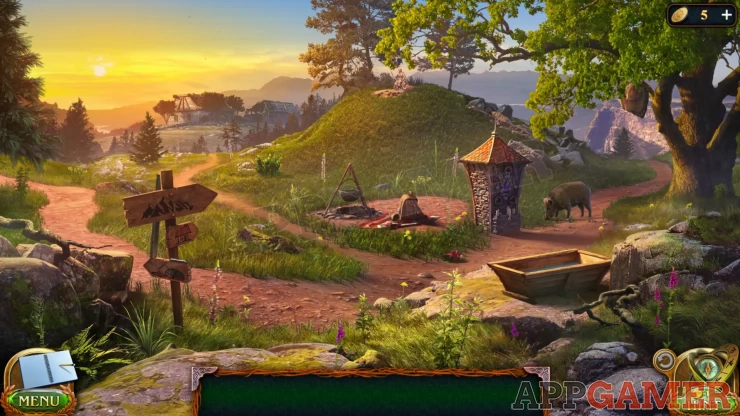
New Task: Boy's Shelter.
Morphing Object: status on top of the small hill in the center.
Collection Item: Book in the rocks on the lower left side.
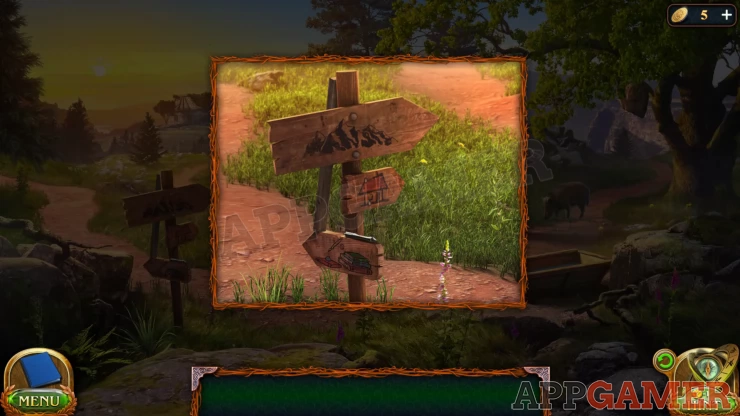
First tap on the sign post to view it and then collect a Screwdriver shaft and a Stick.
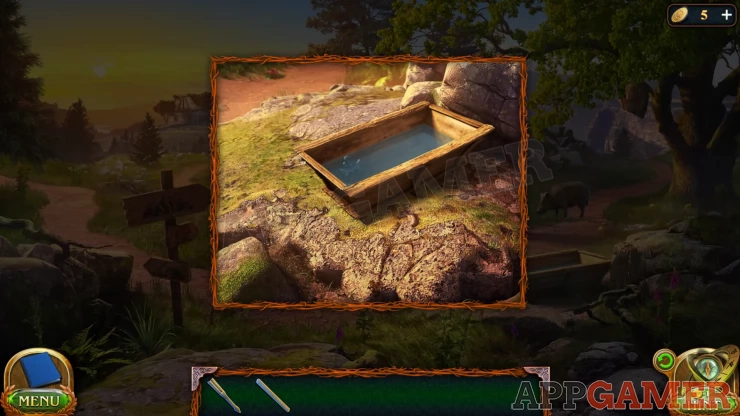
View the water tough on the right and collect an Iron Flower
Use the stick on the bee hive hanging on the tree on the right. This will scare away the wild pig.
Tap on the path on the right now to move through to the next area.
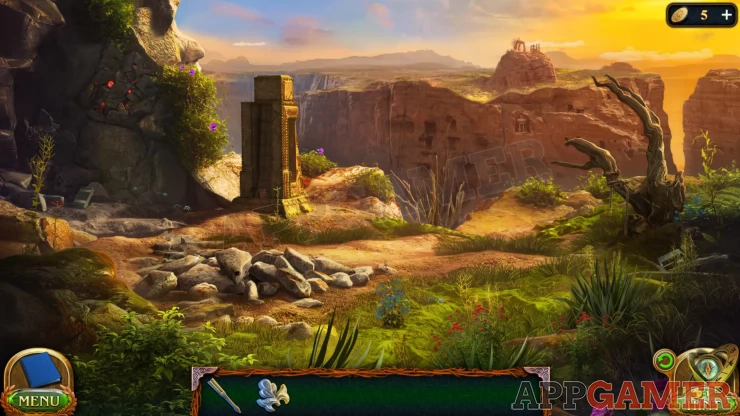
Collection Item: Book, by the rock wall on the left.
Morphing Object: Carving in the cliff face on the far side of the canyon below the ruins.
Tap on the rock wall on the left near the top where you see some red gems. Collect a Wooden Honeycomb piece.
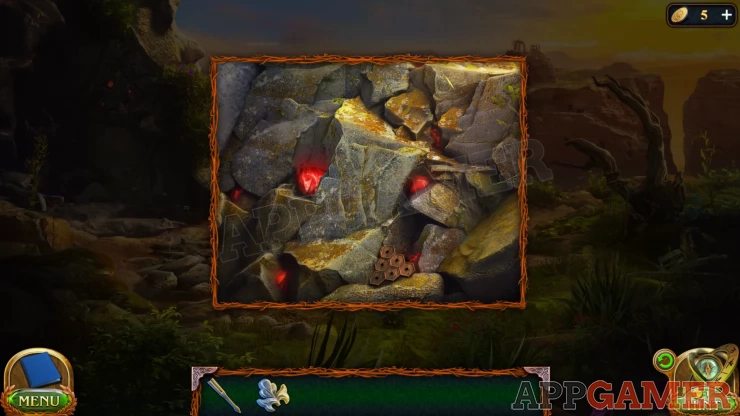
Then view the stone square pillar in the center to find another Wooden Honeycomb.
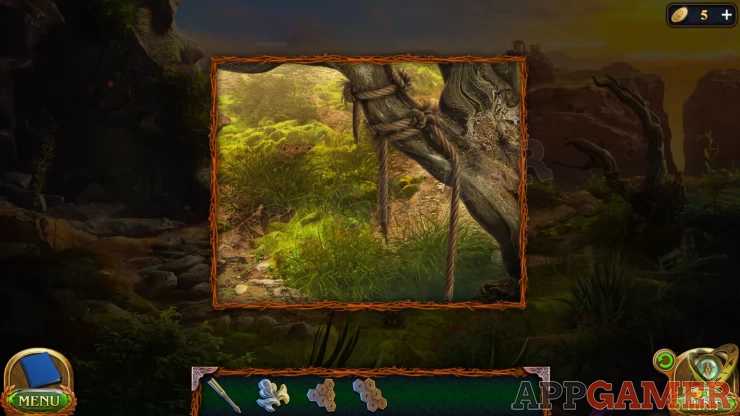
Then tap to view the Tree on the right with the ropes, there is one more Wooden Honeycomb piece in the grass to the left.
Now view the pile of rocks on the ground to the left and move the rocks to uncover a puzzle box.

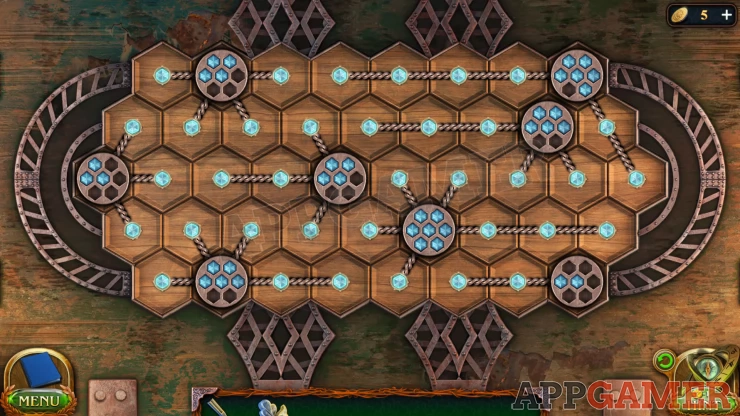
Honeycomb Puzzle Box

- Add the 3 wooden piece to it to start the puzzle.
- The puzzle contains hexagonal blocks that have some diamonds on them.
- For each of these you need to tap and then stretch out a line from them to cover the other hexagons on the board.
- Each starting point must cover the same number of hexagons as the number of diamonds on it.
- To complete it the entire board will need to be connected.
Solution: The board can vary with each game so your solution may be different.Show
Collect the Roll of Rope and the Shelter Key.
Next collect an Ascender from the hollow in the grass on the right of the scene.
Now view the tree again and add the Rope to it. Then tap in the center of the cliff side where there is a branch growing to move it and then look down.
Tap the rope to lower it and then add the Ascender to the rope that is now hanging down.
Tap at the bottom of the cliff to travel down.
Collection Item: Gear on the rocks to the right of the central boarded up entrance.
Morphing Object: Tortoise / Frog in the long grass on the lower right of the scene.
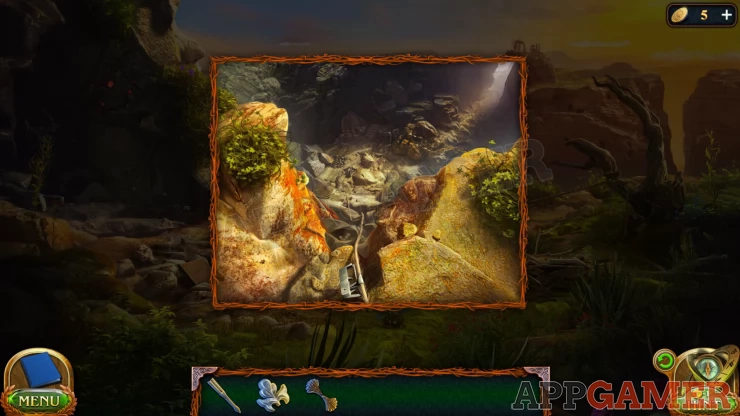
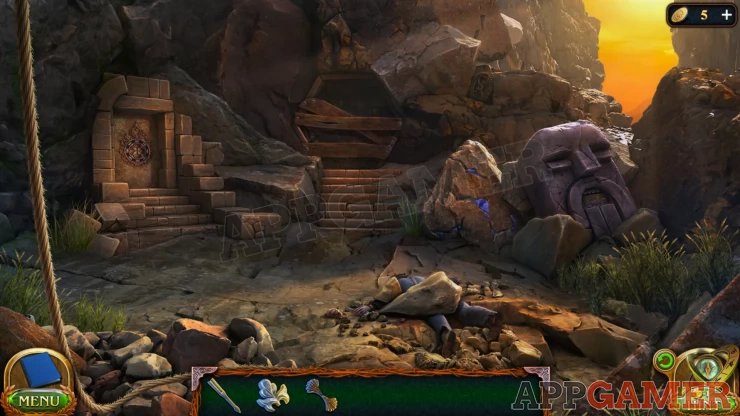
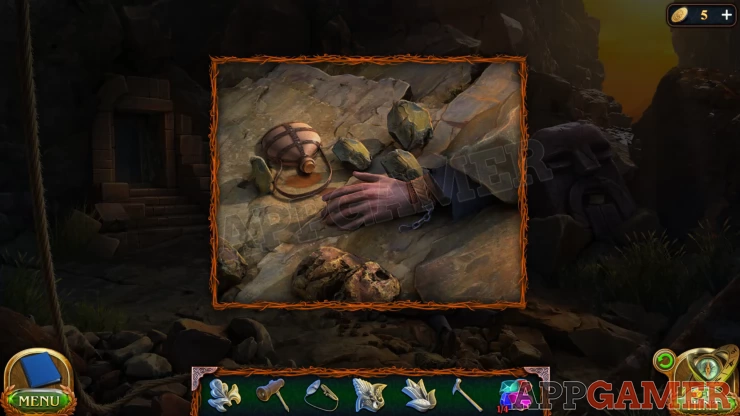
View the body on the ground under the rock.
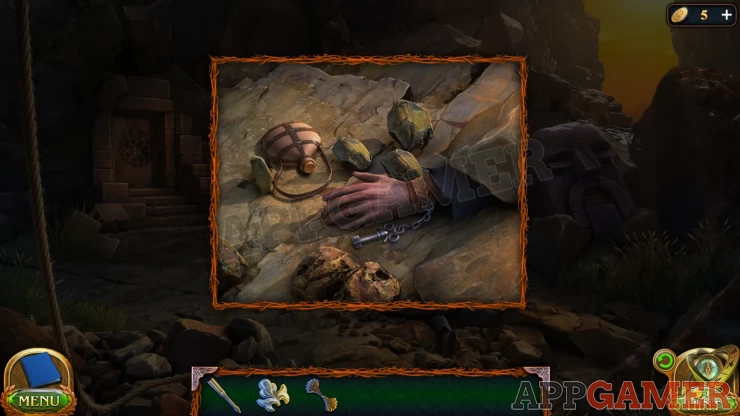
Collect the Travelers Key from it and also examine the flask.
Now view the large stone statue head on the right. There is a puzzle inside the mouth.
Two headed snake puzzle
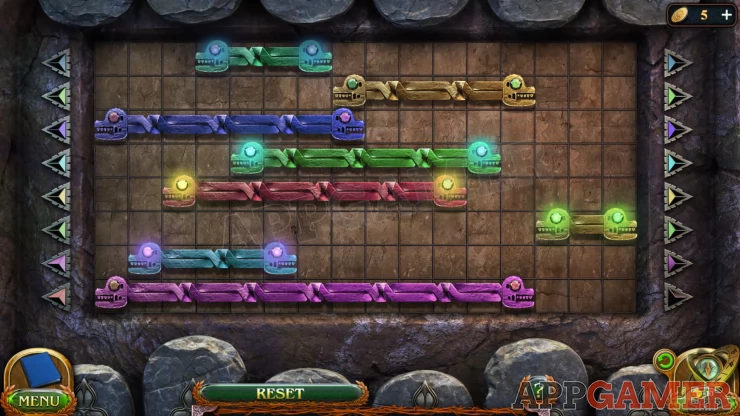
- There are 8 rows each with a 2 headed snake.
- Move the snakes left and right to arrange them in the correct positions.
- You need to make sure that each column of the grid has only 1 snake head in it.
Solution: Show
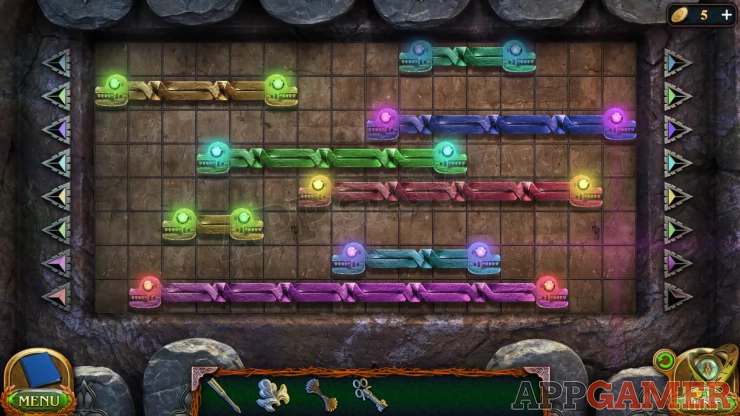
Inside you will find a paper with a clue and then collect a Screwdriver Handle.
Combine the handle with the screwdrivder shaft to make the Screwdriver
New Task: Re-hidden key
Back up to the starting area with the camp in the center. View this and you can use the traveler's key to open the bag.
Collect a Flint from inside.
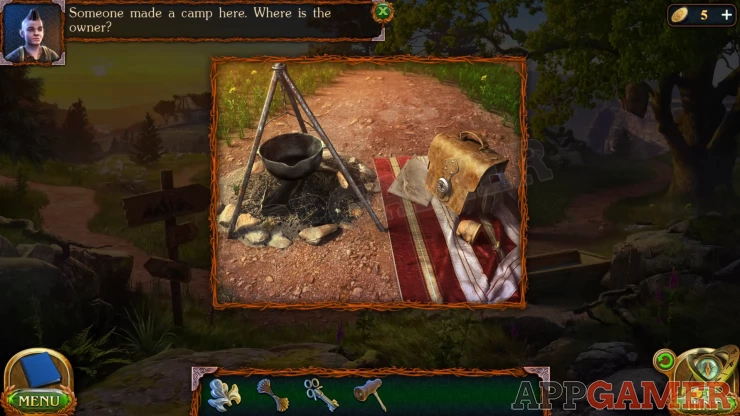
Manuscript: Found under the bag.
Next tap on the path to the left of the camp to move through to the Schoolyard.
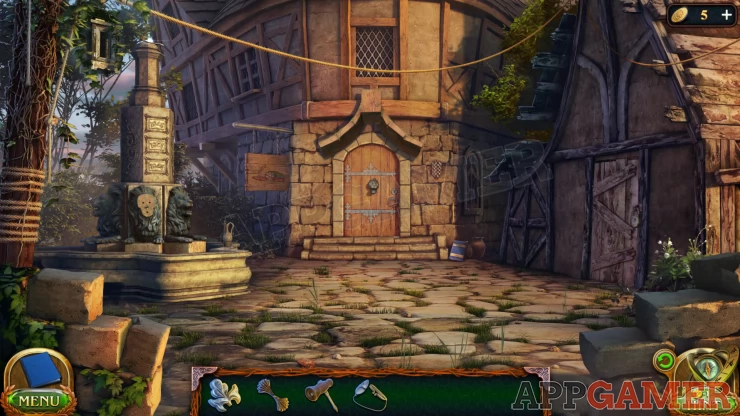
Collection Item: Book, to the right of the steps for the central door.
Morphing Object: Window decoration on one of the high windows on the main building to the left.
View the central door and use the screwdriver on the hanging Lion Mask to remove and collect it.

Next view the fountain on the left to find another Iron Flower in the bottom. Then add the Lion mast to the lion sculpture missing the face.
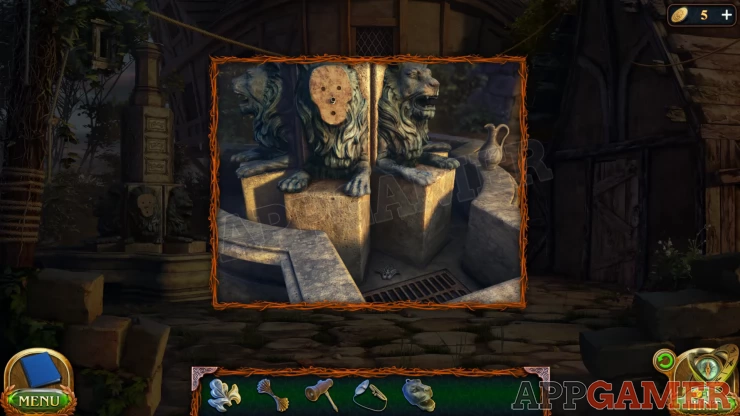
A section opens, at this point a school teacher appears and asks you to fix the fountain. You will receive the Barn key.
Use this to open the door on the right and enter the barn.
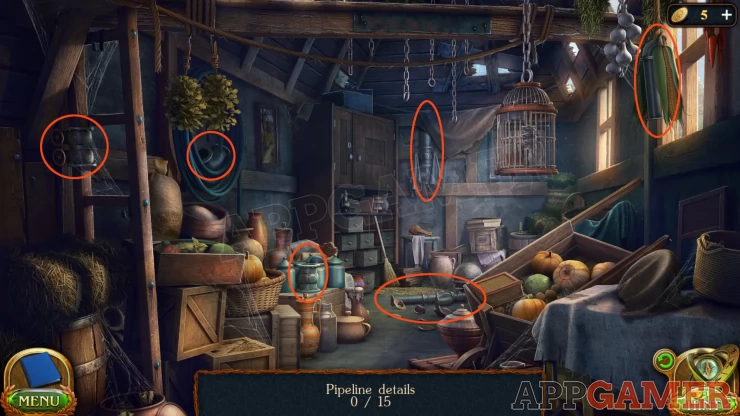
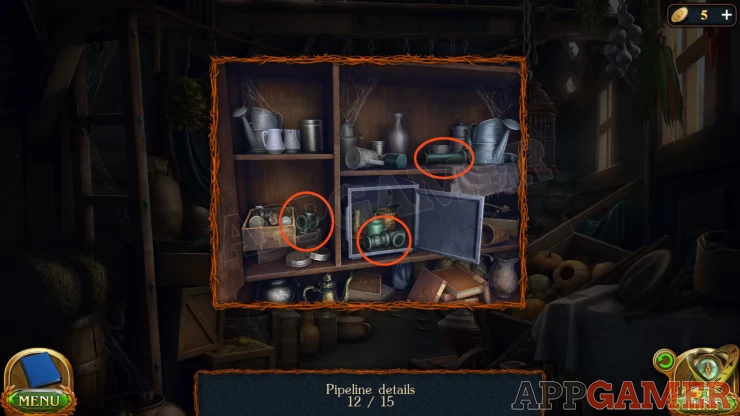
Barn Hidden Object Scene
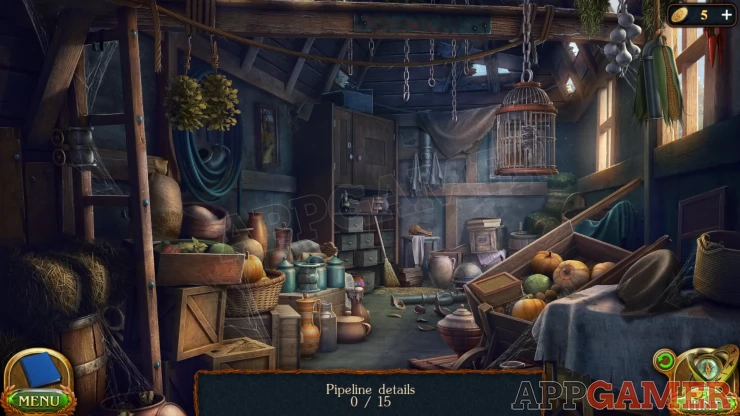
For this scene you need to locate 15 Pipeline Details. Look for pipes and pipe connector pieces.
There are cabinets and other ares to look in. Some will require you to find a key to open doors or look inside other objects.
Solutions:
Main scene - 6 items
Show
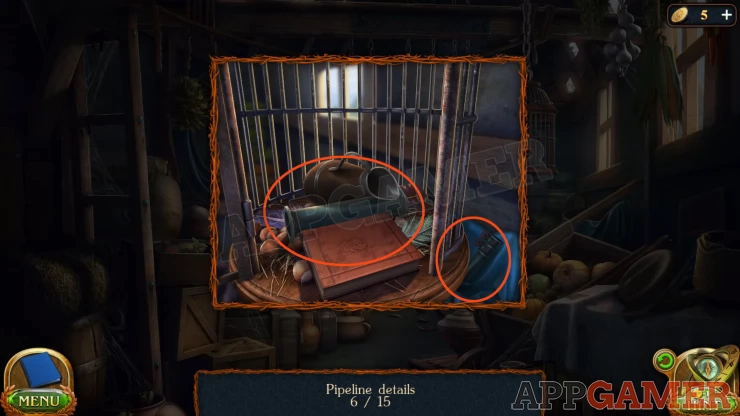
View the birdcage on the top right. remove the chain to open the door and move the items inside. 2 items
Show
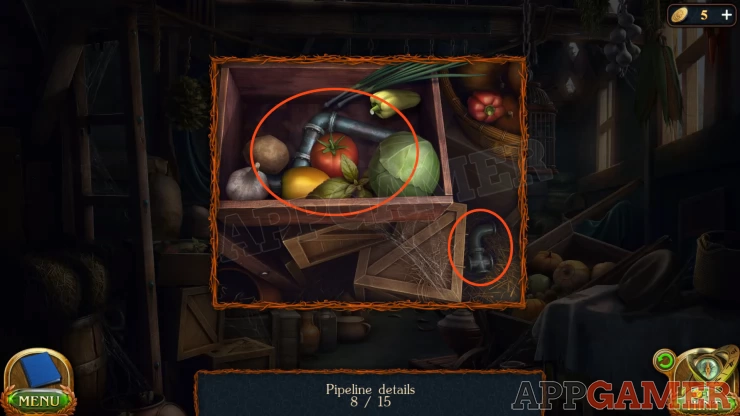
Vegetable box on the left look under the vegetables. 2 items
Show
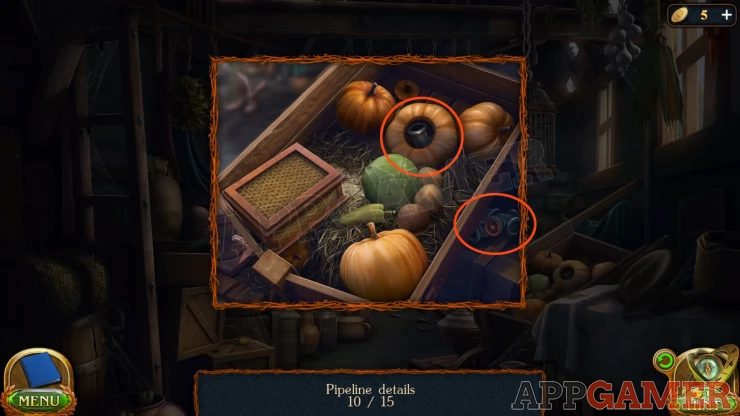
Vegetable box on the right. Look inside the pumpkin. 2 items
Show
Open the cabinet at the back of the room. Find a key under a book on the bottom right to open the door on the left.
Then take a wheel from inside and open the metal safe. 3 items
Show
You now have the plumbing parts.
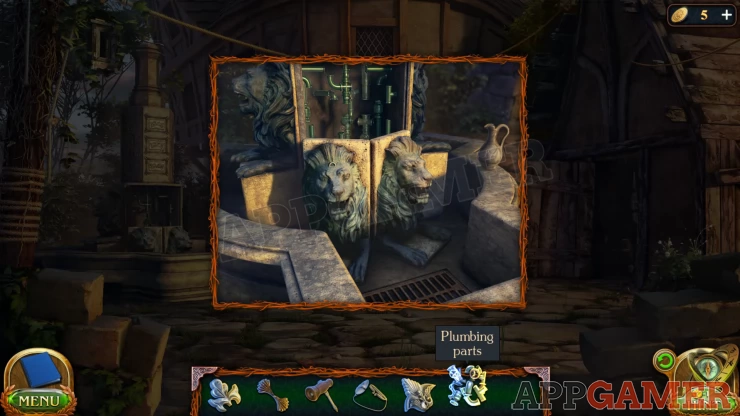
Return to the fountain and add the parts to it. The cover will close. Then tap on the top section of the fountain and on the panel there to open it and find the pipe puzzle.
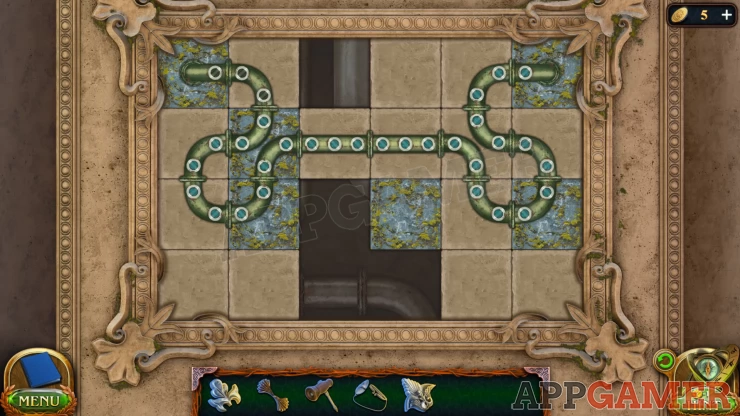
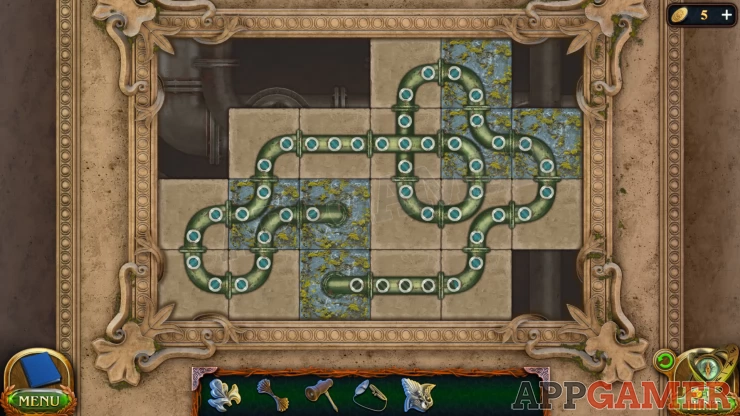
Pipeline Puzzle
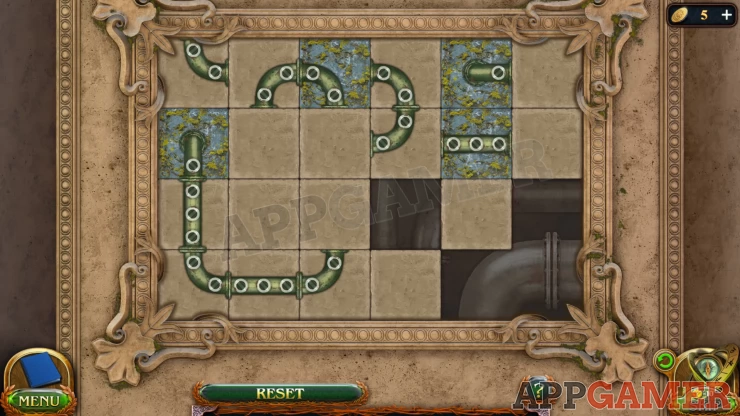
- Rearrange the blocks with the pipes on them to make a single pipe line from the left to the top right.
- Once you complete the first one there are 2 more levels to complete with more complicated layouts.
- Each level can be different for your game.
Solutions: These were my puzzle layouts, yours may vary.Show
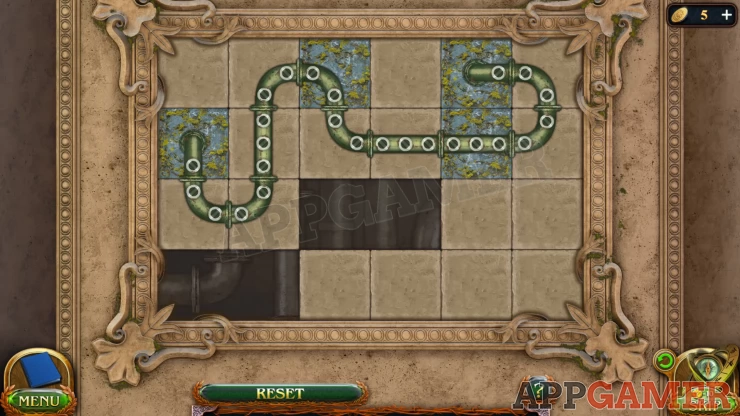
Once the water is flowing the key will fall out and into the water at the base. Look inside.
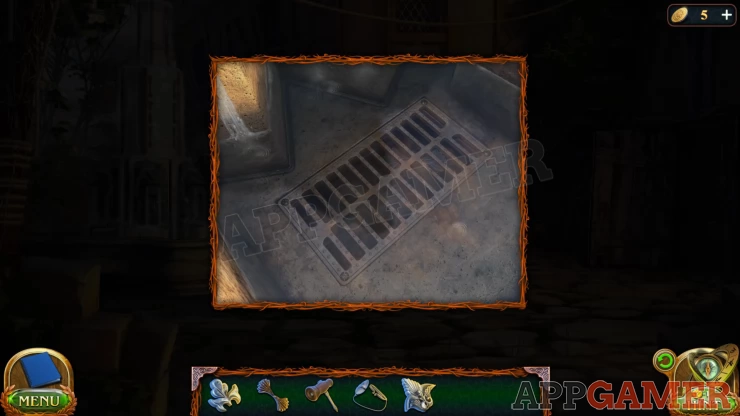
Use the screwdriver to open the drain cover and then you can collect the second Shelter Key from inside it. This completes the task.
Return to the bottom of the cliff where the shelter is and you can now view the shelter door on the left.
Use the 2 shelter keys to open it. The go inside the shelter.
Morphing Object: lantern hanging from a wooden post on the top left.
Collection Item: Gear in the shadows at the back on the right of the shelter.
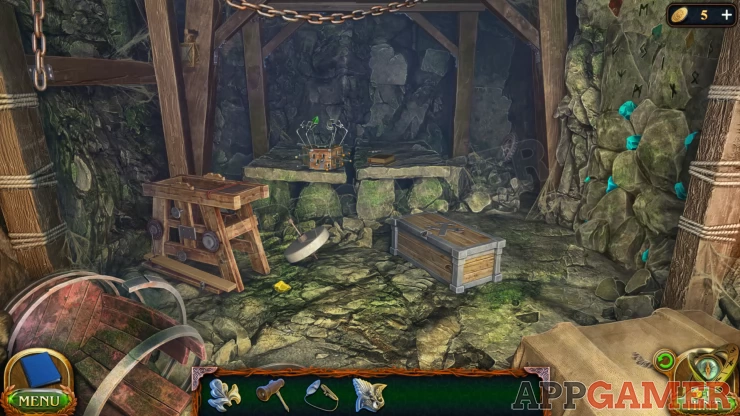
New Task: Experiment
View the stone table in the center of the room. Collect the Toolset Key and another Iron Flower. Then open the book on the right. Then check the paper that is under the book to see a clue.
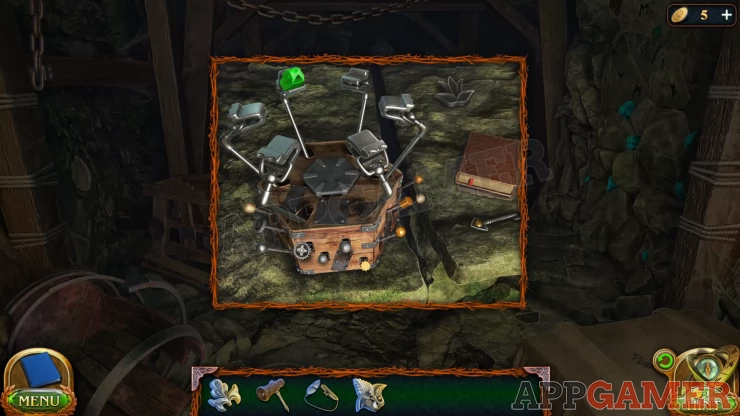
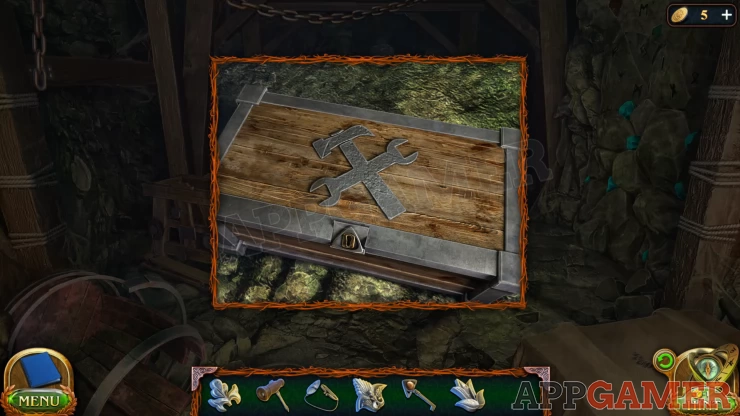
Next view the wooden toolbox on the ground. Use the key to open it.
Manuscript: in the toolbox.
Collect also a Gear transmitter and a Hammer.
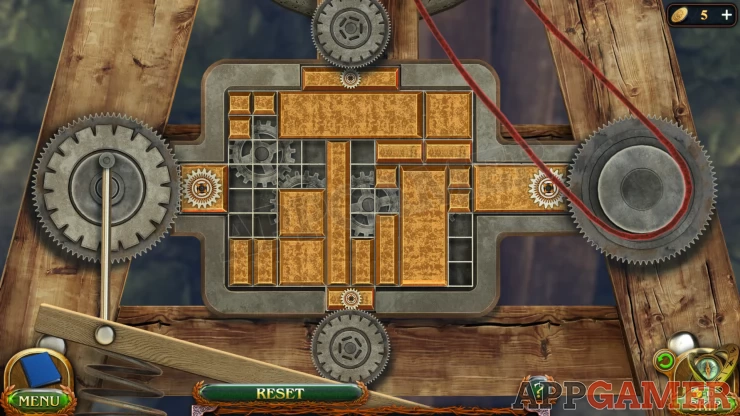
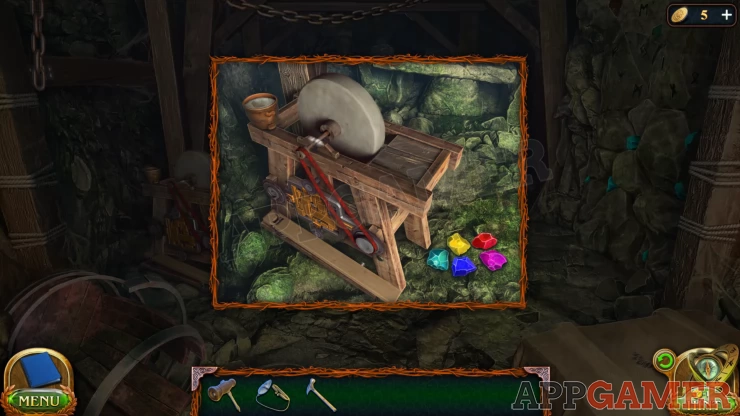
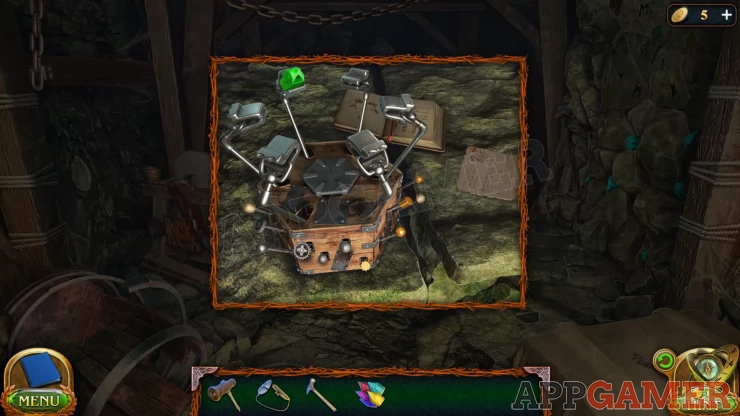
Next view the grind wheel frame on the left.
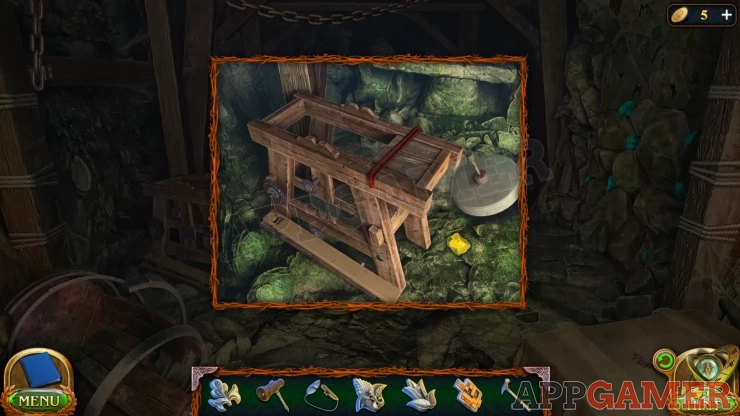
Tap the wheel on the floor to place it on the frame and then the red strap to place it as well. Then place the gear transmitter on the side and tap it to start a puzzle
Gear Puzzle
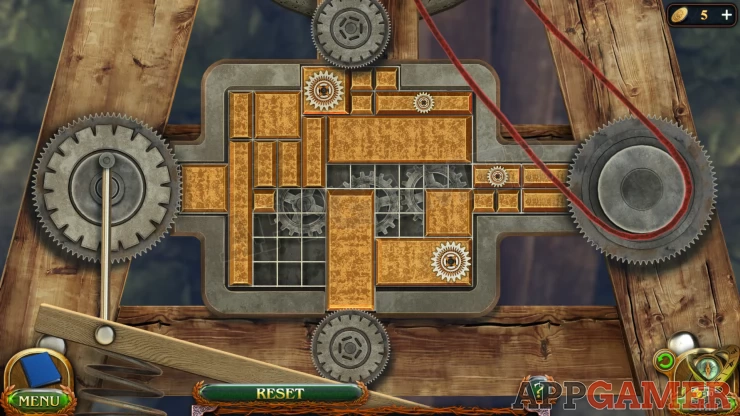
- There are 4 large gears on the sides of the puzzle and 4 small ones on the blocks in the middle.
- Move the blocks around to position the small gears next to the large ones at the top, bottom, left and right.
- Each of the small gear blocks will only fit next to one of the large fixed gears.
Solution: Show
Once done tap the foot pedal to start the grinder, but it will need lubricant.
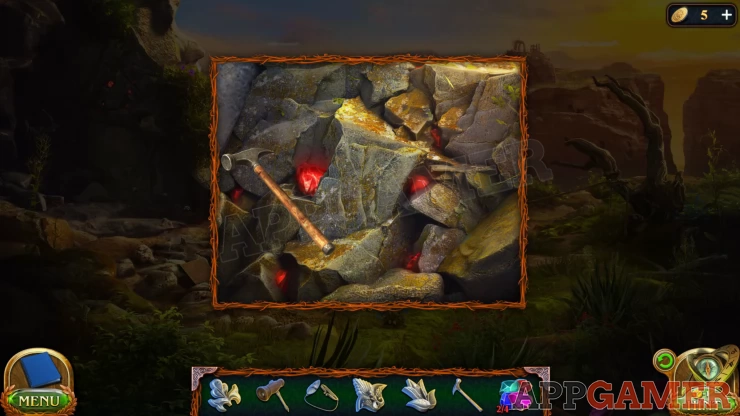
Next view the right wall with the turquoise gems in it.
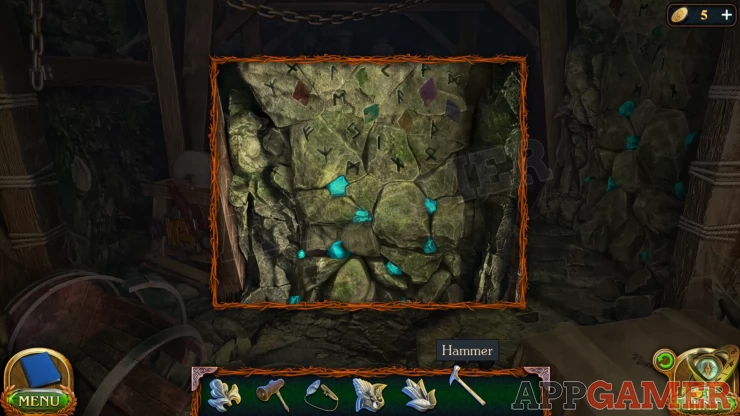
Use the hammer here to collect a Nuggets (1 of 4).
Now travel to the start scene with the camp in the center. Tap inside the bag again to find a wrapped piece of meat, open this.
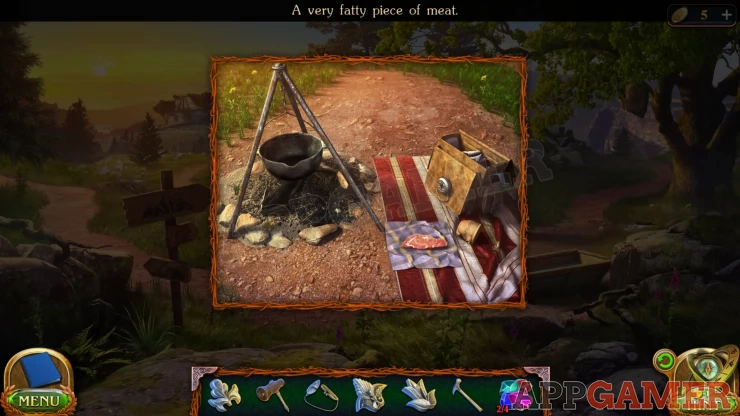
Now place the meat in the cooking pot. You will need wood to start the fire.
Use the right path to go to the top of the cliff. Collect some brushwood from near the tree on the right.

While you are here view the rock on the left with the red gems in it. Use the hammer to collect a Nuggets (2 of 4)
Go back and place this wood on the camp fire, use the flint to try to start it but it will now tell you that you need a catalyst.
Return to the bottom of the cliff and view the rock on the right with the purple gems in it. Use the hammer to collect another Nuggets (3 of 4).
Then view the body on the ground again. You can now collect the Flask with alcohol.
Go back to the camp and add the flask to the fire, then use the Flint to light it.
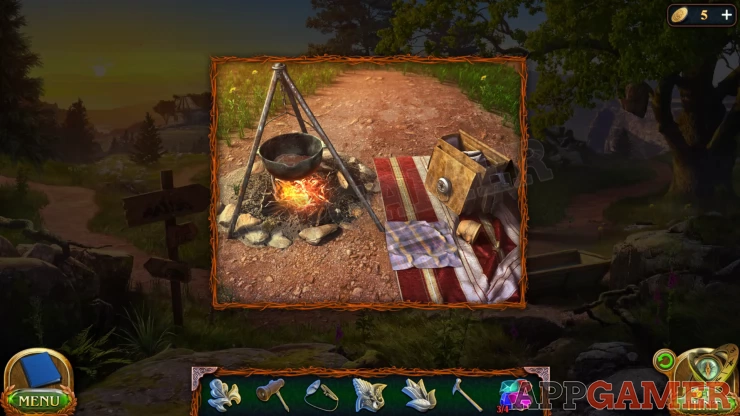
When the meat cooks tap on a small cup by the bag on the right then collect the Fat from the cooking pot. Next view the stone altar that is to the right of the camp.
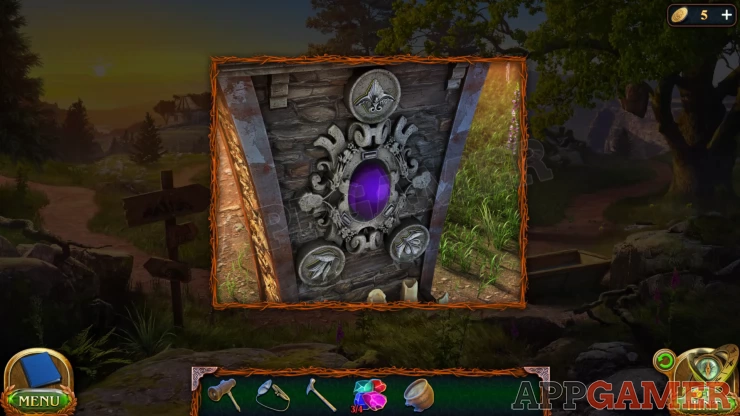
Add the 3 Iron flower items that you have to the slots. This will release the center gem. Collect the Nuggets (4 of 4)
Return to the Shelter and view the Grind stone again. Add the Fat to it so that it runs smoothly. Now place the 4 nuggets on the floor with the yellow one that is already there.
You can then tap them to use them on the stone. You then collect the Crystals.
View the stone table again and add the crystals to the device that is there. This completes a task.
The game proceeds to a cut scene and we will continue the guide in Chapter 1 Part 2.