Another Shadow Walkthrough and Guide
Another Shadow Guide
Welcome to our Another Shadow walkthrough, another creative escape room mystery story game from Dark Dome. It features the similar story style and some recurring themes from previous games such as Nowhere House and The Ghost Case.
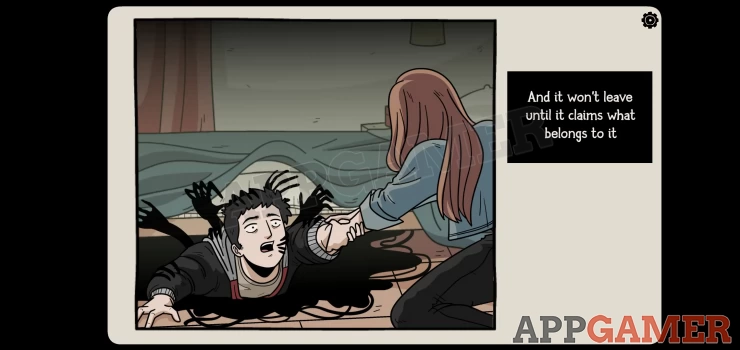
In Another Shadow you will have the option to switch between 2 characters that inhabit the same house but in 2 dimensions. Bastian has been taken to a dark dimension and Carissa remains in the normal world, start playing and help both of these characters beat the curse and go back home. As you find clues and unlock areas in 1 dimension it will affect the other and let you move forward.
Follow through our complete guide to get hints and solutions to all of the games puzzles.
Another Shadow Walkthrough Tips
- On the left of your inventory list will be a button to switch from one character to the other. This takes you from the normal world (Carissa) to the dark dimension that Bastian has been taken to,
- Actions in one world can affect the other so make sure to switch between them and check for opened doors and new items to interact with.
- The game is full of complex puzzles with clues to codes and combinations hidden in the house. As with previous Dark Dome games the codes and symbols that you need will vary with each play though.
- We will give an explanation of the methods for solving each puzzle so that if your game requires a different code you will understand how to find it.
- If you have any questions for any stage of the game please head to the Answers Page to ask there.
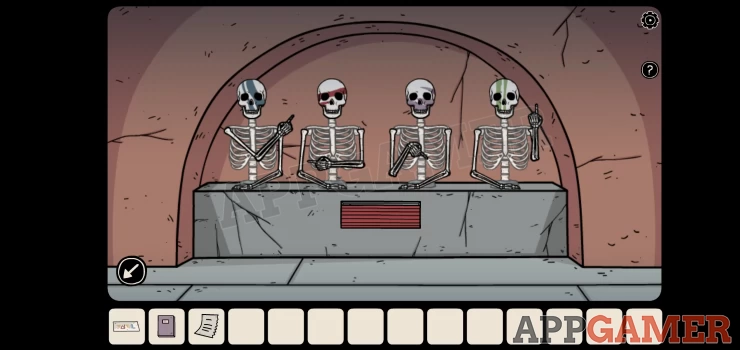
Another Shadow Walkthrough
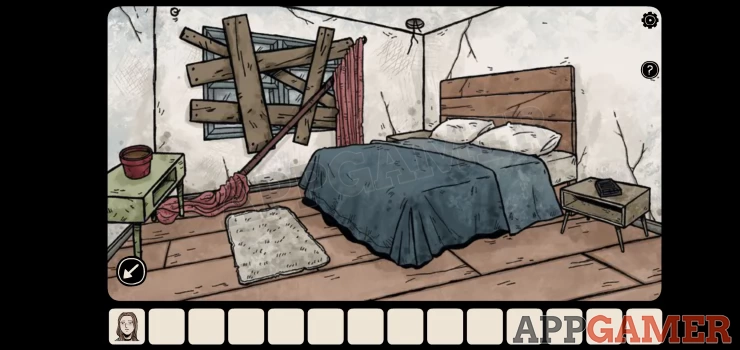
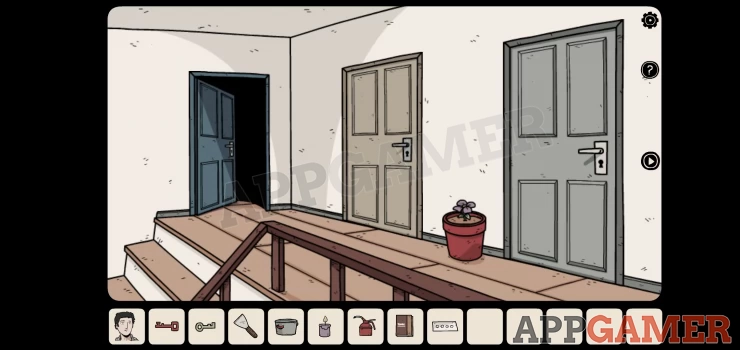
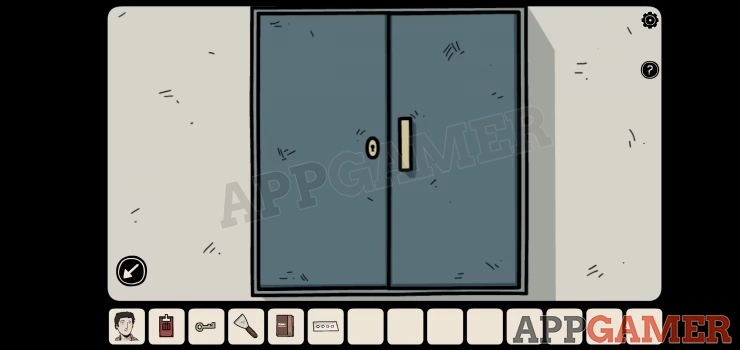
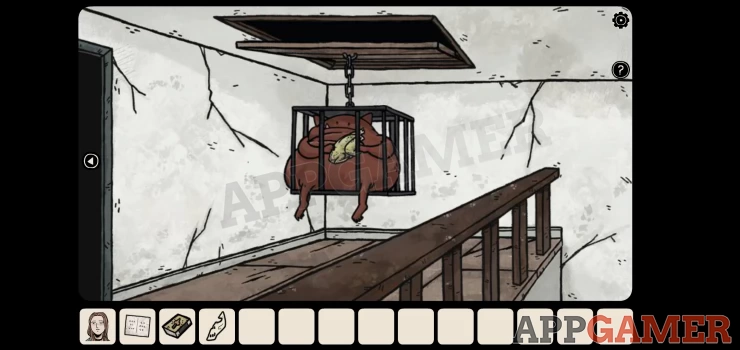
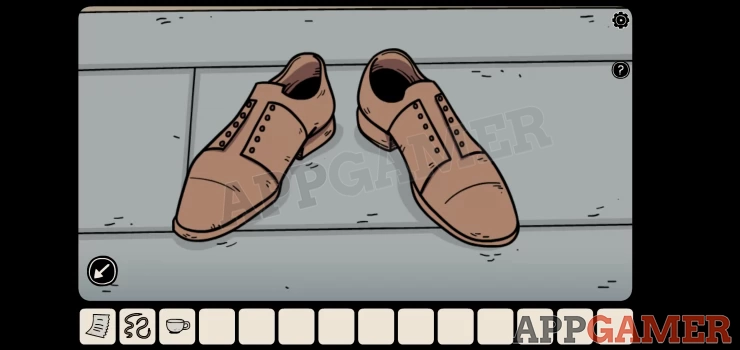
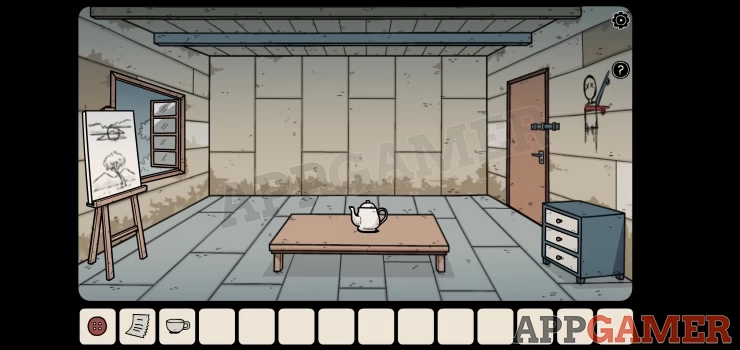
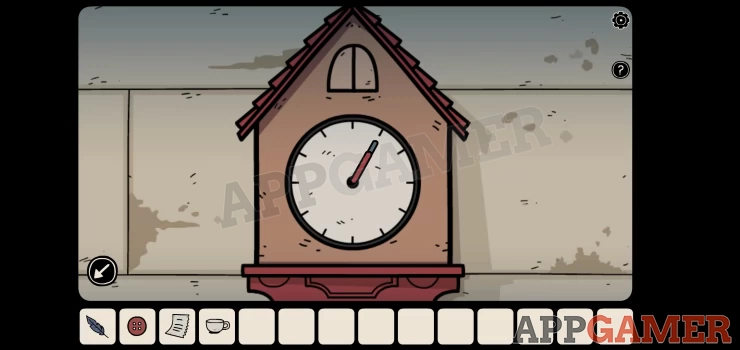
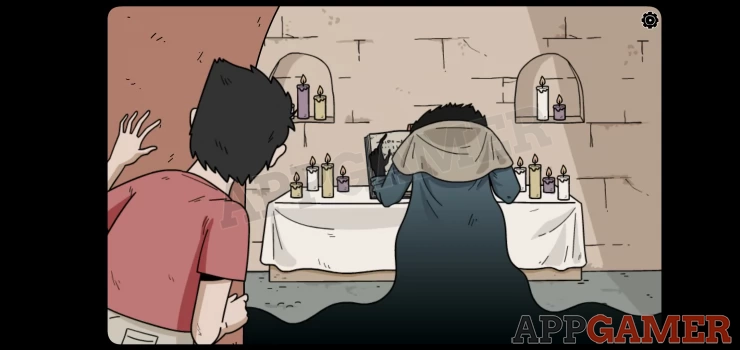
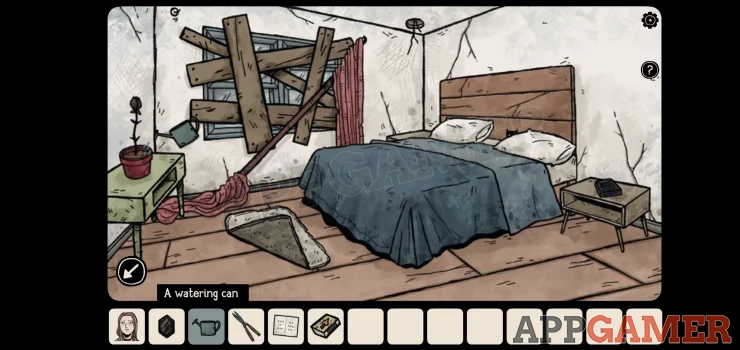
After the opening introduction scenes you find yourself in the bedroom of the house, this is the normal world and you are here as Carissa.
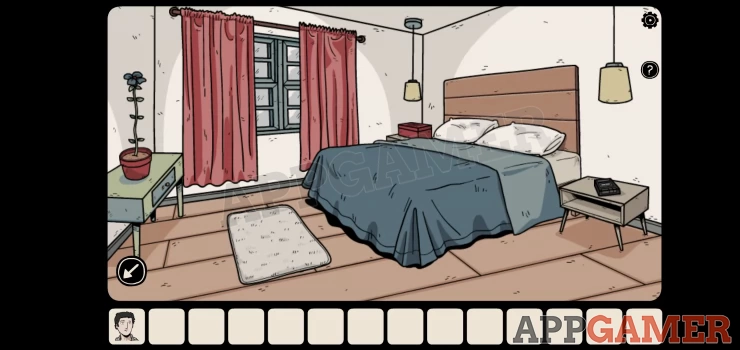
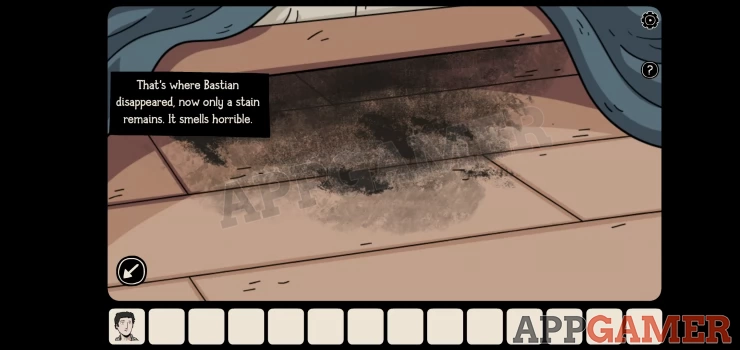
You can tap to look under the bed to see the dark stain on the floor where Bastian disappeared.
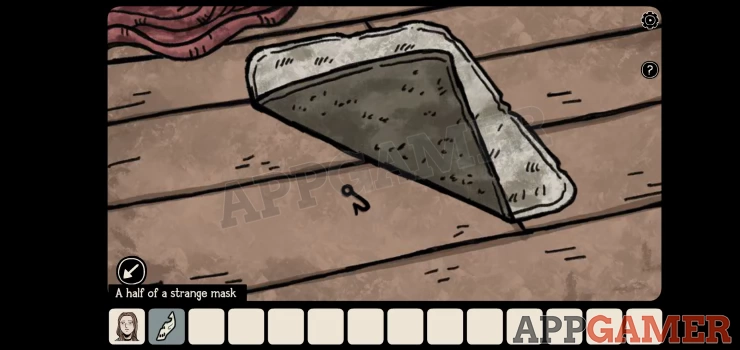
Tap the icon of Bastian in the lower left to be transported to the dark world and play as Bastian.
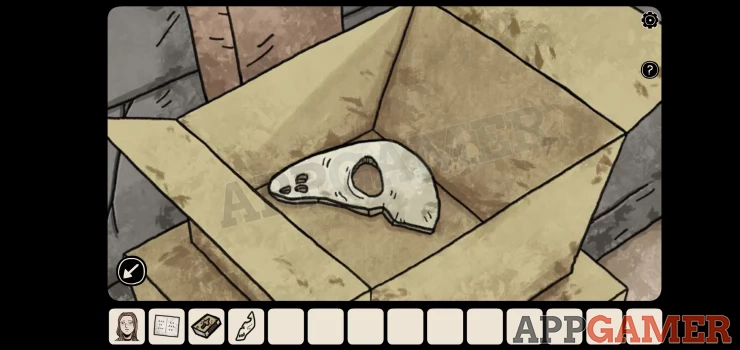
Look again under the bed here and you will be able to collect a 'Half of a strange mask'.

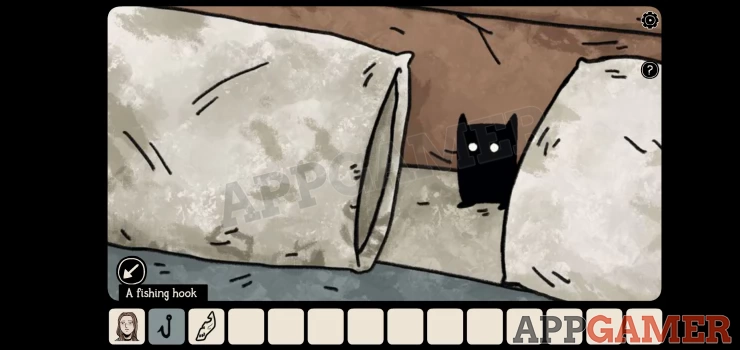
Then tap the rug at the end of the bed to look under that and you can collect a 'Fishing Hook'.
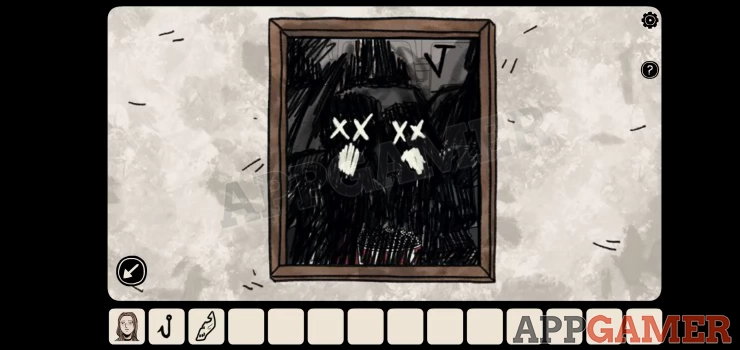
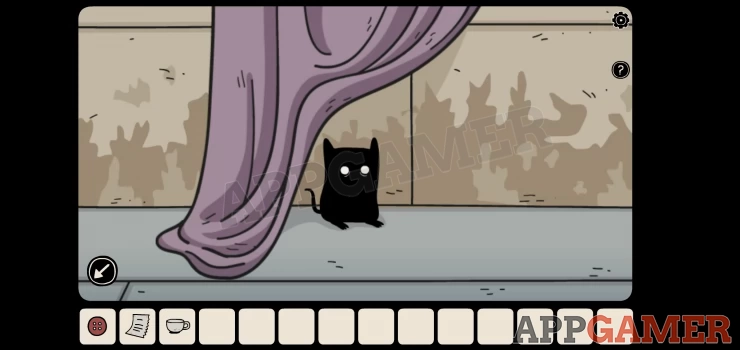
Shadow Collectible: Tap on the pillows on the bed to view them and then again to move them apart and find the small black cat creature. There are 9 of these to find in the game and you can check your progress in the settings screen.
Now tap the icon of Carissa to change back to the normal world and then use the back arrow on the bottom left to back out on to a landing.
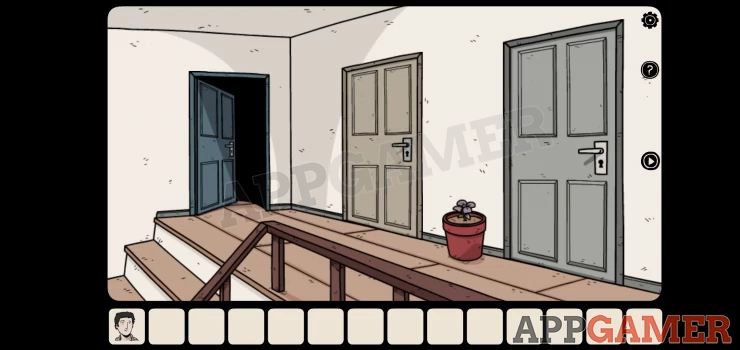
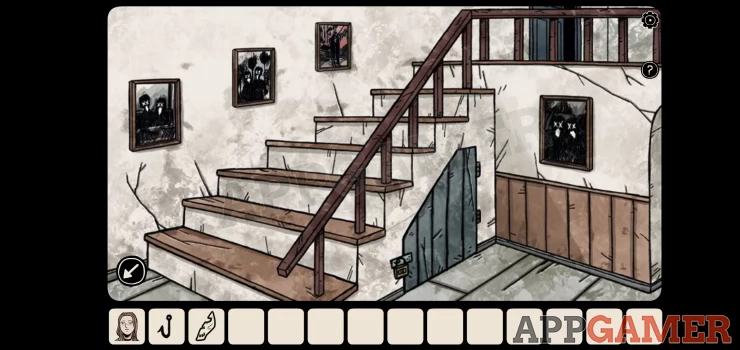
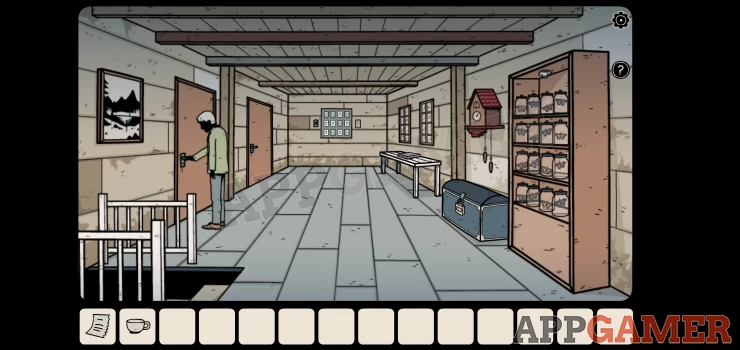
Tap the stairs on the bottom left to go down. Notice the photos on the wall. Then back up again to the front room.
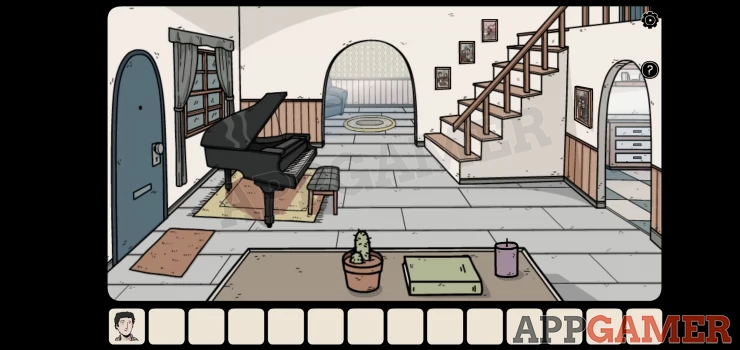
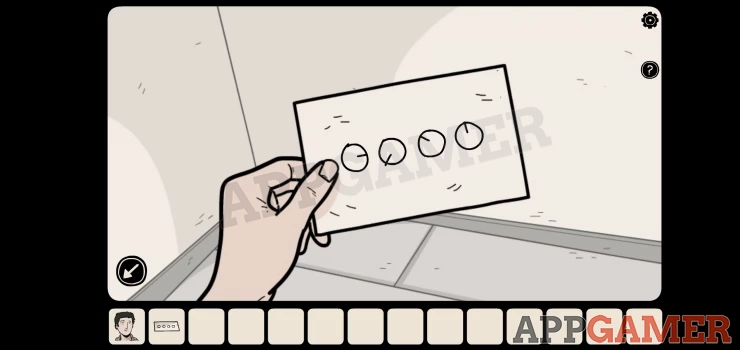
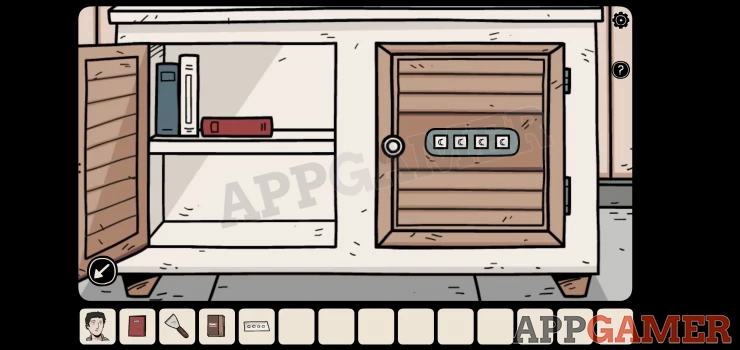
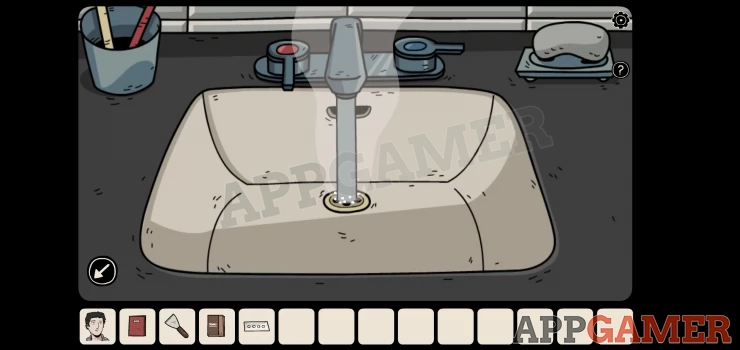
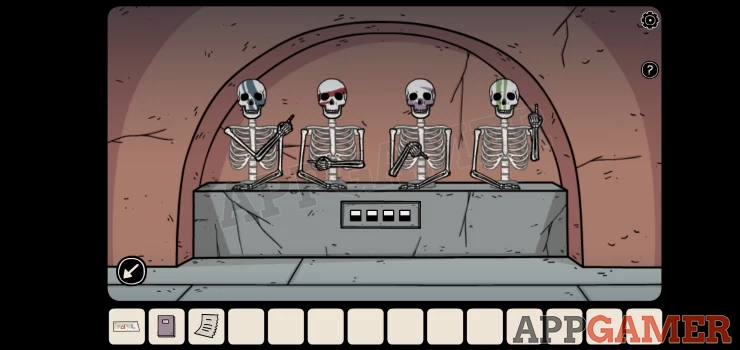
Now tap the arch in the center to move through to a living room with a phone on the right. View the phone on the table.
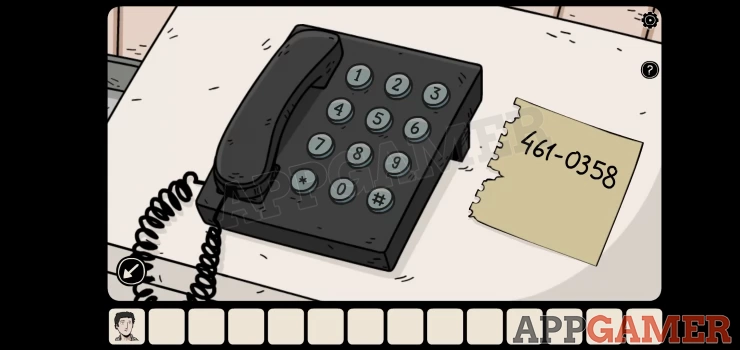
Tap the phone to lift the receiver and then dial the number shown on the paper. This will make a call to your brother to ask for help. After you leave the message you will open the phone and find a paper with a clue, collect this.
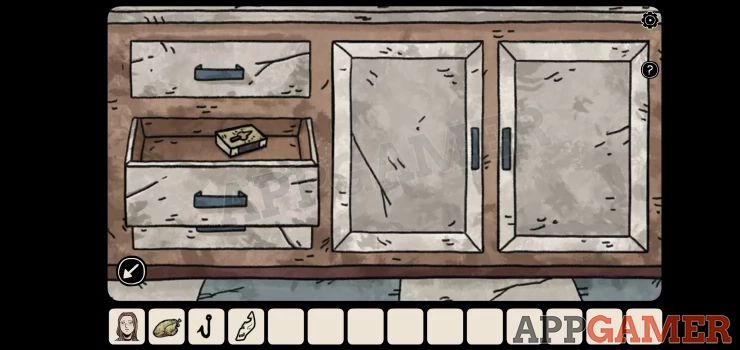
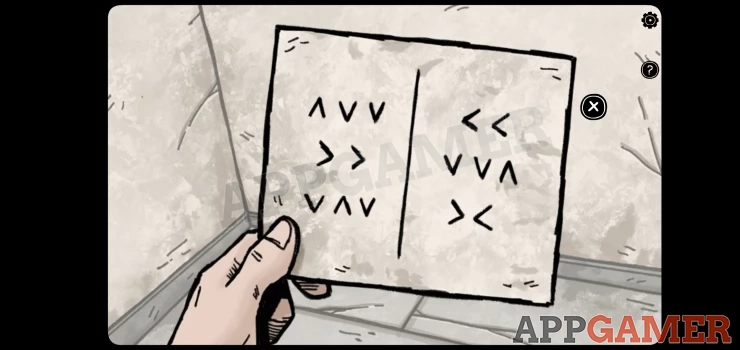
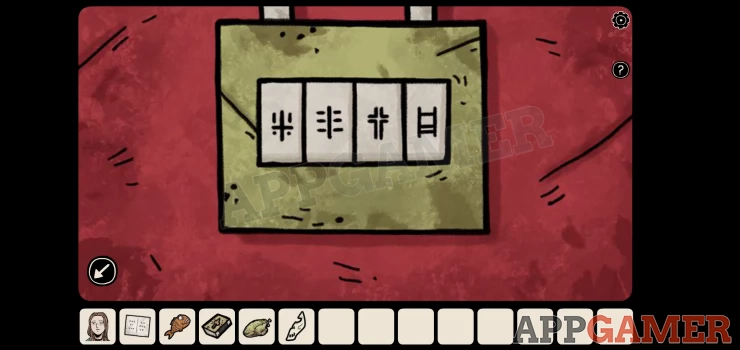
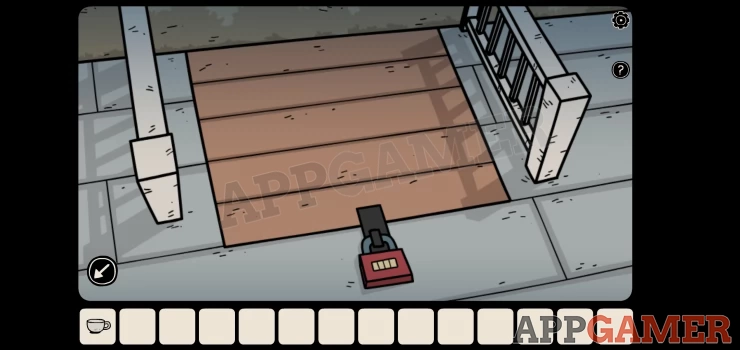
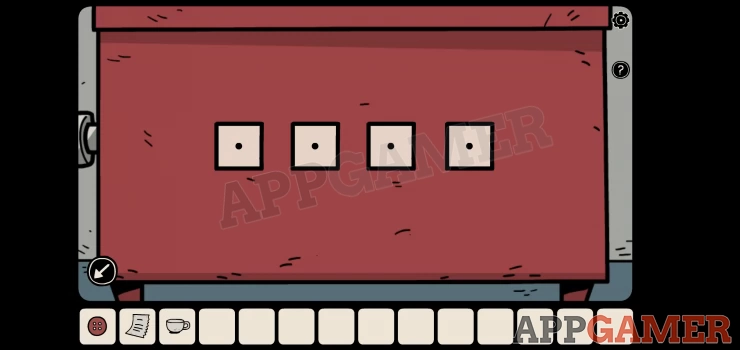
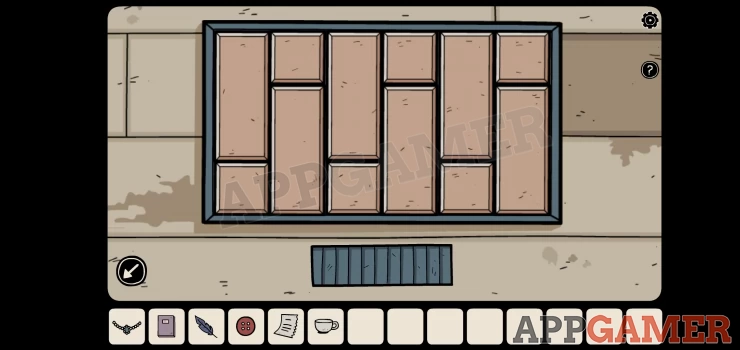
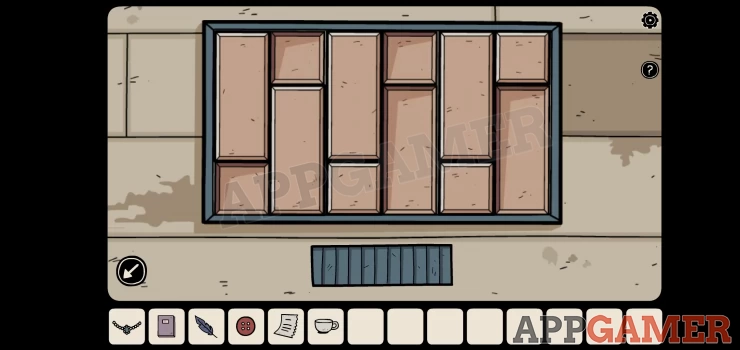
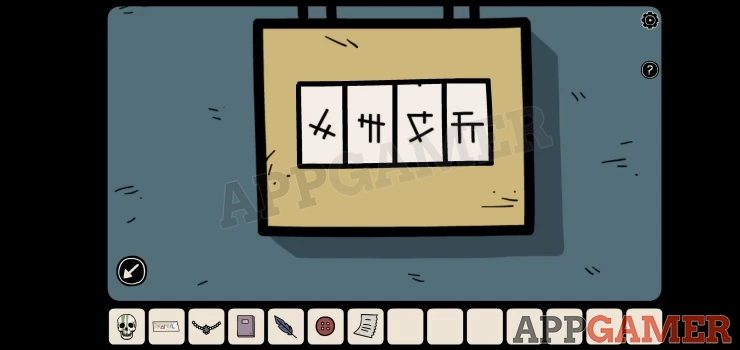
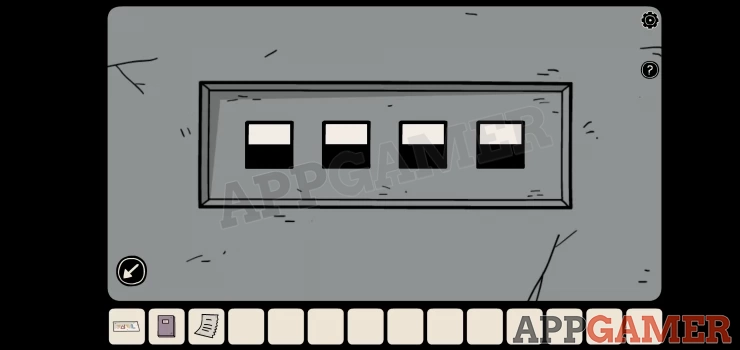
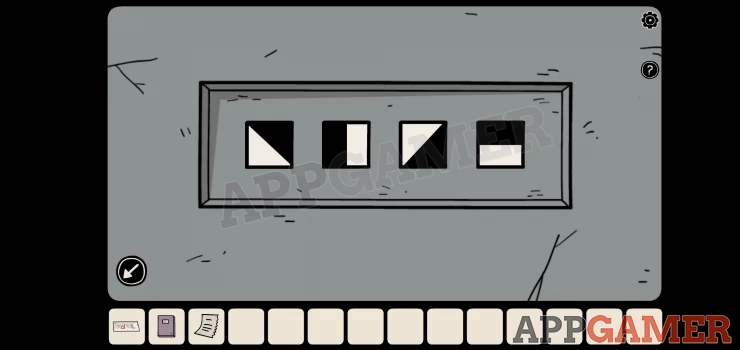
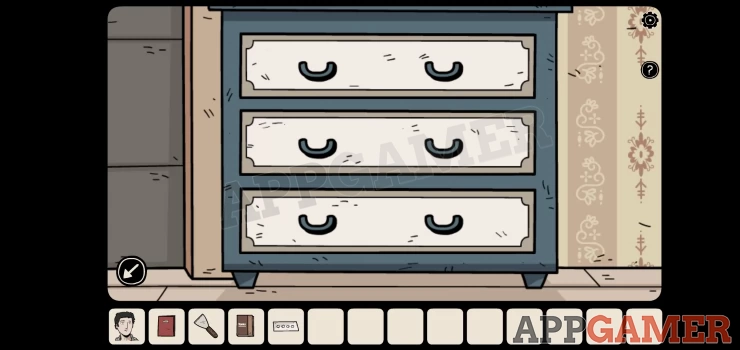
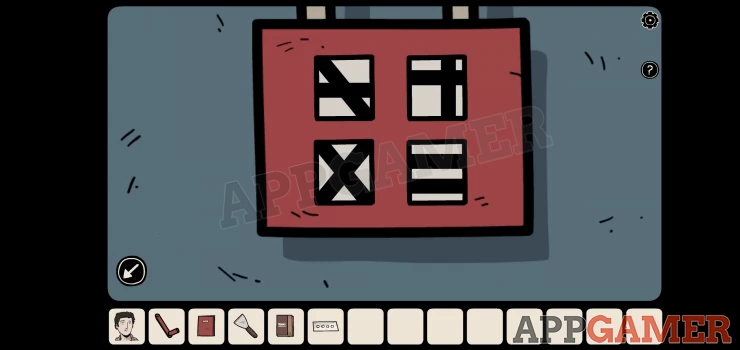
Now view the cabinet below the phone to see 2 doors, the door on the left has 4 dials, check the paper for the clue.

The clue may have different positions for you so set the dials on the door to the ones you see on the paper in your game.
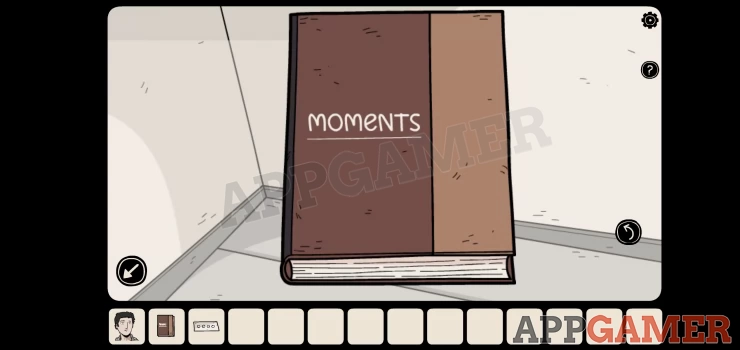
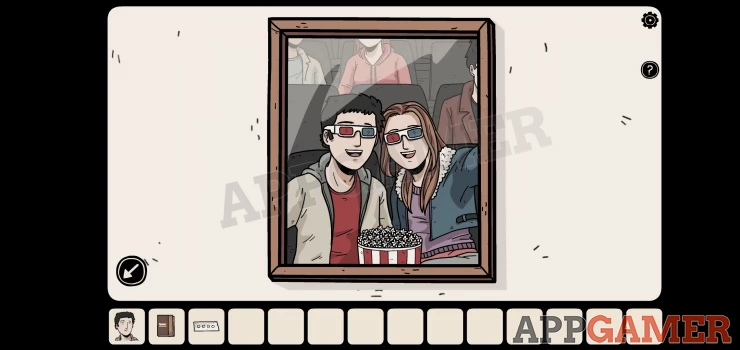
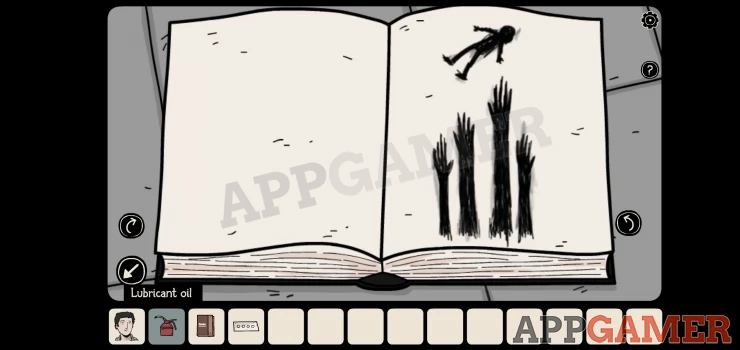
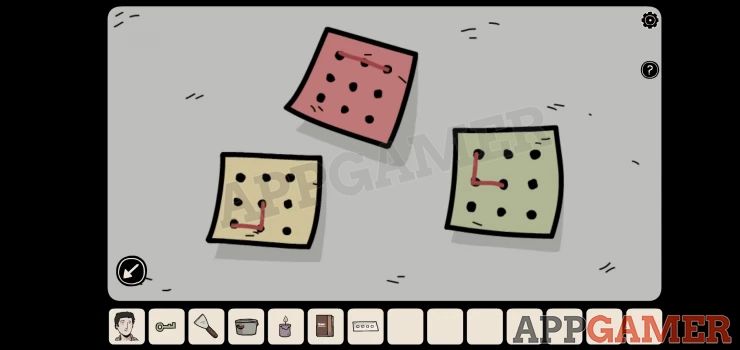
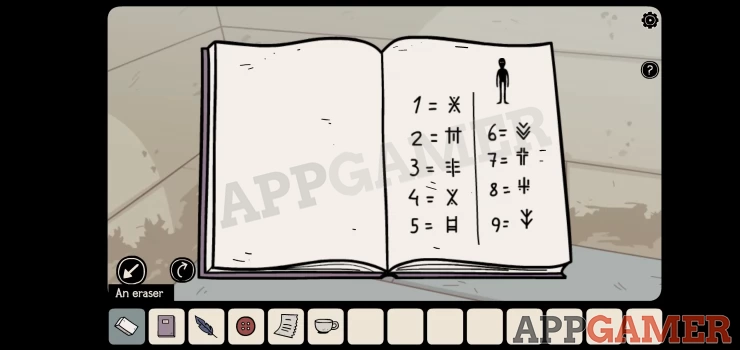
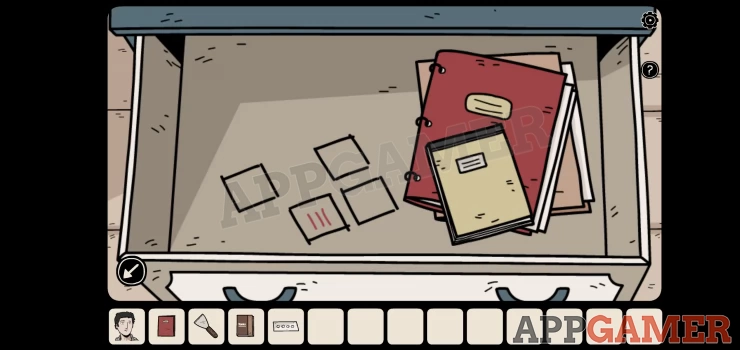
When the door opens collect the large brown book. Then view this in your inventory. There are 4 pages that you can flip through to see clues. On each page is an item. For me the order was 3D glasses, Balloon, Pizza, Shells.
Cupboard under the stairs
Back up and look at the stairs again. There are 4 pictures on the walls and if you view them you will see that they are associated with the 4 items. Note the positions of the 4 pictures in the order of the clues.
- 3D Glasses = Movies
- Balloon = Balloons
- Pizza Logo = Pizza
- Shells = Beach
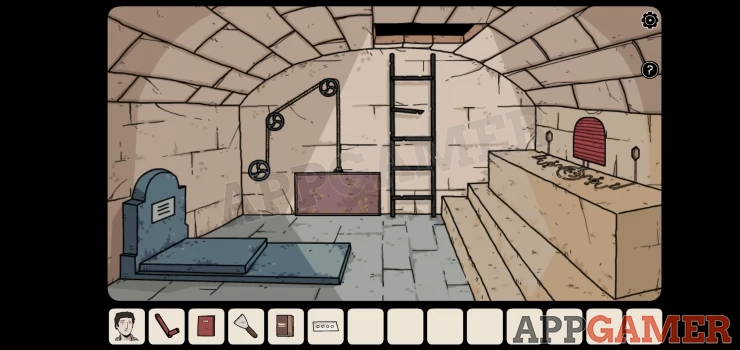
Dark World
Now change to the Dark World. Back out to the same view of the stairs.
Examine the same 4 photos on the wall in the same order, they will look different.
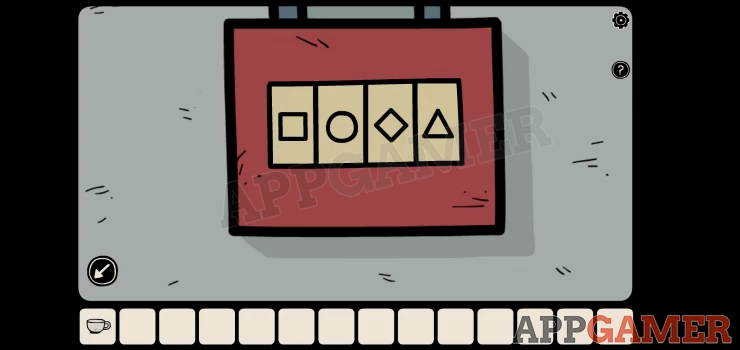
On each photo is a symbol, make a note of these that you see. They will be different for each game. Then view the door to the cupboard under the stairs there is a padlock with a code.
Use the 4 symbols that you have from the photos to open it. This was my solution:

Once done there will be a cut scene of opening the door. Look inside the opened cupboard and collect the Rag Doll.
Normal World
Switch to the Normal World and go to the same location to see the opened hole for the cupboard. Look inside.
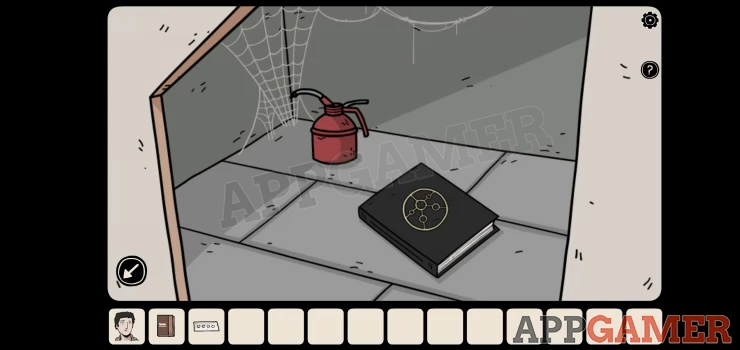
Collect the Lubricant Oil and then look inside the book that is there for clues. You can turn the pages to see 3 clues.
Dark World
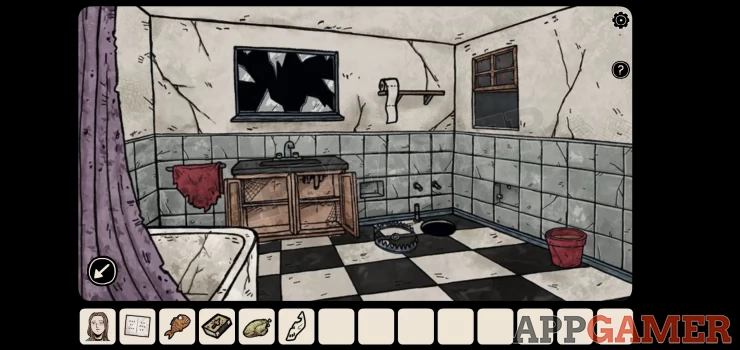
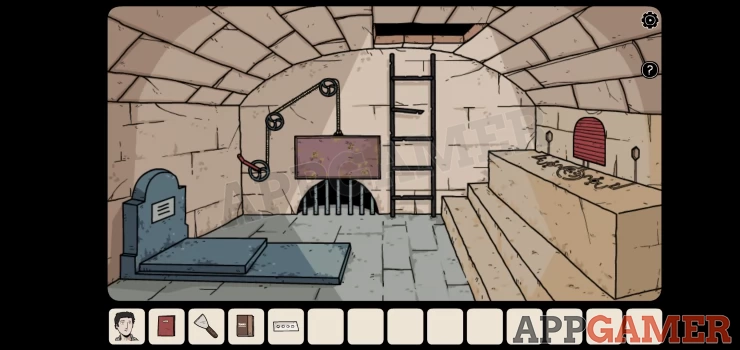
View the doorway to the kitchen on the right of the room to see some ghostly hands blocking your path.
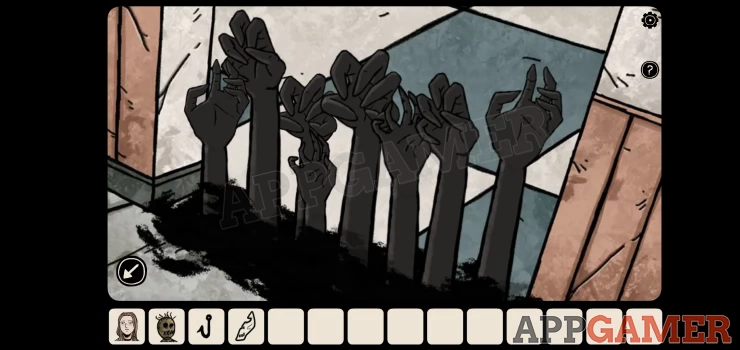
Follow a clue from the book and use the rag doll on the hands, this will remove them and let you pass into the kitchen.
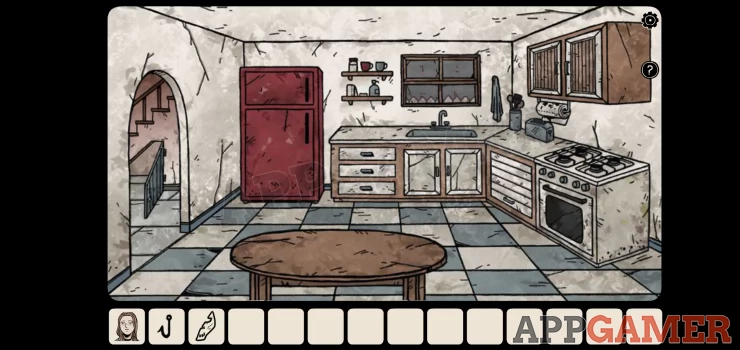
The Kitchen
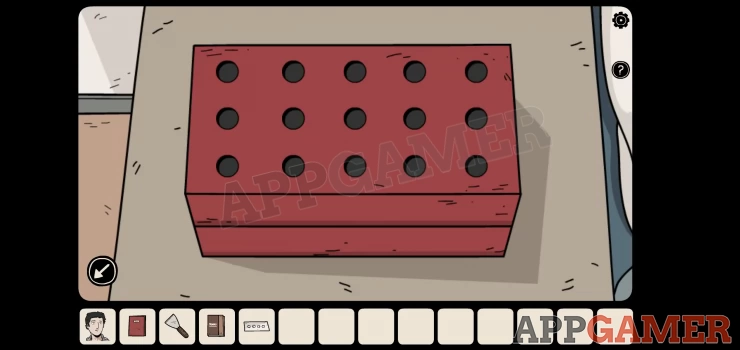
First look in the large red fridge, at the bottom is a Rotten Chicken that you can collect.
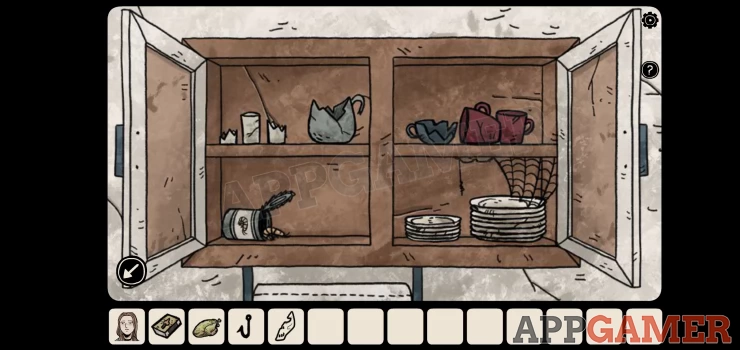
Next view the cupboard under the sink, open the drawers on the left to find some matches.
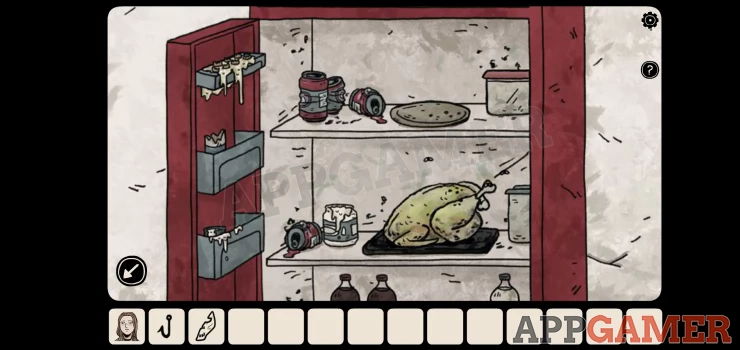
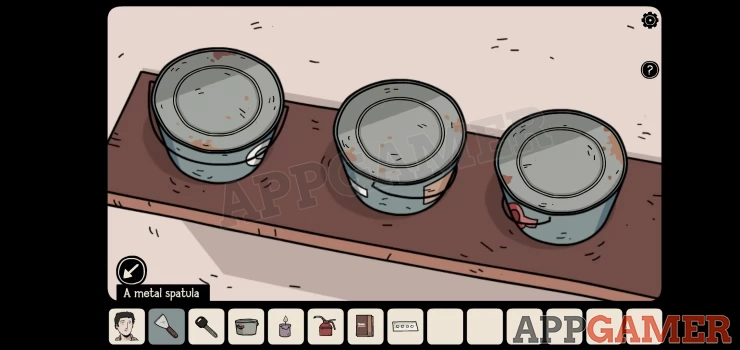
Now view the cupboard on the right wall above the stove. Open the doors and then you can collect a Shrimp from the can on the left.
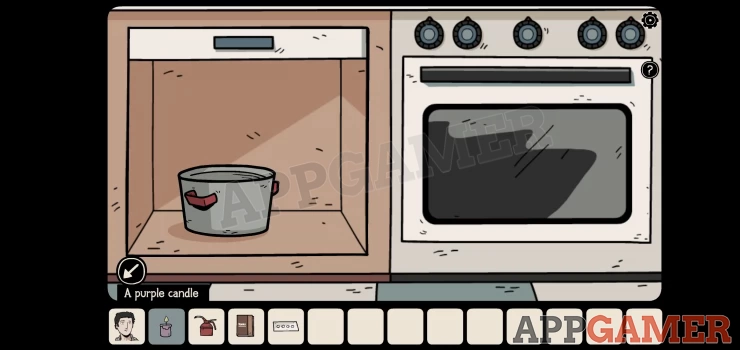
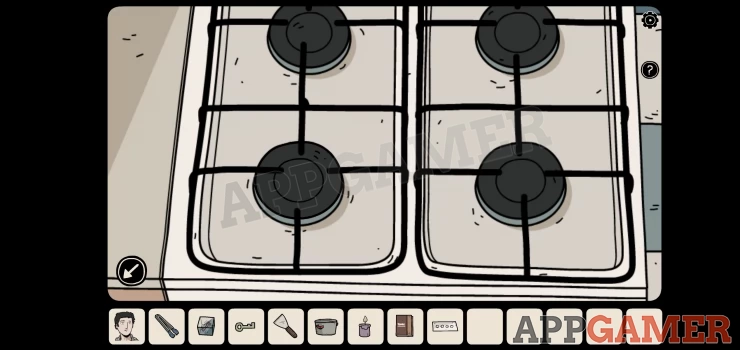
Now view the stove below it.

Shadow Collectible: Open the door to the left and then tap to lift the pot to find the black cat creature.
Open the oven door on the right and look inside to see some burnt cookies.
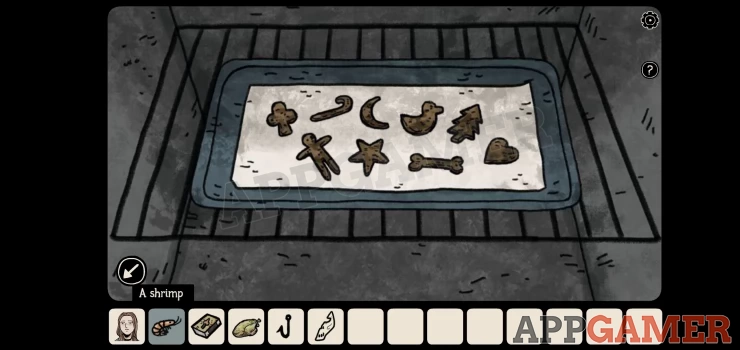
You can tap each of these to remove them and you will find that 4 of them have numbers underneath. This gives you an order of shapes. If you do not remember the shapes that the numbers were under then you can find them again in the Normal World.
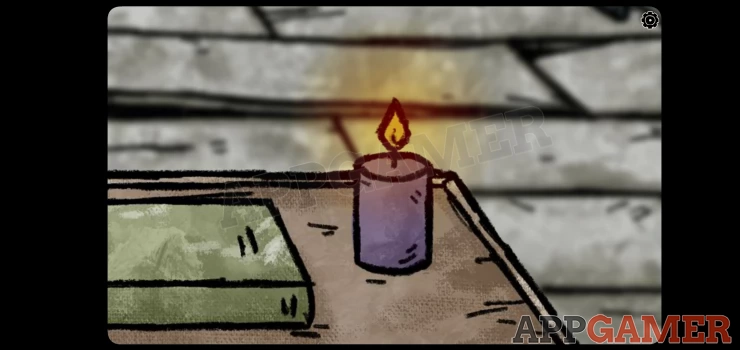
Exit from the kitchen to the front room. Use the matches on the purple candle on the table to light it. This also lights the candle in the normal world.
Normal World
Change to the Normal World. Collect the lit purple candle. Go into the kitchen and view the stove on the right again. Open the door on the left and collect the pot.
Find the Car Key
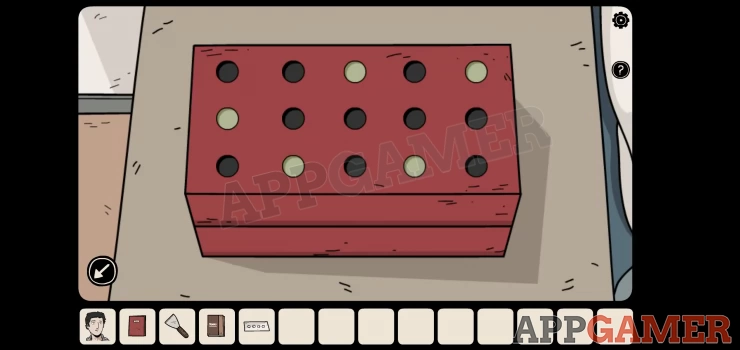
You can then open the oven door on the left and look inside the see the real world cookies to remember the locations. Compare these with the dark world cookie tray for the numbers.
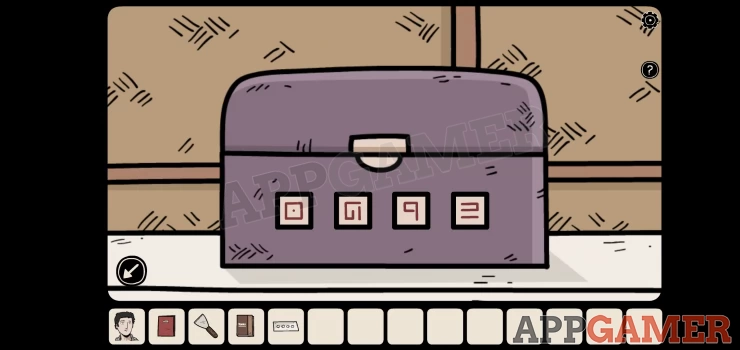
Now view a box on the kitchen table.
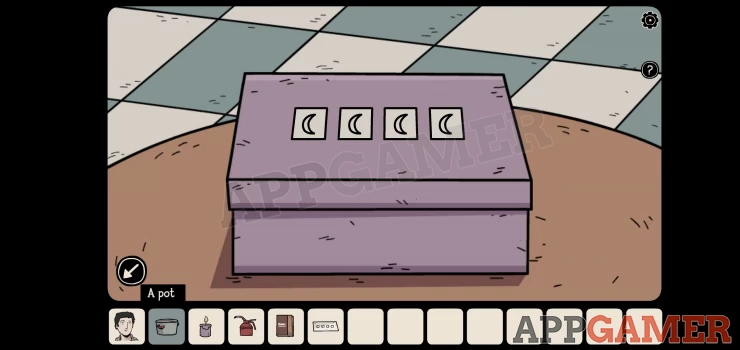
Use the 4 shapes from the cookies to set the combination and open the box My code is shown below.

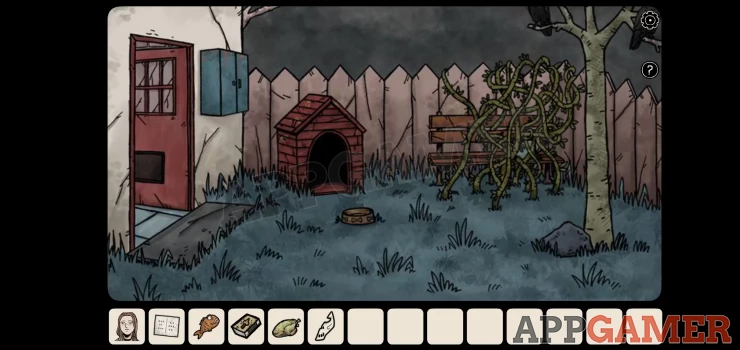
Collect a Car Key. Exit the kitchen and go through to the sitting area again with the telephone. First open the door on the right and go out into the garden.

Tap the bottom of the tree on the right to look behind it and collect a metal spatula.
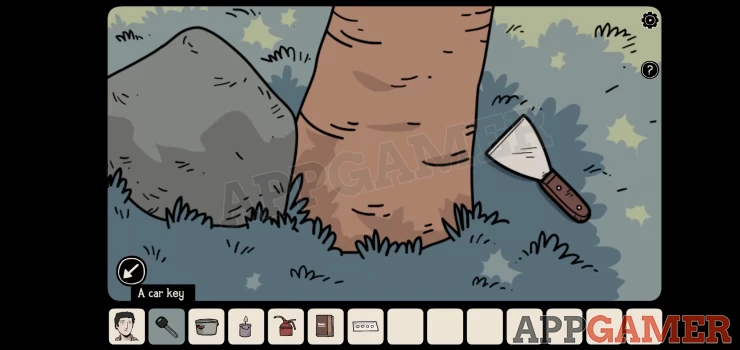
Go back inside and now open the door on the left to go through to a garage.
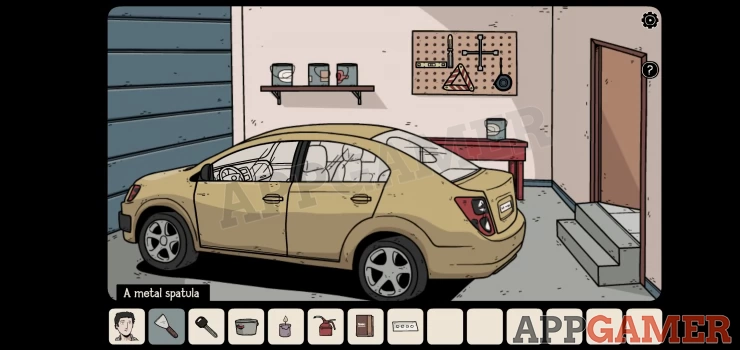
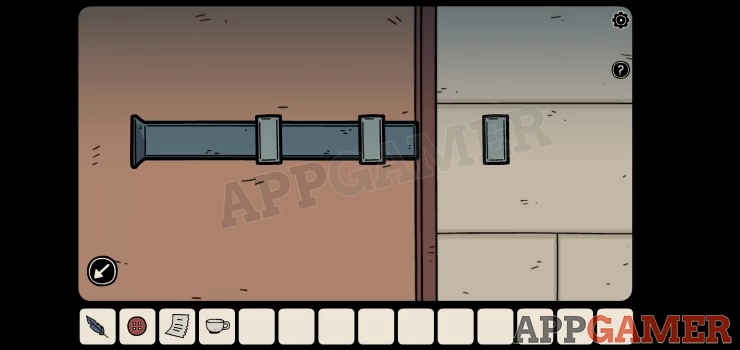
First, notice the tool board on the top right. Then view the 3 paint cans on the shelf on the wall.
Use the metal spatula on these to open then and then you can collect a Small Key. Now use the car key on the car door. Open it and look inside.
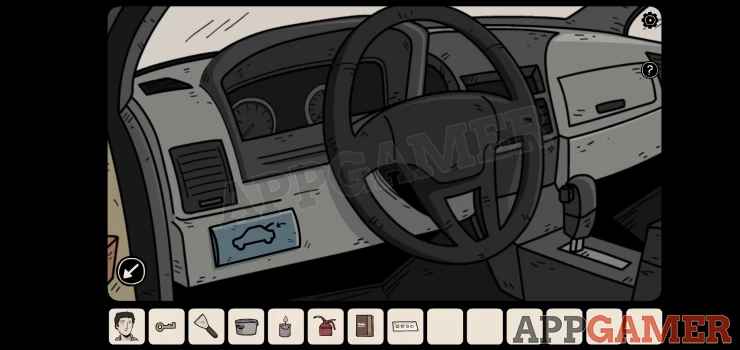
Tap the Blue button to open the trunk and you will see that the trunk also opens in the Dark World.
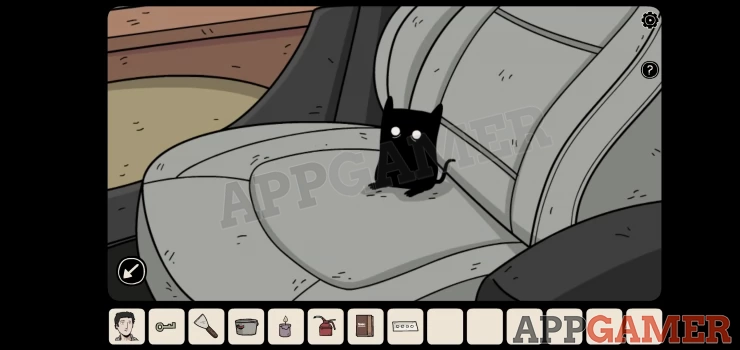
Shadow Collectible: Before exiting the car tap to the right side of the steering wheel to look to the right and find another black cat.
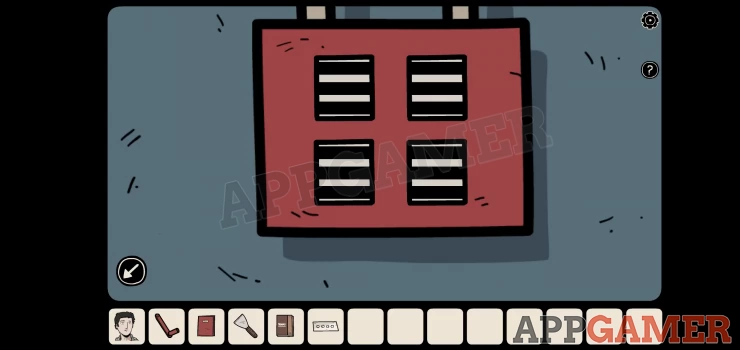
Car Trunk Box
Look in the trunk to see a box. This require 4 shapes to open it.
Hint: The clue is on the wall.

Solution: On he tool board you will see 4 shapes laid out copy these. These can vary, mine were as below.Show
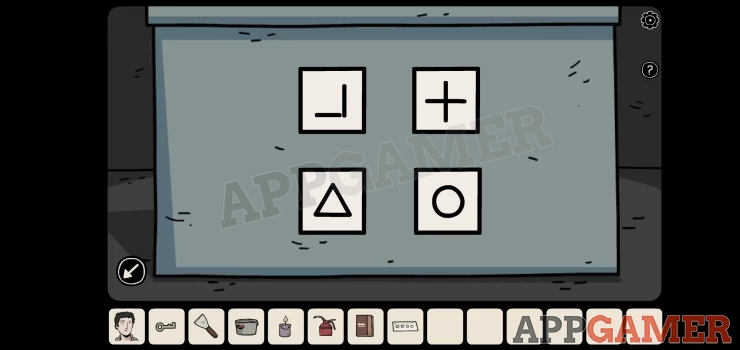
Collect the red key.
Dark World
Move through to the garage as well, you will not be able to go to the garden yet as there is the ghostly figure of Bastian's dead brother blocking the door.
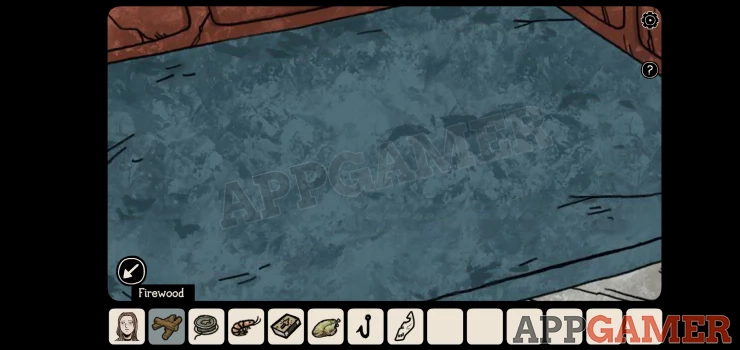
Look in the car Trunk and collect from it a Fishing Line and Firewood.

Catch a Fish
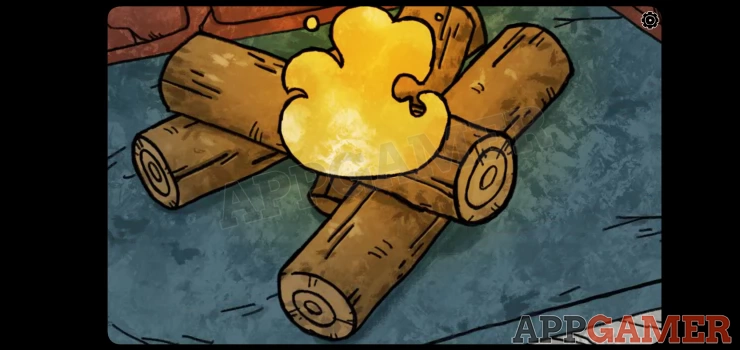
Go back through the door to the sitting area and then view the open fireplace.
Add the firewood and then use the matches to light it.
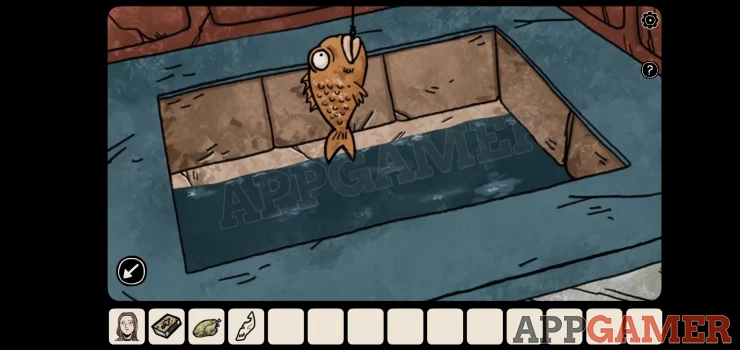
This will also reveal a fire place in the Normal world. After the fire burns there will be a hole in the ground with water. Select the fishing hook in your inventory and then add to it the fishing line. Then select this hook again and add to it the shrimp.
You can now use this baited hook on the water to catch a fish.
Normal World
Now return to the Normal world go upstairs to the landing.
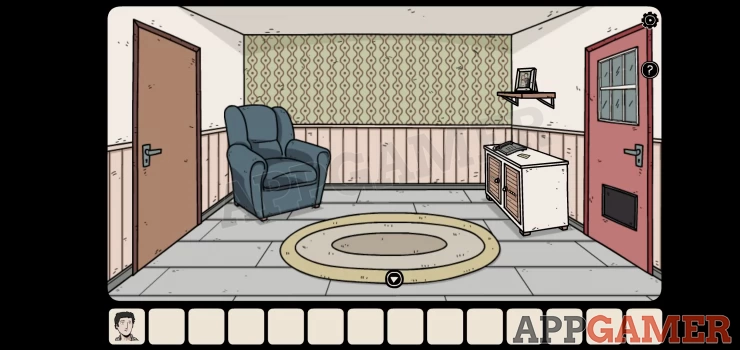
Use the red key on the door on the right to open it and enter the Office.
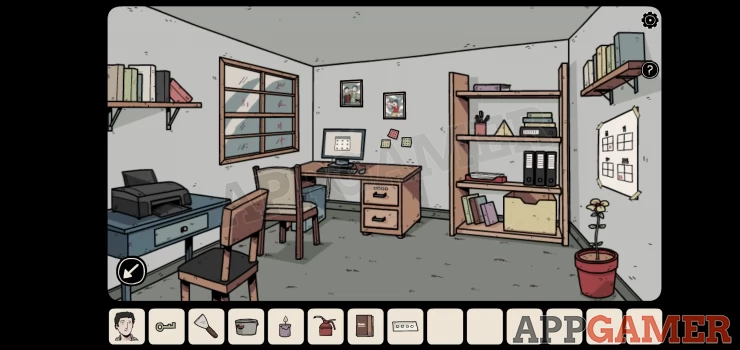
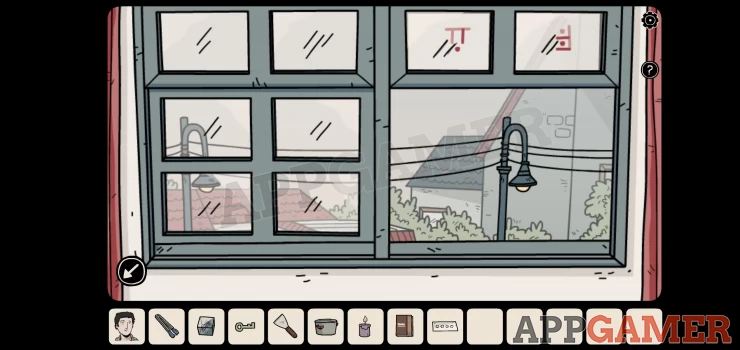
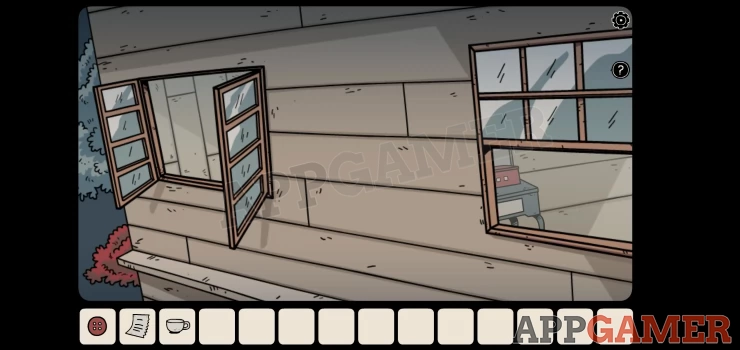
View the window, it is stuck and cannot be opened.
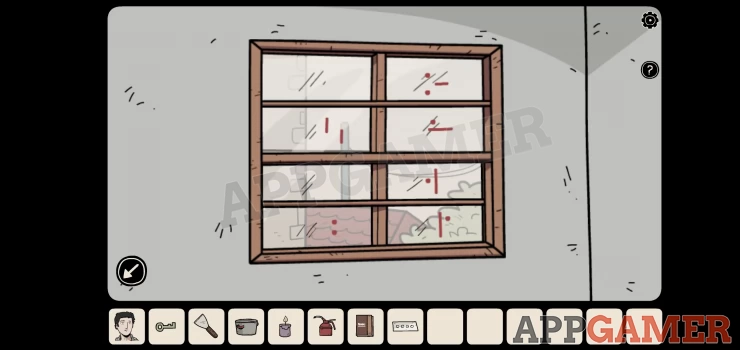
Use the oil on it an then tap to open the window. Notice how the symbols on the glass line up. You will also see in a cut scene that a dense fog in the dark world office room is lifted.
Unlock the computer
Next look in the drawer of the blue desk on the left (with the printer). to find a clue. This is a color order.
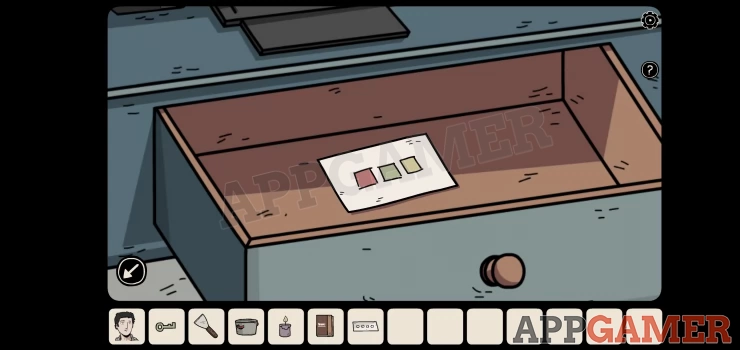
Then look at the wall behind the computer to see 3 colored notes.
Now you can view the computer screen and use theses clue to unlock it.
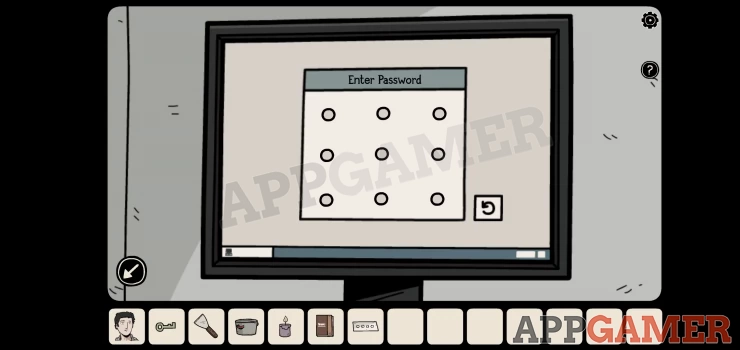
Draw the lines from the papers in the order of the colors. Tap the points starting from the top right. If your clues are different then you will need to follow them.
There is now a file to print but you need paper. View the bookshelf on the right.
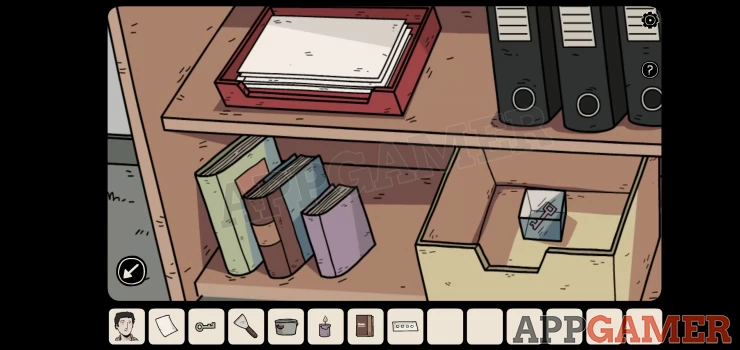
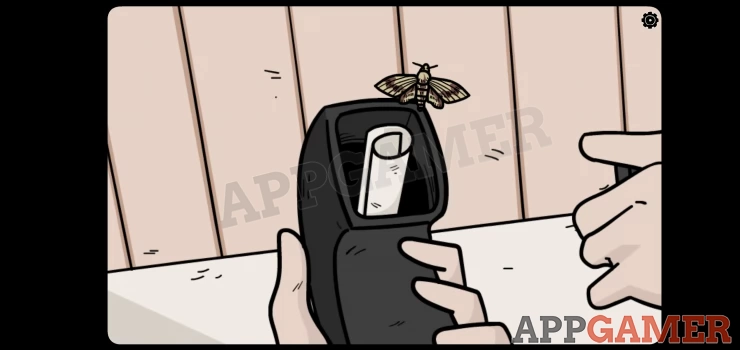
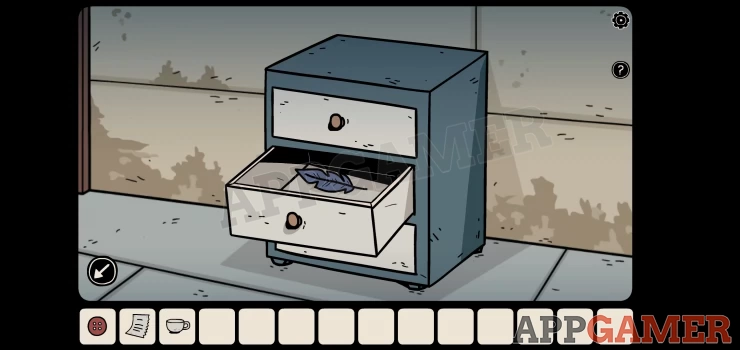
Collect a paper from the red tray and then look in the yellow box to collect a Plastic cube with a key inside.
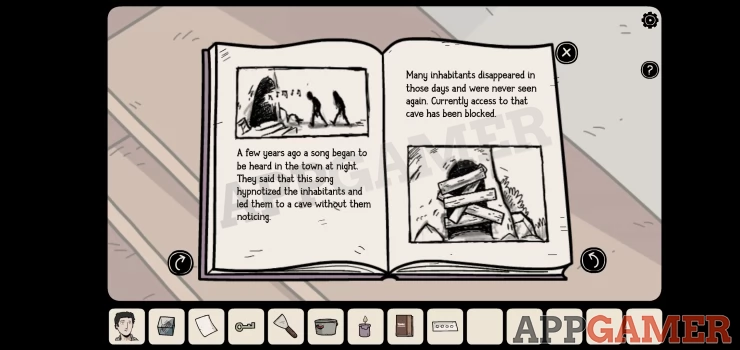
You can also look on the top shelf of the bookshelf to find a purple book. look inside to read some back story.
Add the blank sheet of paper to the printer, then use the computer to print. You will get a print out with 4 symbols. These can vary for each game.
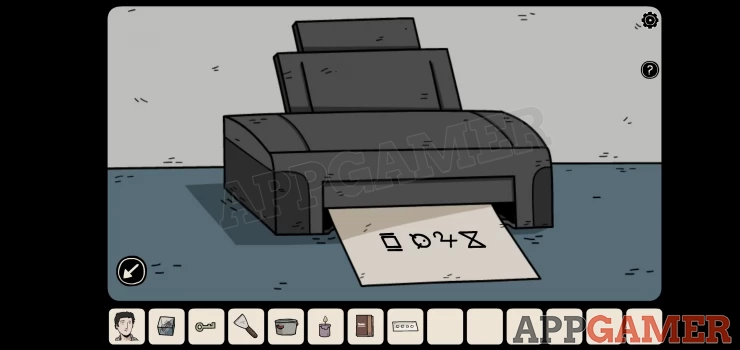
Now view the top drawer of the desk with the computer. This has a lock.
Use the 4 symbols from the print out to open it.

Collect the pair of tongs.
Windows Puzzle
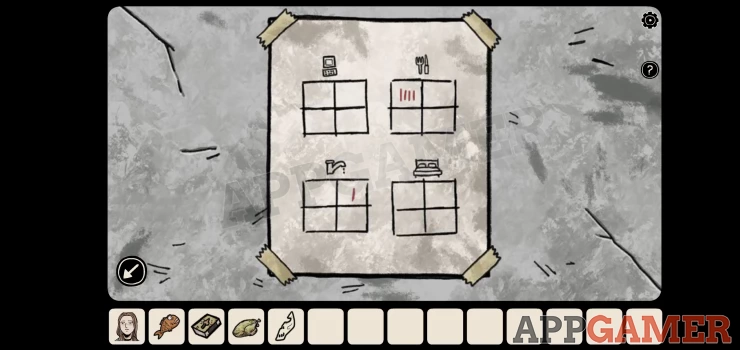
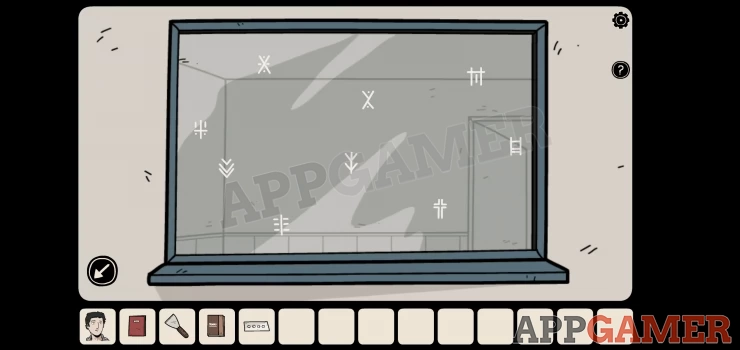
Now look at a poster on the right wall, this shows 4 window shapes with clues to the locations. Office, Kitchen, Bathroom, Bedroom. There will also be numbers on 2 of them. The positions will vary.
For me the Office had the number 2 (II) in the bottom right corner. This is in the normal world. You can look at the open window in the office and make a note of the symbol in the matching position. For you it may be different.
Dark World
Move to the office room in the dark world. Then look at the same poster on the right wall. It will tell you the other 2 locations needed.
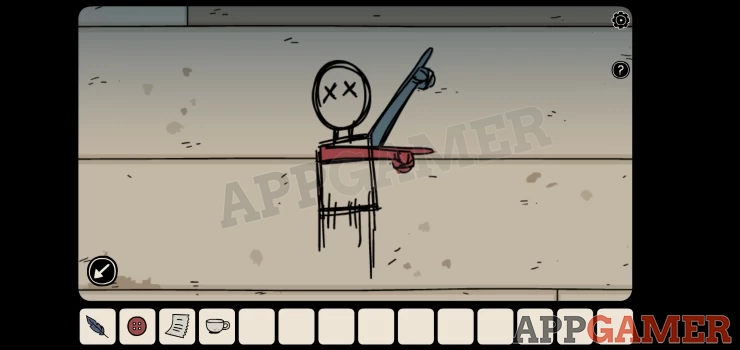
Now view the desk and open the bottom drawer to find a clue. A paper with hands drawn on it and numbered fingers.
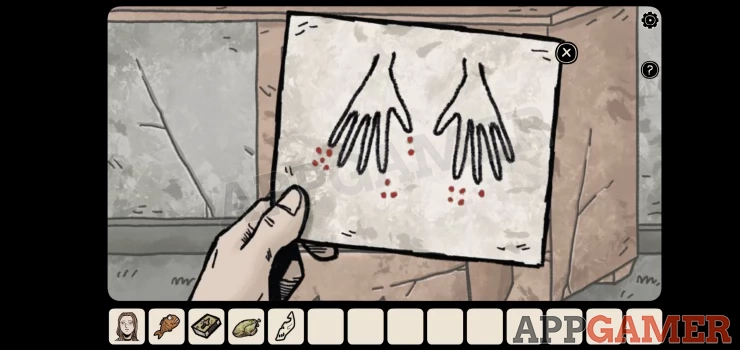
Now tap on the dark spooky figure on the left of the room to view its hands.
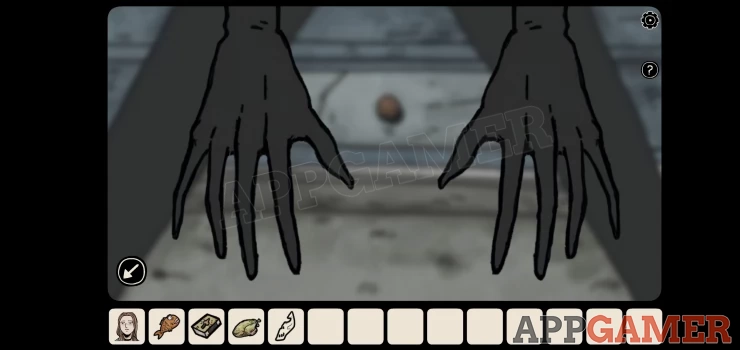
Tap 5 fingers in the order shown by the numbers on the paper. If you get this correct then the figure will disappear. You can now look in the drawer of the blue desk to collect another clue.

Next on the top shelf on the right is a blue box, for this we need 4 symbols.
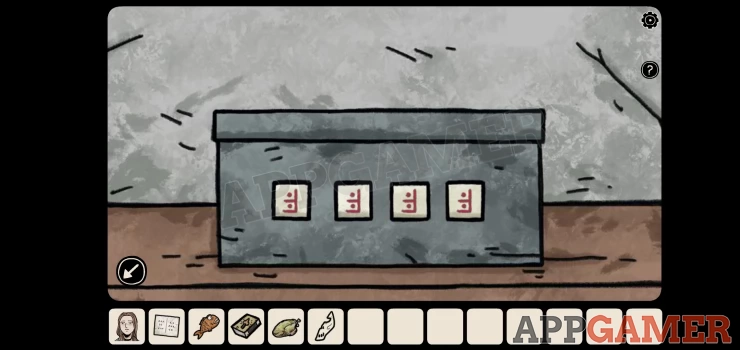
To get these you need to follow the clues from the posters and examine the symbols on the windows in the 4 rooms. You will need to follow whichever positions you are shown in your game.
I have already found the symbol in the normal world Office. I then need to find the symbols in the Normal world Bedroom, Dark world Kitchen and bathroom.
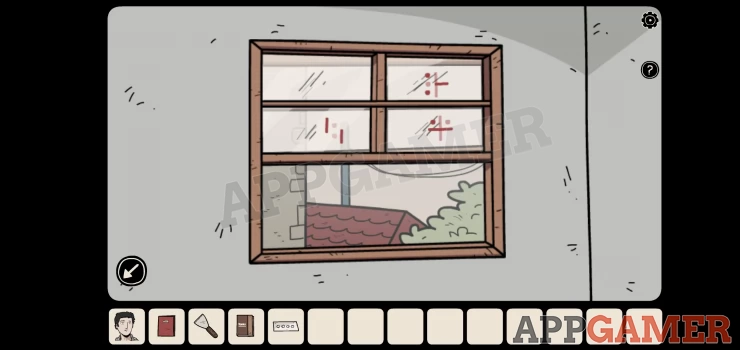
In the normal world bedroom tap to open the curtains and then view the windows. Open the window on the right to align the symbols.
The bathroom is the center door on the upper landing. View the window and open it to align the symbols.
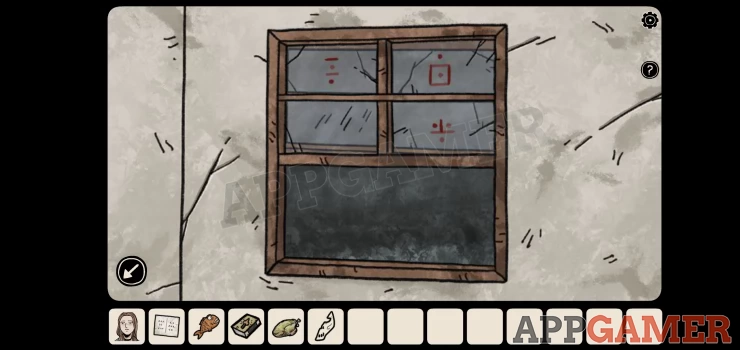
In the kitchen again open the window and find the symbol you need.
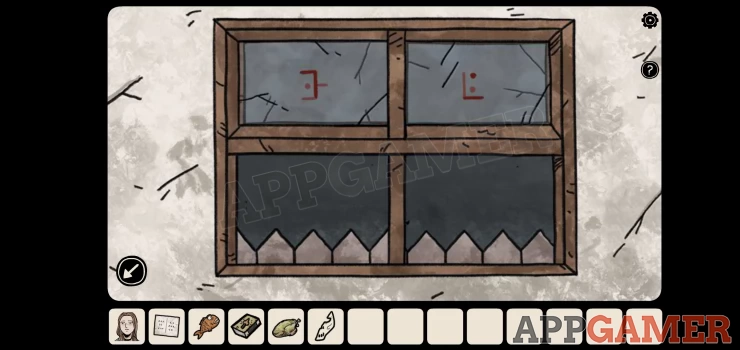
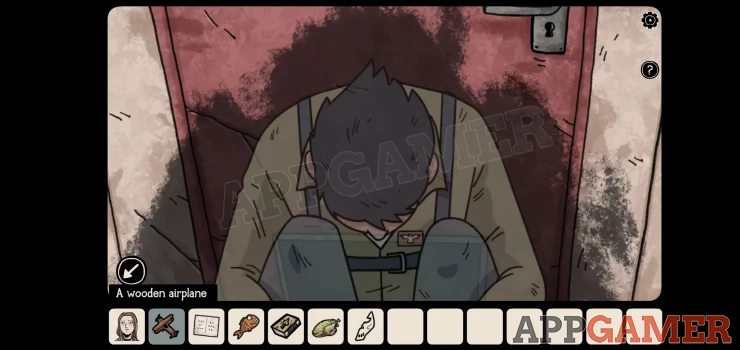
Once you have them return to the dark world office. Put them in the order shown by the numbers on the posters and use them to open the box.

Now you can collect a wooden airplane.
Normal World
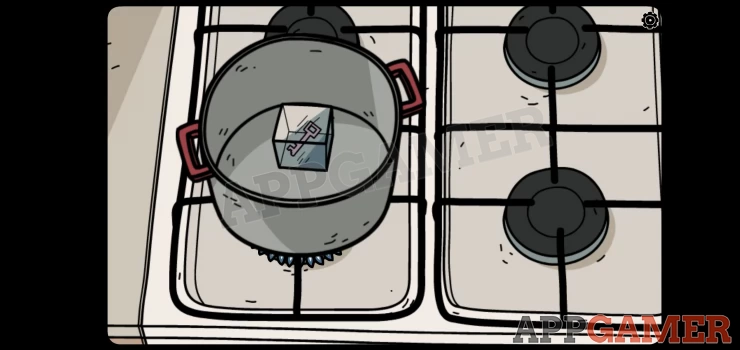
Return to the normal world and go to the kitchen. View the top of the stove.
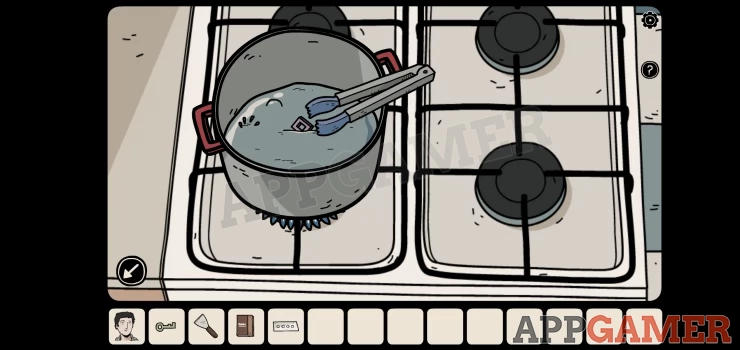
Use the candle on the stove to light one of the burners (bottom left) and then place the pot on it, followed by adding the plastic cube to the pot.
The plastic melts and you can then use the tongs to collect a blue key.
Go back upstairs to the bedroom and view the drawer on the table on the left of the room.
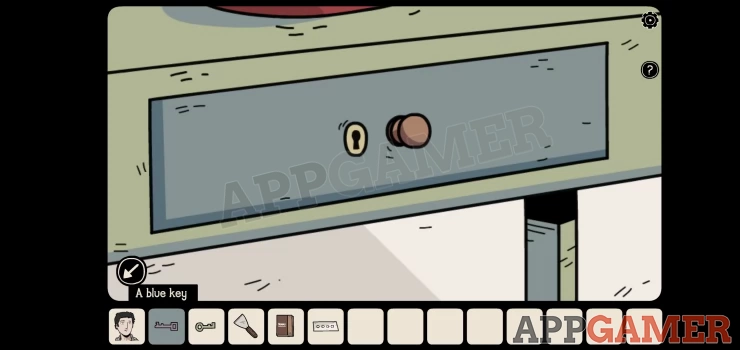
Use the blue key to open the drawer and collect a red switch.
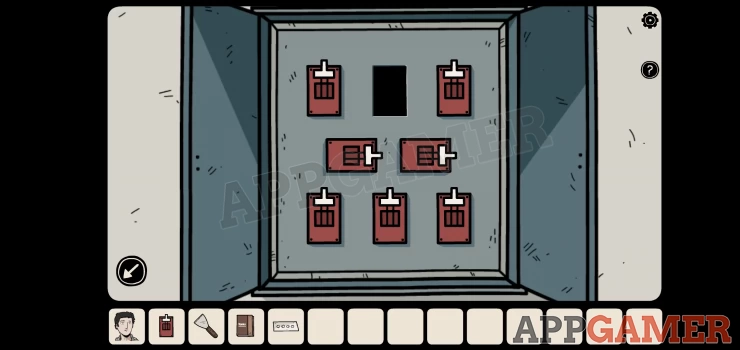
Garden Switch Puzzle
Now go back down stairs and through the sitting area to the back door to exit out into the garden. On the wall in the garden is a blue box. View this.
Use the small key to open it. Add the red switch to the empty slot.
Dark World
In the dark world move to the back door as well. It is blocked by the ghost of Bastian's Brother.
Give the wooden airplane to the ghost and he will disappear. Open the door and exit to the garden.
View the blue box on the wall here and open it to see more switches.
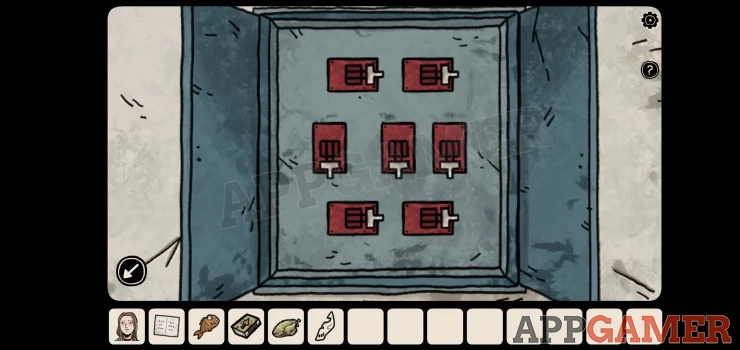
Now you can use the paper clue that you have in the dark world to set the switches.
- On the right are the positions for the dark world and on the left is the normal world.
- These can be different for you.
- Set the positions (left or right, up or down) as shown on your clue.
Once done you will see that the electric field over the piano in the dark world will clear.
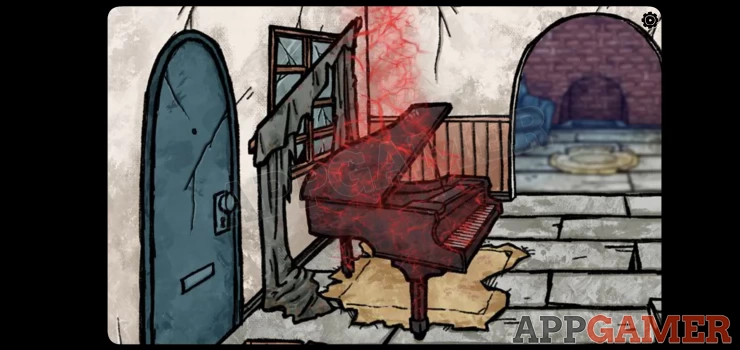
In the dark world go to the front room and tap on the the piano. You will then see a cut scene followed by a knock on the door.
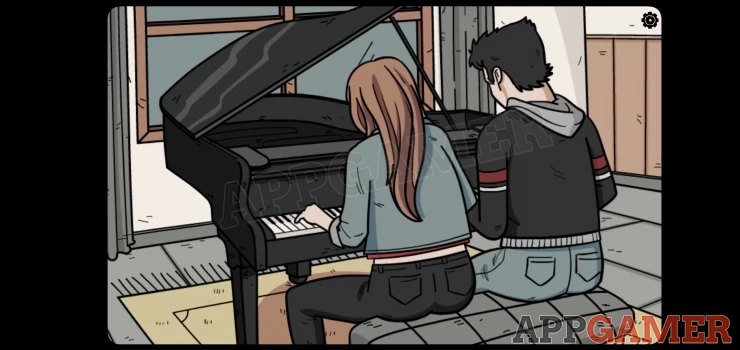
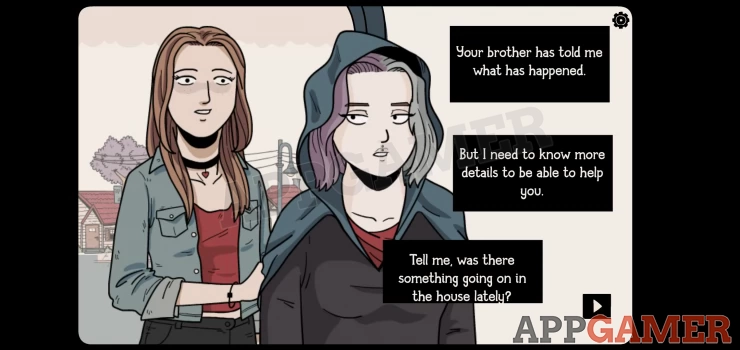
Carissa's Brother Lian has arrived to help us in the Normal World. Lian leaves but gives you a folder collect this from the table.
Open it in your inventory to find the details of Lou the Seer.
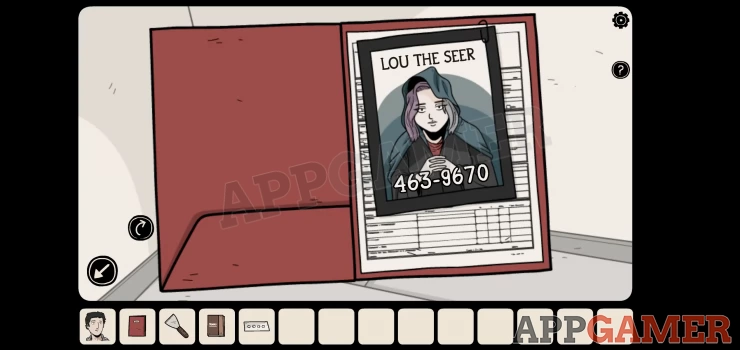
Lou the Seer
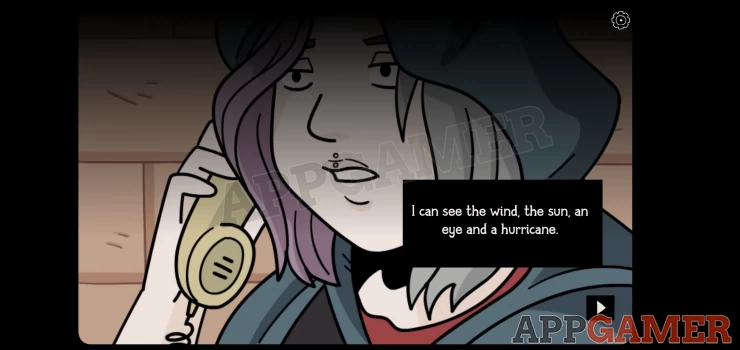
Move to the telephone and pick it up again and dial the number. 463 9670
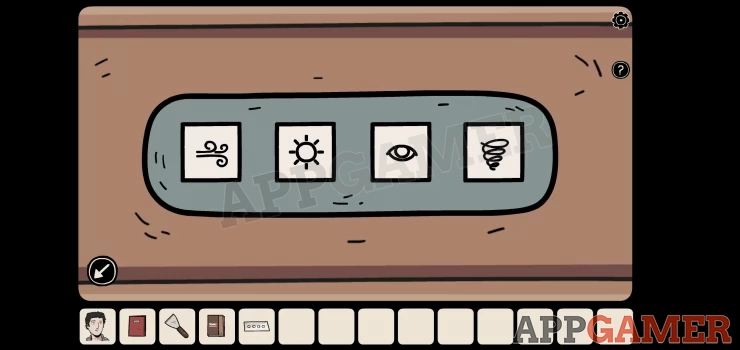
Lou will tell you of a vision. She will mention 4 items, they will vary for each game. Carissa will draw 4 symbols by the phone.
Now look at the cabinet under the phone again, the door on the right required 4 symbols. Use the ones from the phone call to open it.
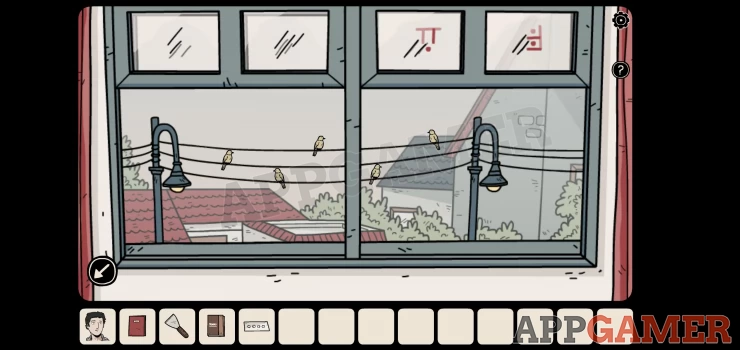
Collect a Bird shaped whistle. Now go up to the bedroom. View the windows again. Open both of the windows and then use the bird shaped whistle on the wires outside, this will call 5 birds to land on a pattern on the wires. The pattern will vary.
Now view a red box on the far side of the bed, it has holes on top.
Tap the holes in the same pattern as the birds. (your birds will probably be different)
You can now collect a cassette tape. On the side table on the near side of the bed is a tape recorder. View this and add the cassette tape to it.
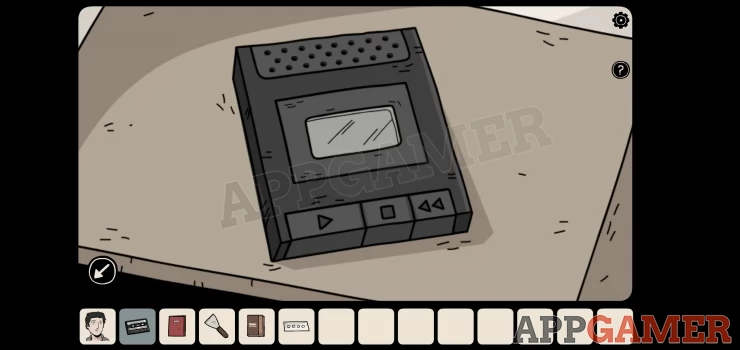
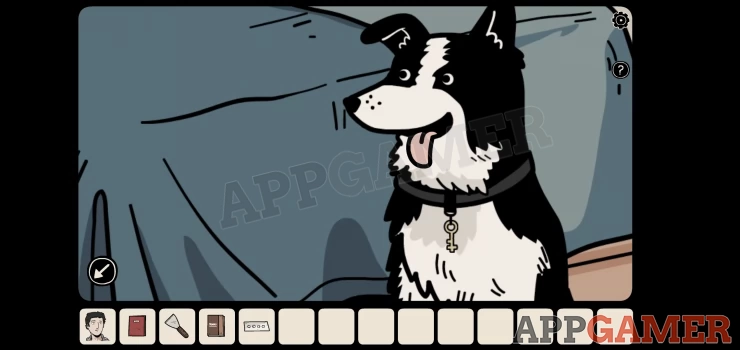
Press play and you will hear Bastian Whistle. This will alert the dog Laika.

When the dog comes to you you can collect a yellow key from her collar.
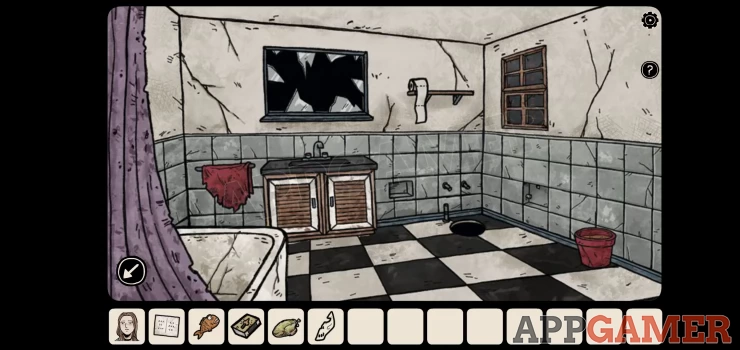
Bathroom Mirror
Now back out to the landing and enter the bathroom (middle door).
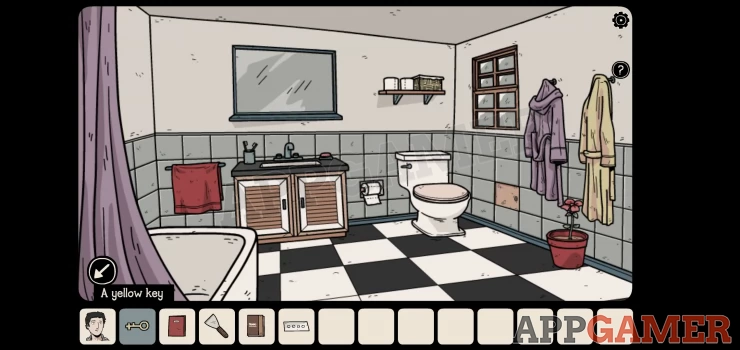
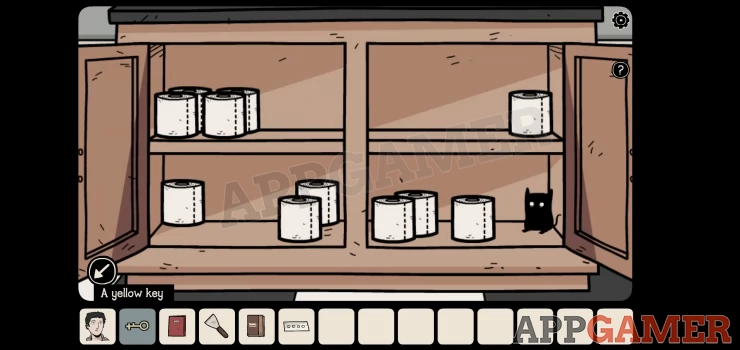
Shadow Collectible: open the cabinet below the sink and move the toilet rolls around to find a black cat.
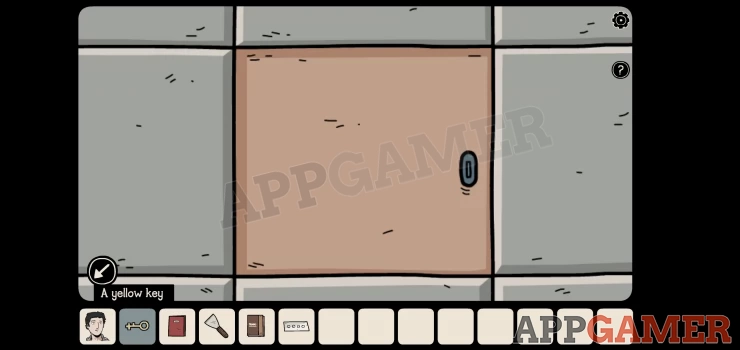
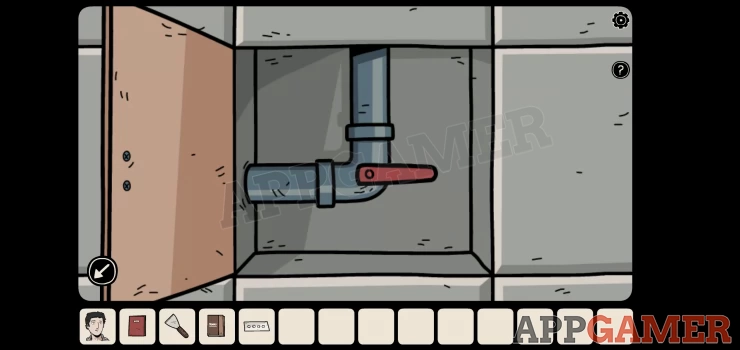
On the right of the toilet is a small panel on the wall. Use the key to open this.
Then tap the valve handle inside to open the water.
Now view the sink and tun on the hot water, steam will rise.
You will see symbols appear on the mirror above. These are different for each game.
Dark World
Go to the bathroom in the dark world and view the broken mirror here, you will see the symbols but only 4 are visible. Make a note of the 4 in your game.
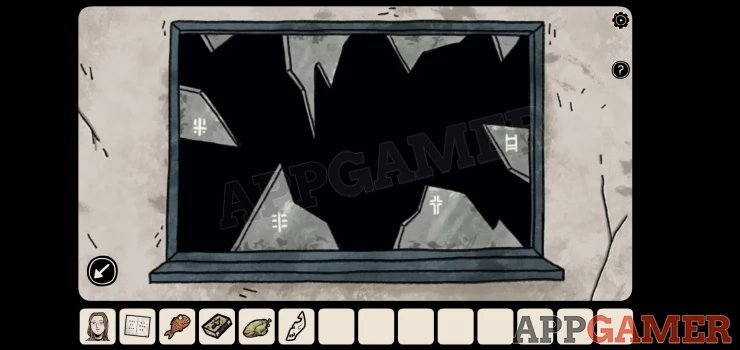
Go down stairs and out into the garden, then look inside the dog kennel. There is a trap door with a padlock.
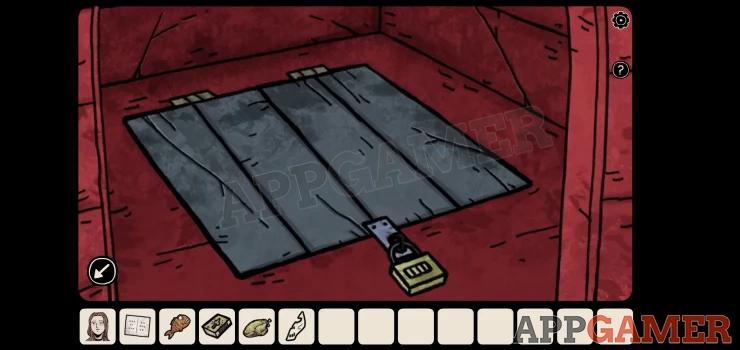
Use the symbols you have found in the mirror to unlock it.
Collect from inside a Bear Trap. Now go back inside and up to the bathroom. Use the bear trap on the hole in floor where the toilet should be. It will be placed there.
Normal World
In the bathroom in the normal world view the toilet.
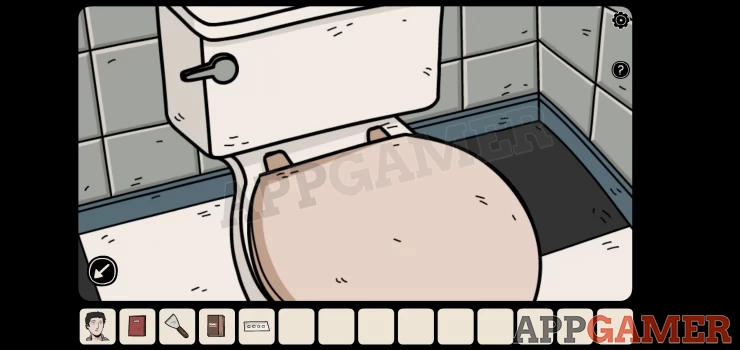
Tap the handle to flush it, you will then see a scene in the dark world where a tentacle appears and is cut off by the trap.

Dark World
Switch to the dark world and then you can collect the piece of tentacle from the floor. Now back out to the landing and then tap the arrow on the right side to look around to the other end of the landing.
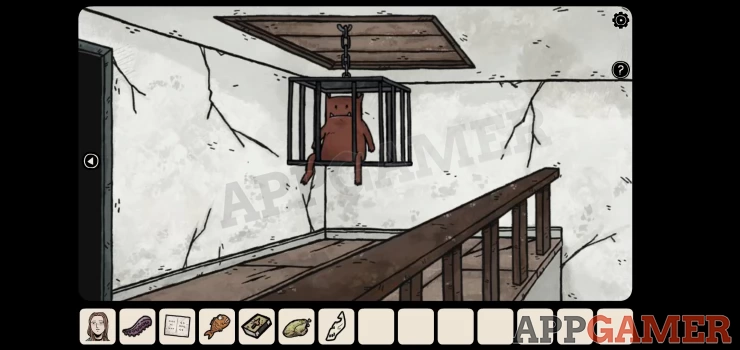
There is a small monster in a cage hanging below the trap door. Follow a clue seen in the book in part 1.
Feed the Monster
Give the tentacle, the rotten chicken and the fish to the monster. Each item will make it heavier and eventually the door will open. It will open in the normal world as well.
Tap the ladder to go up and watch the cut scenes and then Lou the seer will arrive.
After this you will begin a flash back story of Bastian's Childhood.
Cabin in the Woods
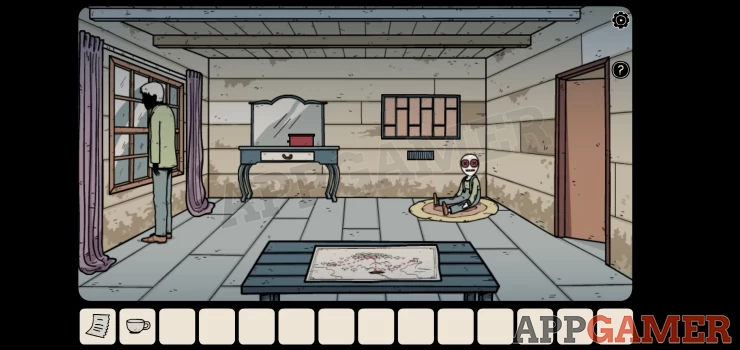
Collect the cup from the table and then also notice the painting above the fireplace (Trees).
First tap the stairs on the left to go up. Notice the picture on the wall (Lake, with mountains).
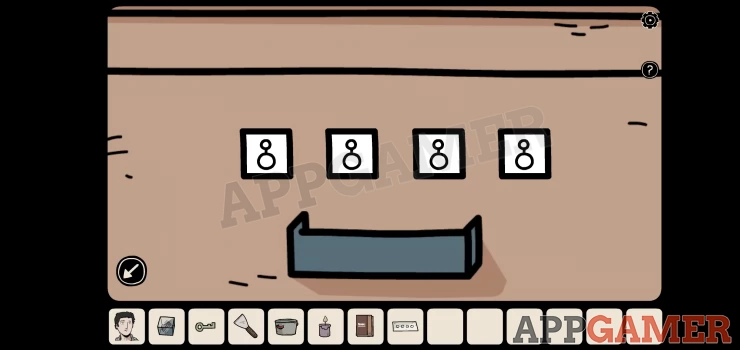
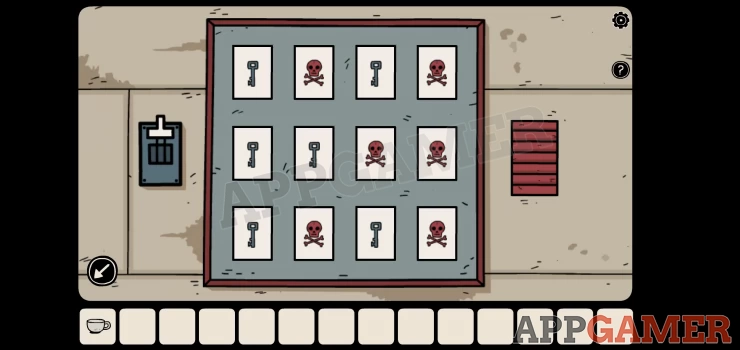
View the panel on the wall at the far end, tap the switch on the left to reveal a pattern of keys and skulls. This is a puzzle.
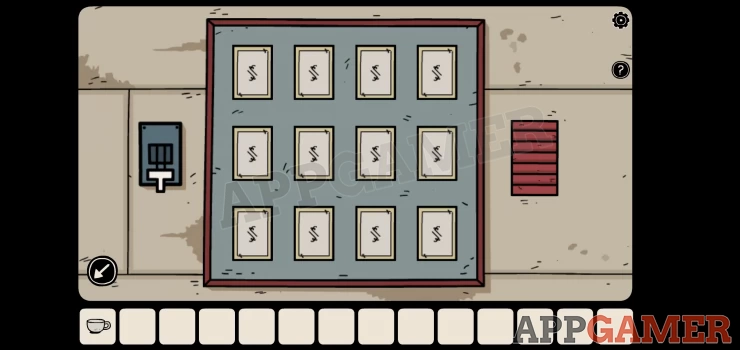
- The pattern will disappear after a second.
- Tap on the cards to turn them and find the keys.
- If you hit a skull it will reset to a new pattern.
- Find all the keys to open the red door and collect a Blue Key
Now go back down stairs and then tap the door to the left to go through.
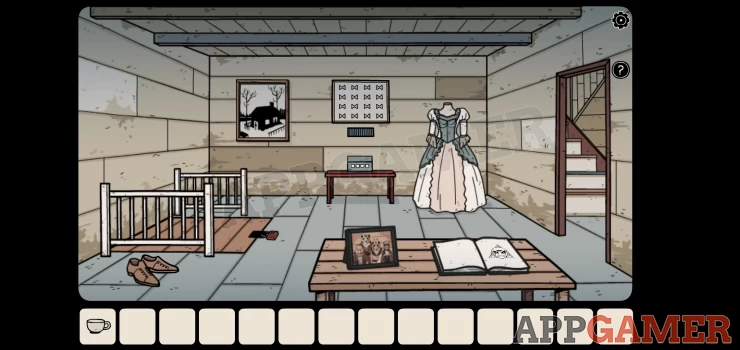
Shadow Collectible: Tap the bottom of the dress on the mannequin with no head. Then again to lift the dress and find the black cat.
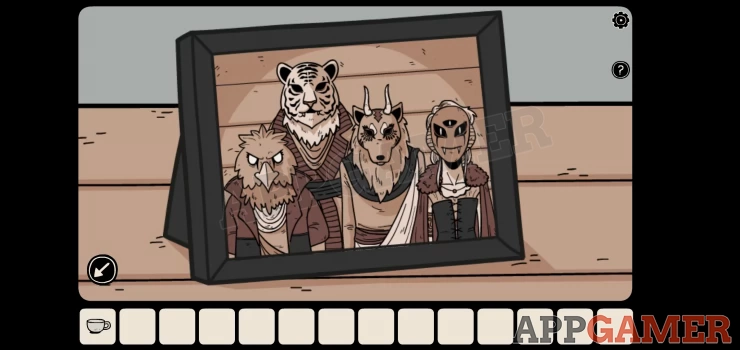
Notice the picture on the wall (House). Then also look at the photo on the table, there are 4 creature faces in order.
Then look at the book on the table. Look through the 4 pages and you will see the same 4 faces each with a shape behind it. This will give you an order of shapes for a code.
Now tap on the trap door on the left.
View the lock and use the shapes code to open it.
Cabin Basement
You can now go down the steps to a basement. Notice another picture on the wall (Tower).
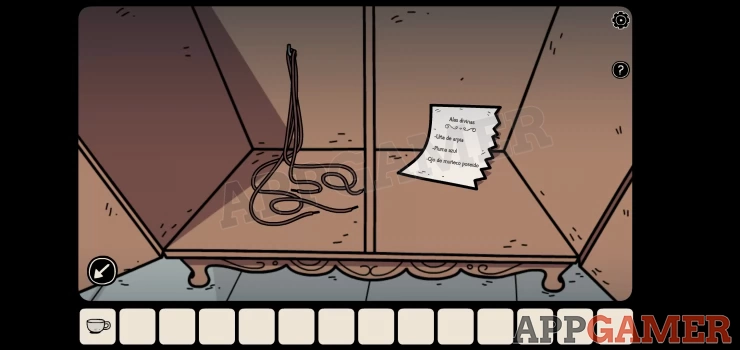
View the cupboard in the center and use the blue key to open it. At the bottom you can collect a pair of shoelaces and also a note with a clue. You can also move the clothes at the top.
Go back up the steps and then view the shoes on the floor to the left.
Add the laces to them and they will walk across the floor to the next room. Go through to the next room and tap the shoes again and they will go upstairs.
Upstairs you will see them in front of a door. Tap them again and a person will appear and open the door.
Follow them through
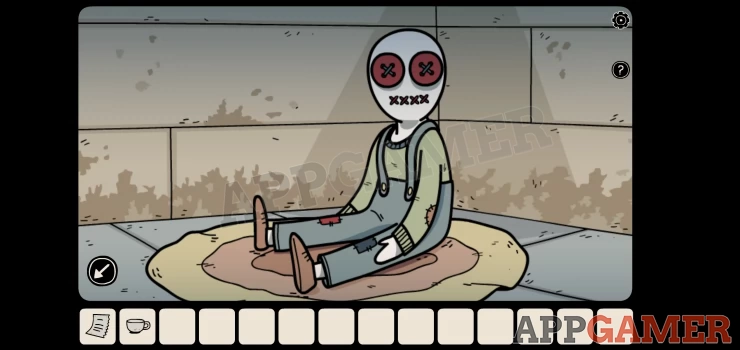
Eye of a possessed doll
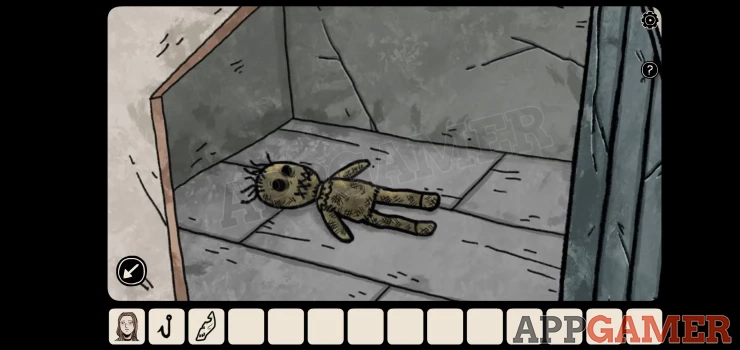
First view the doll in the corner and you can take one of its eyes.
Then view the map on the table. This shows a route through 4 locations, the route will vary. This is a clue for later.
Next tap on the man at the window and he will start banging his head. This is a clue.
- Count the number of taps on the window.
- There are 4 sets of taps separated by a small pause.
- This will give you a 4 digit code. It varies with each game.
Now you can view the red box on the table. Use the code to open it.
The man at the window vanishes.
Shadow Collectible: Tap on the bottom of the purple curtain in the left, then tap it again to lift and find a black cat creature.
Now view the window and open it. Then look outside.
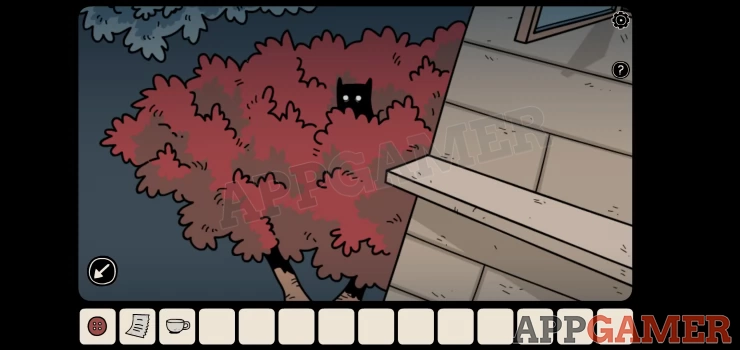
Shadow Collectible: Tap the orange tree on the bottom left to see another black cat.
Now tap the left window to enter the other room.
Blue Feather
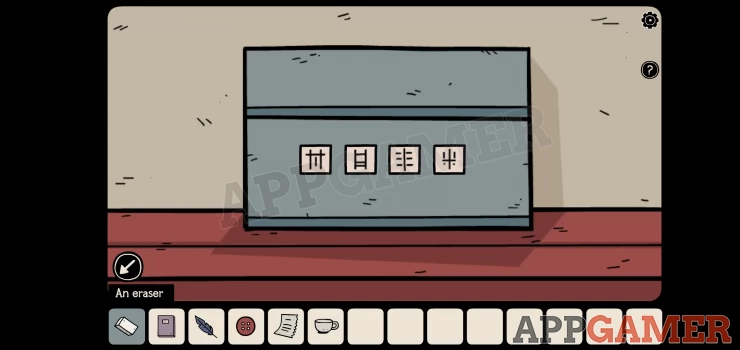
First view the drawers on the right and open them to find a blue feather.
Then view the drawing on the wall above the drawers. Note the blue and red hands.
Tap on the door and then the bolt to unlock it, you will see a ghostly event that leaves hand prints on the wall.
Go through the opened door then view the clock on the wall on the right.
Set the red and blue hands as shown in the clue drawing. You can then collect a light bulb. Next view the shelves on the far right to see butterflies in jars.
Butterfly Case
Add the light bulb to the holder at the top and you will see that some of the butterflies start moving. Make a note of this pattern of the moving ones.

Now collect the purple book that is on a white table on the right of the room. You can view this in your inventory and flick through to the back pages to find some clues. These will be needed soon.
Go back down the stairs and through to the room with the mannequin. First tap the picture on the wall with the bow tie shapes.
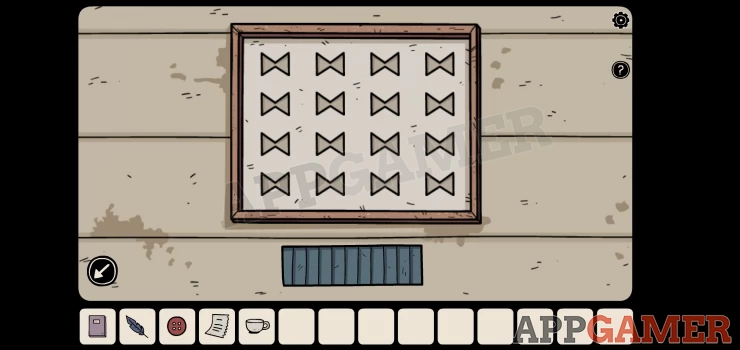
Tap the bow ties that are in the positions of the moving butterflies pattern found above. This may be different for you.

You can then collect an Eraser.
Next look at the box on the table below this picture. You need 4 symbols to open it.
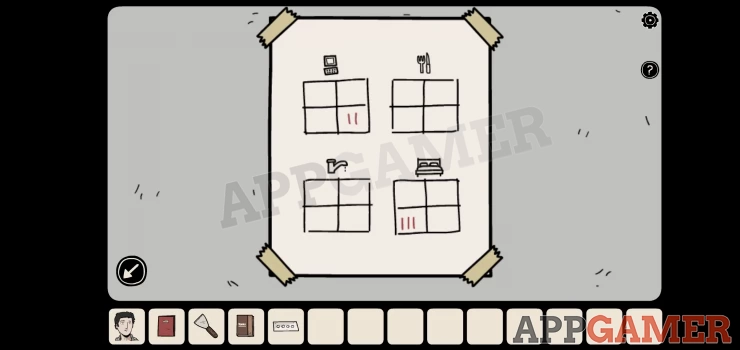
Map Puzzle
- For this you need to use the map and the 4 pictures we have seen.
- All of the items can vary for you.
- Check the map in your game to see the route it shows, there will be 4 locations, For mine it was House, Trees, Lake, Tower.
- Next view each of the pictures with these locations and count the number of people shown in each, this will give you a number code. For me it was: 2538
- Now look in the purple book in your inventory, the final page will show you a symbol for each number. This is your code.
Collect the porcelain ballerina from the box.
Music Box
Go back upstairs to the first room on the left and view the red music box that you opened. Add the ballerina to it.
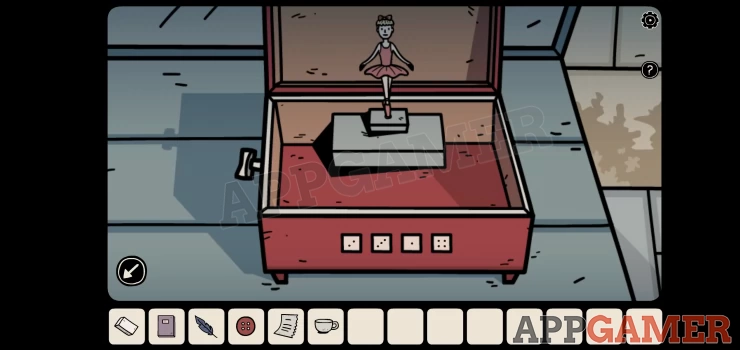
Tap the key on the left to wind it and watch the spooky scene, you can then collect a necklace. Now move into the second room on the left and view the drawing on the easel on the left.
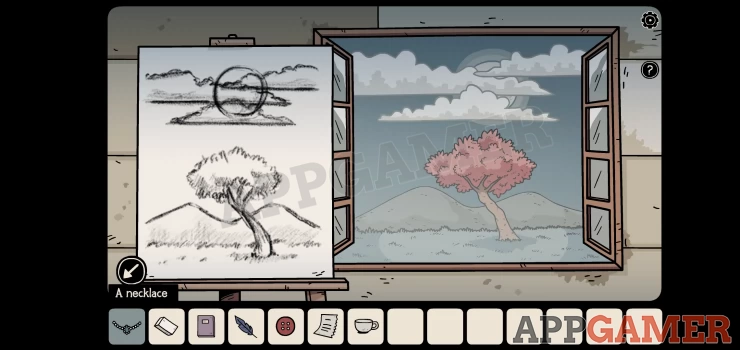
Use the eraser on the picture to remove the clouds one at a time. When they are all gone the moonlight will shine in and create a pattern on the hand prints.
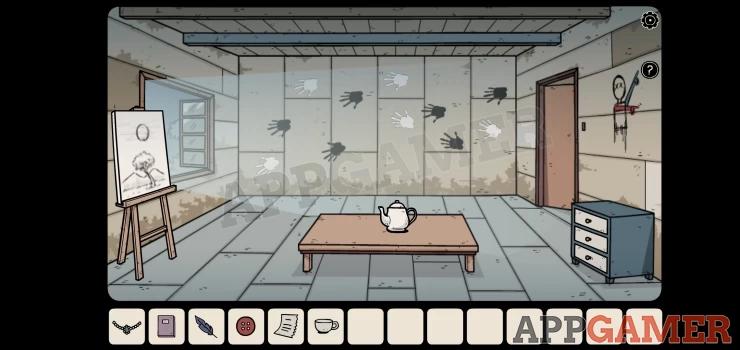
Notice the pattern of boards on the wall and the locations of the white prints.
Go back to the first room and view the panel on the wall above the cursed doll. This will resemble the boards on the wall in the other room.
Tap the blocks on the panel in the positions of the white hands in the moonlight.
Once done you can collect a paper with a clue and also some tea leaves.
Making Tea
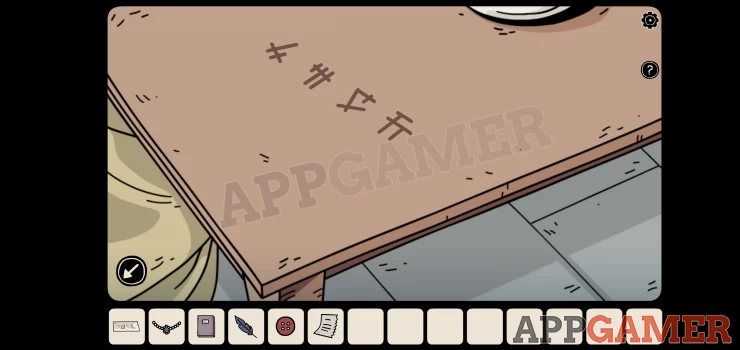
Go back again to the second room with a teapot on the table. Add the tea leaves to the pot and then place the white cup on the table. You will then see a scene as a skeleton appears to make tea then write a clue on the table.
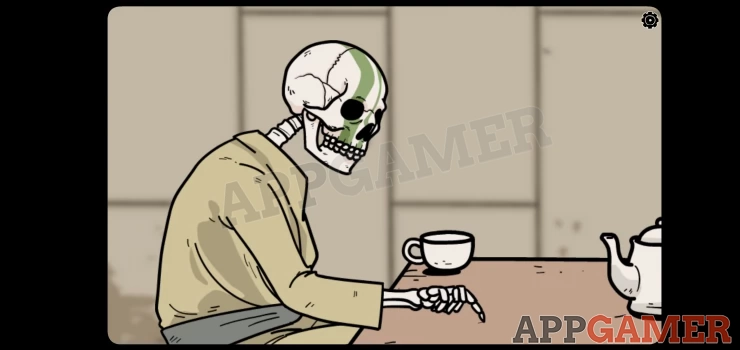
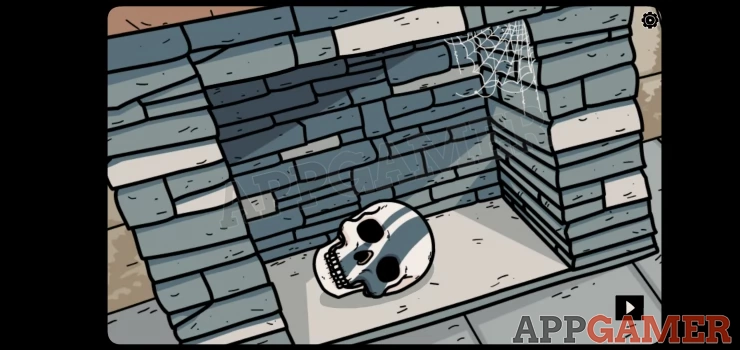
Make a note of the clue and then tap the skeletons head to collect it (1 of 3).
Exit the room and view the large blue chest on the right.

Use the code from the table to open the lock.
Collect from inside a Wheel with colorful symbols.
Go back downstairs and through to the room with the mannequin, view it. Add the necklace to it and another skeleton head will appear. Collect this head. (2 of 3)
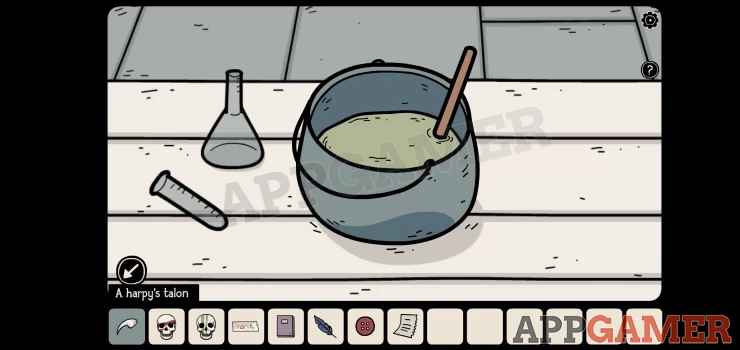
Harpy's Talon
Next go down to the basement and view the wall on the right with 3 colorful wheels. Add the wheel you have to start the puzzle.
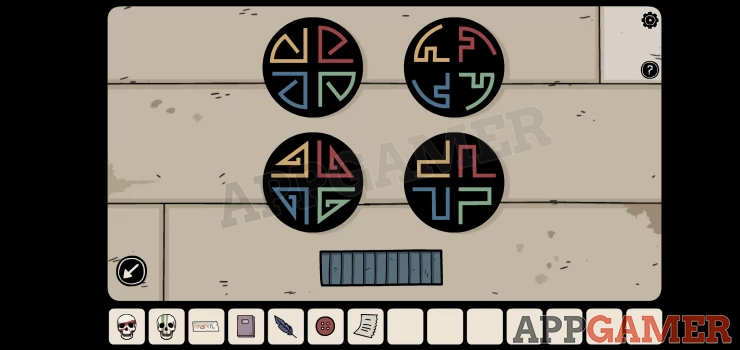
- The clue is on the paper you have in your inventory.
- The paper shows 4 shapes in 4 colors.
- Tap each wheel to rotate the colors so that the correct shape is in the matching color on the paper.
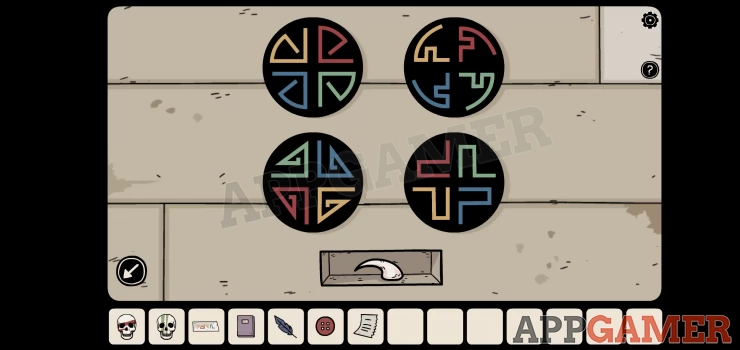
You can then collect a Harpy's Talon.
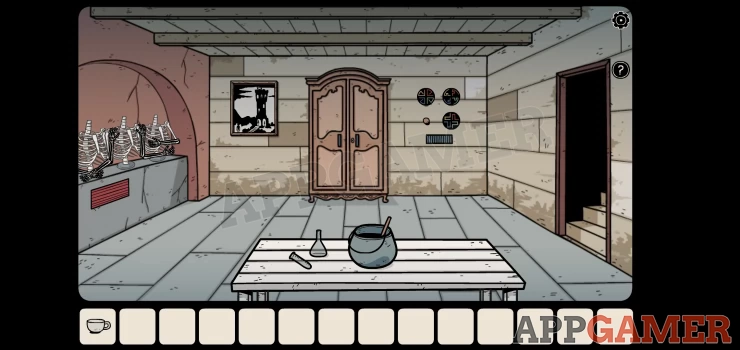
Now view the table with the pot.
Magic Potion
Add the talon, the feather and the button (cursed dolls eye) to the pot, then when it changes color collect the glass flask from the table and use it on the pot to collect a flask with magic potion.
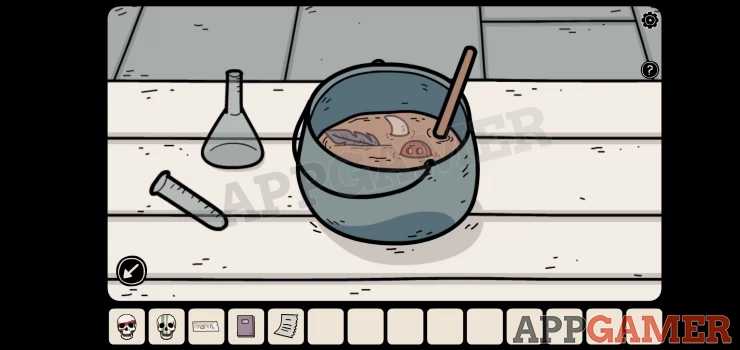
Now back up to the first room with the fire place. Then view the frog in the hearth. Add the magic potion to the frog and it will grow wings.

When it flies up it will knock down another skull to collect. (3 of 3)
Now go left and down to the basement and tap to view the line of skeletons on the left wall.
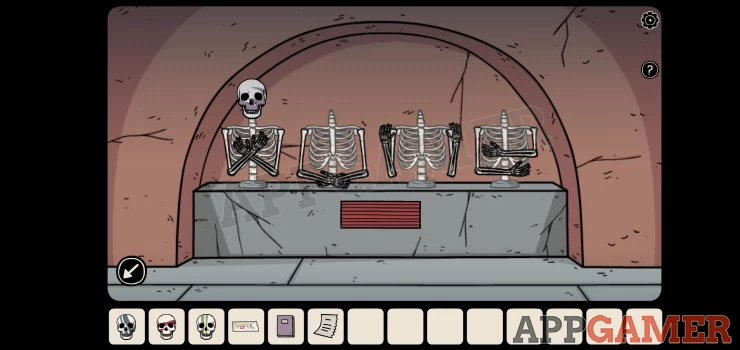
Skeleton Heads Puzzle
Add the 3 heads to it to start a puzzle.
- Notice the positions of the arms on each skeleton.
- Look in the purple book to see a page showing arm positions and colors.
- Tap the heads to swap them around and match the colors to the arms.
Once done the panel below opens and the arms change. Note the directions that each skeleton is pointing. Then view the panel that has opened.
- Tap the 4 squares to set the combination.
- Use the pointing directions to know where to place the black section of the squares.
- My solution is below
A passage opens and you can go through. You will be cursed by the entity that is inside.
This completes the flashback explanation and now you return to the normal world.
Normal world
Now Lou the Seer explains what this means and that you need to find keys to rescue Bastian from Penumbra.
We begin in the Normal world with Carissa. Go up the stairs and then turn to the right and go up the ladder to the attic.
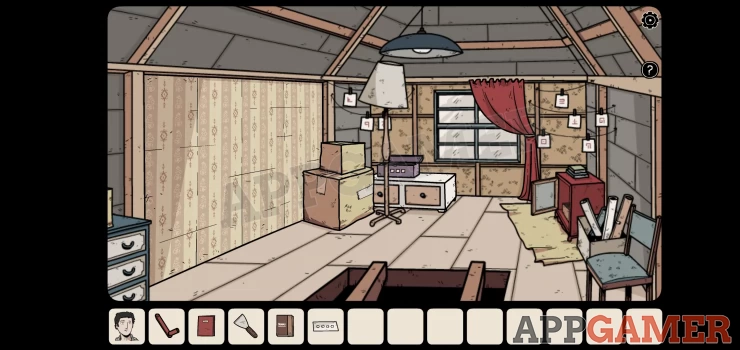
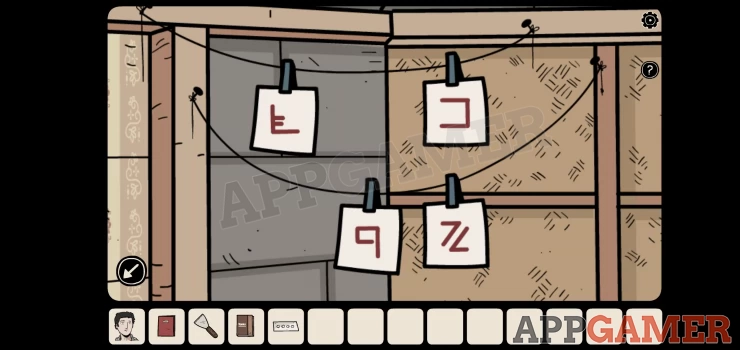
The Attic
On the wall at the far end are some papers hanging with symbols. There are 4 on the left and 5 on the right.
After checking these tap to view the blue set of drawers on the left of the room.
Open the top drawer to look inside and then move the folders to find a clue underneath.
Then open the bottom drawer and move the clothes inside to find a similar clue. These may vary for you.
You can now check the purple box on the drawers by the window.

Combine the clues to get the code. The clues in the drawers show which of the symbols from the papers to use and the number order.
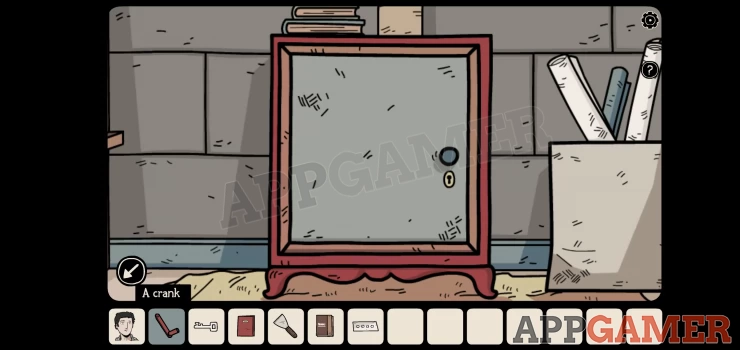
You can now collect a white key and a crank. Next view the red safe on the right of the room. Use the white key to open it.
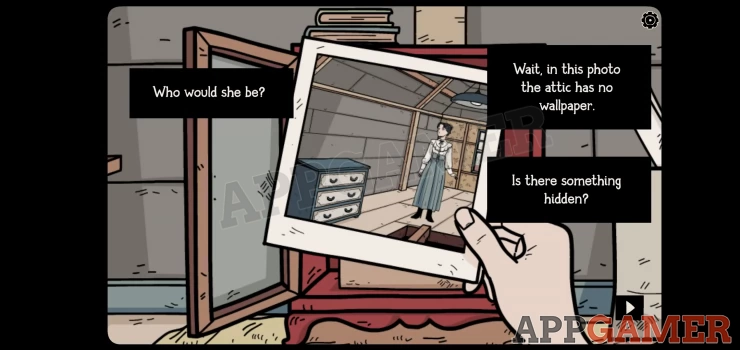
Tap the papers inside to view an old photo. This leads to a cut scene.
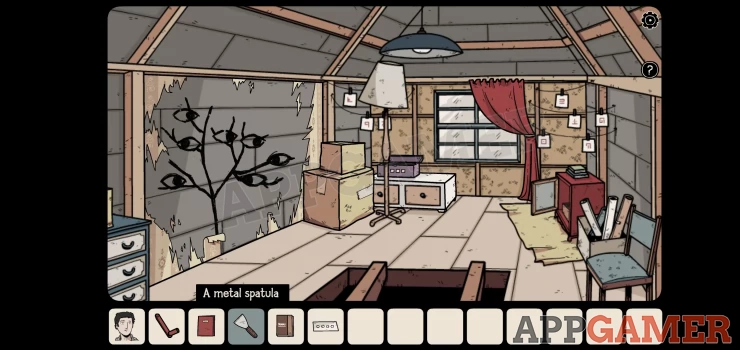
Once it completes you can use the metal spatula on the wall paper to remove it. You will then see a clue drawn on the wall of the attic. A tree with eyes, the directions can vary for you.
Dark World
Change to the dark world and go up into the attic.
First view the 2 cardboard boxes on the left and open the top one. Collect the half of a strange half (you now have both halves).
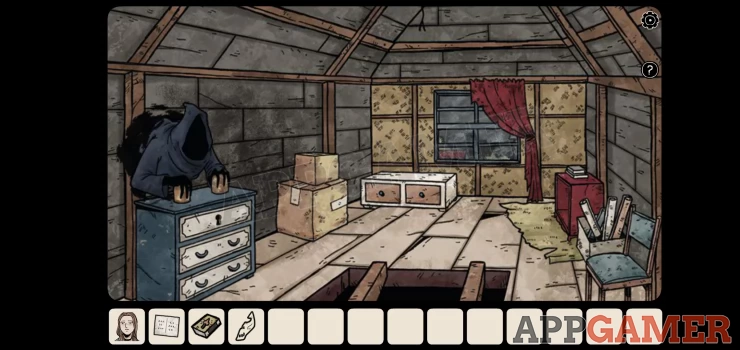
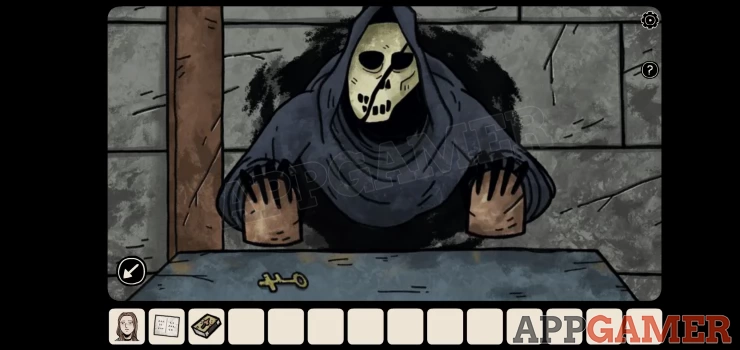
Then tap on the ghostly figure on the blue drawers.
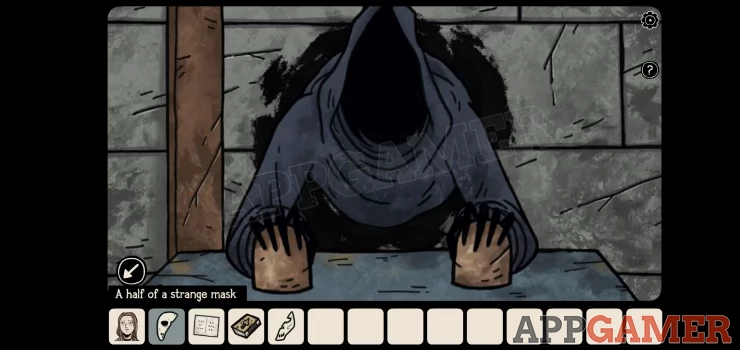
Add the 2 halves of the mask to the hood and it will raise the hands so that you can collect a yellow key.
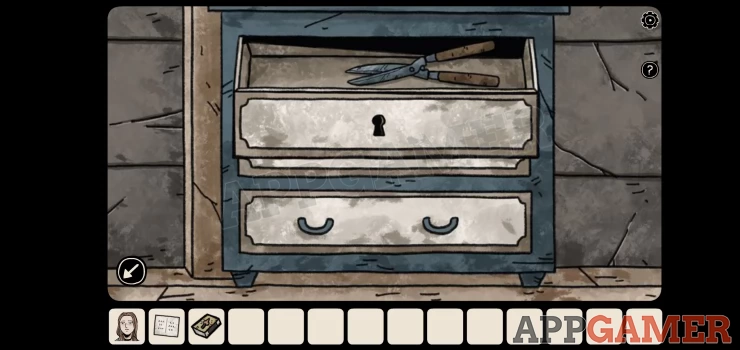
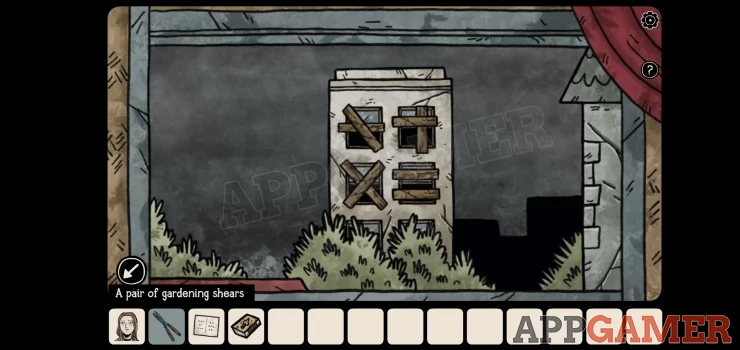
Use the key to unlock the top drawer on the left then collect the gardening shears.
Next view the window and open it to look out and see another clue. Note the pattern of the boards on the windows of the far building. This may be different for you.
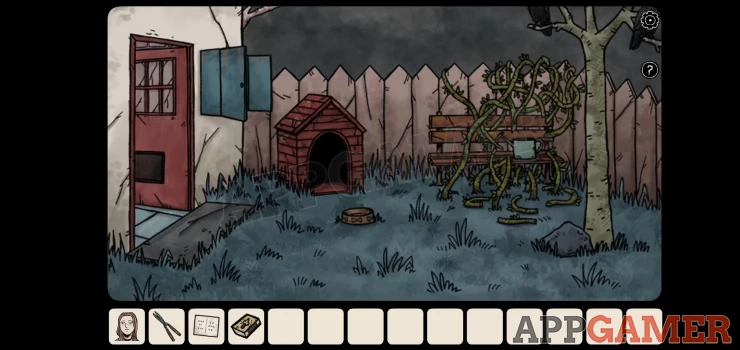
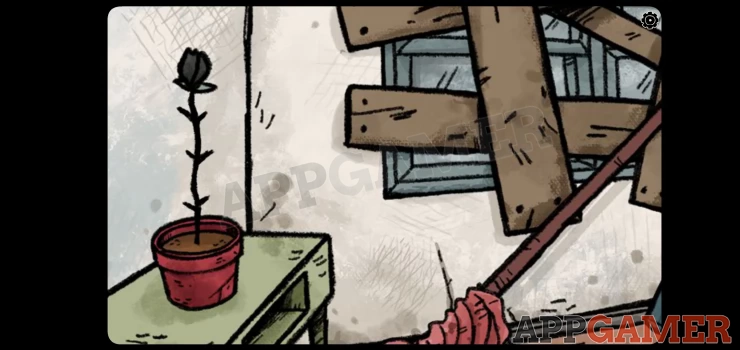
Now exit the attic and go down to the garden. First use the shears on the thorns and vines covering the bench, you can then collect a watering can.
Black Diamond
Then tap the top of the tree on the right to see some birds on it.
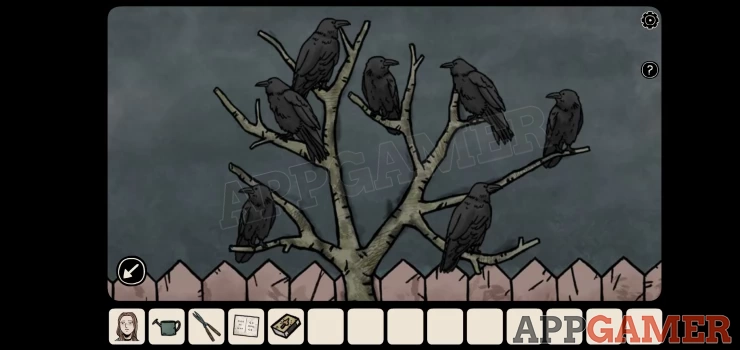
- The tree resembles the drawing on the wall in the attic in the normal world.
- You can tap each bird to change the direction it is looking in.
- Match the eye directions of the clue in the attic.
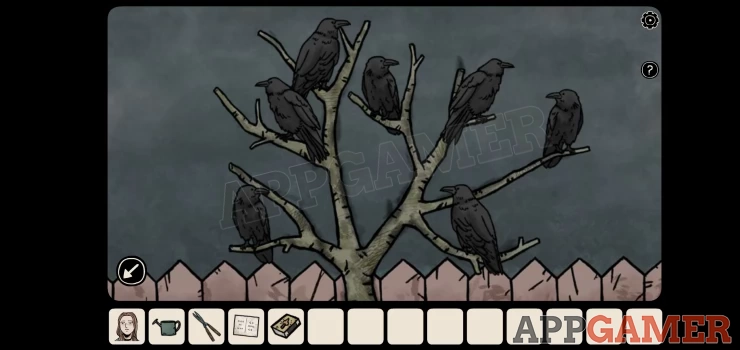
Once done a hole opens in the tree and you can collect a black diamond.
Normal World
Return to the normal world and go down to the ground floor and through to the opened fire place.
Shadow Collectible: first go out into the garden and look inside the empty dog kennel. You will find the black cat creature.
Now back inside and view the lock of the grate inside the fire place and then you can use a clue from above to open it.
The code is found from the shapes of the boards on the windows that you saw from the attic of the dark world. These will vary for your game.
The Crypt
You can then open the grate and go down to a crypt.
Use the crank handle on the lower gear on the back wall and then tap it to raise the panel blocking the drain.
You will see that this also affected the dark world and the water in the fire place there is drained away.
Dark World
In the dark world go to the fire place and down to the crypt. You will see a ghost of a woman crying by the grave.
Collectible: Tap in the opened drain to find a black cat.

Grow the Flowers
Now move back upstairs in the house in the dark world, you will find that there are 4 empty flower pots. The locations are:
- Landing
- Bedroom
- Bathroom
- Office
You can water these with the watering can to make flowers grow. But you need to make the flowers the correct height.
- Check the pots in the same locations in the normal world.
- Check the height by the number of leaves on each and then match the heights in the dark world.
- The first water will raise a flower head and then then each water after that will raise up 1 pair of leaves.
- Once you have all 4 correct, the dark flowers will bloom

You then need to collect all 4 flowers by tapping them.
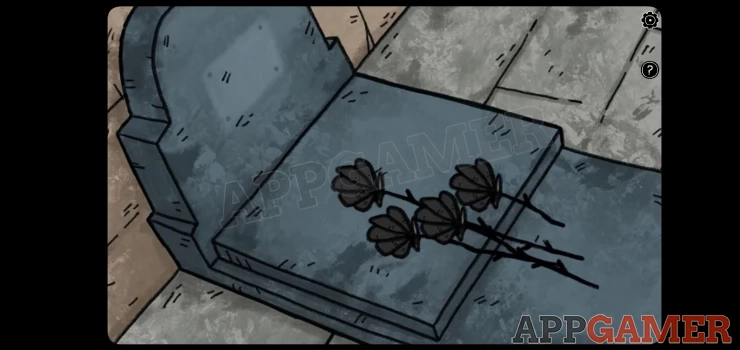
Now return to the crypt, and give the flowers to the weeping ghost.
White Diamond
The ghost will lay the flowers on the grave and then disappear, you will see a hand emerge from the grave in the normal world.
Now view the right wall to see an alter area. Add the black diamond to the slot on the right.
Normal world
Switch to the normal world and you can then collect the white diamond from the hand.
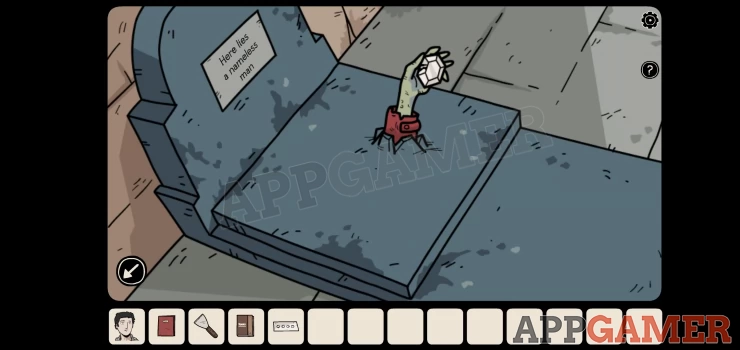
Then view the altar and add the the white diamond to the slot on the left. The red door opens in both worlds to reveal a key in both.
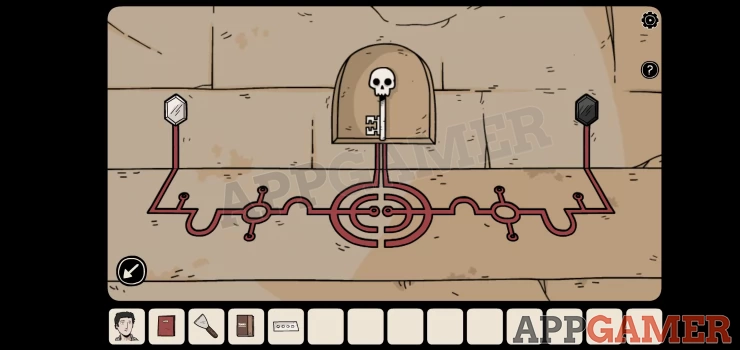
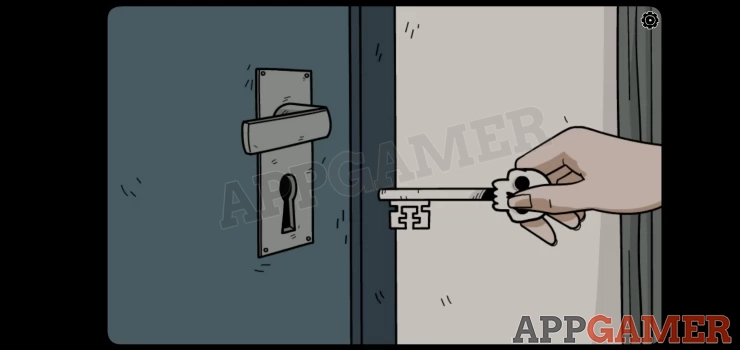
Take the key
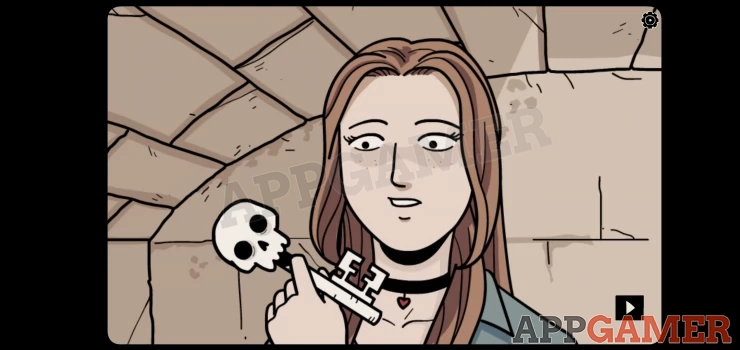
Exit the crypt and go back to the front room with the piano. Use the key on the front door to open it and you will then watch the end game cut scene.
At the end you see a small teaser for the next game Escape from the shadows.

Congratulations on completing Another Shadow by Dark Dome.
If you have any questions about the game of puzzles you can go to the Answers Page to ask there.