Underground Blossom

Underground Blossom Walkthrough

Introduction
Underground Blossom Guide

Last Updated:
Underground Blossom Walkthrough

This is a complete Underground Blossom walkthrough, all 7 chapters of the game are covered from start to finish.

The complete version of Underground Blossom has how been released, and it is available for purchase in the Play Store.

We've put together this step by step walkthrough as we know not all of the choices are obvious and people do still need help completing these kinds of games.

Underground Blossom Walkthrough

Underground Blossom Walkthrough Chapter 1 Crib Station

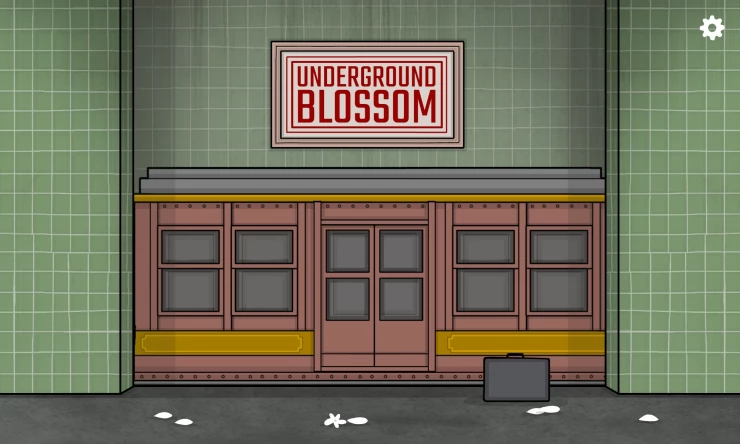
You start the game at a train station. Tap the train doors to enter the train which will take you Crib Station.

There is also a case there, you can tap it all you want, but nothing will come out of it!

When you arrive tap the doors again to leave the train where you will meet Rose Vanderbloom.

Underground Blossom Walkthrough

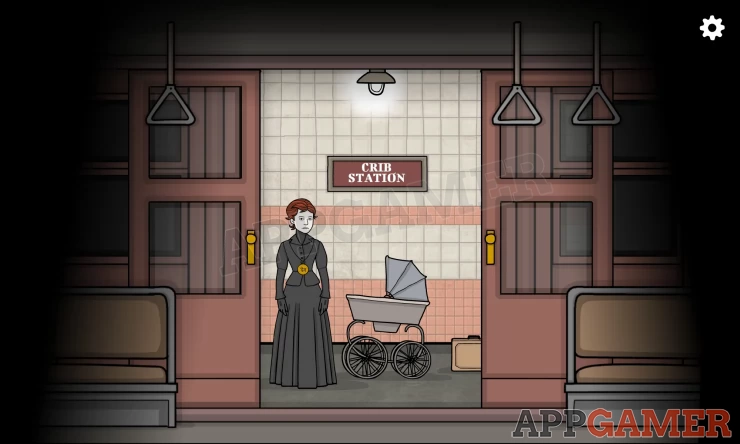
Tap Rose, she is the lady next to the pram, to start an interaction with her.

She tells you you'll need to look after her daughter who is in the pram.

First of all, we'll need what is in the brief case, so tap that to focus on it, and click the locks on either side, this should open it up.

Underground Blossom Walkthrough

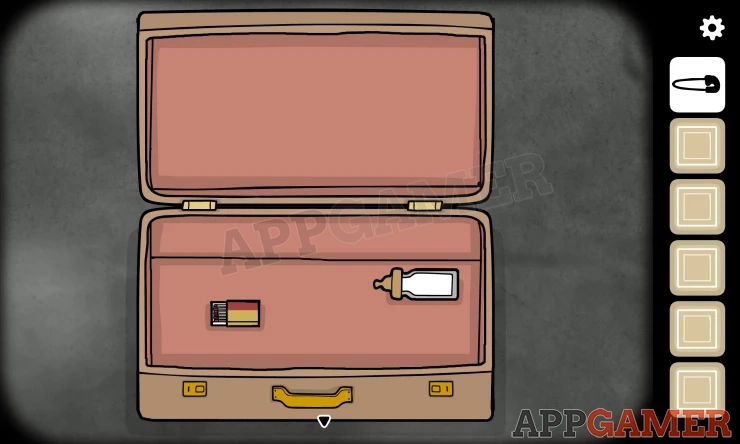
Inside the briefcase you will find a box of matches, and a bottle. Tap on each item to take them and put them in your inventory.

Next zoom back out into the first scene and tap to go right, you'll see a box on the floor, tap that to zoom in.

Underground Blossom Walkthrough

Tap the box to open it up and take both the cloth and the file.

Attending to the Baby

Head back to the pram, and click it.

There is a safety pin near the head of the baby, click that to add it to your inventory.

Tap the blanket to uncover the baby.

First of all tap the bottle of milk that is in your inventory and click the baby to give it to her. Then click the cloth and drag it to the baby, it should then place itself under her. Then tap the safety pin that is in your inventory and tap the cloth that is now under the baby, it should now turn into a diaper for the baby.

Underground Blossom Walkthrough

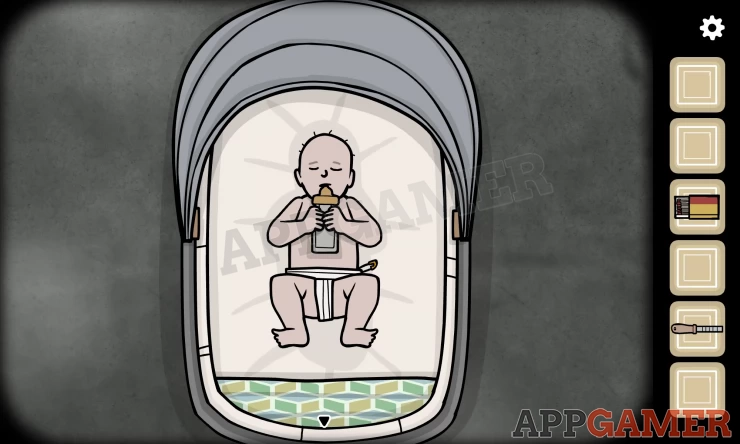
Next you have to make her fill her diaper, to do this, tap the diaper and soon she we fill her diaper, if it doesn't automatically go in your inventory, tap it to put it there.

There are a couple of achievements that you can get here:

  • Fast metabolism: Tap the diaper when she is wearing it and holding the bottle to make her **** in it.
  • Are you proud of yourself?!: Keep poking the baby a little more than you need to until you get the achievement star.

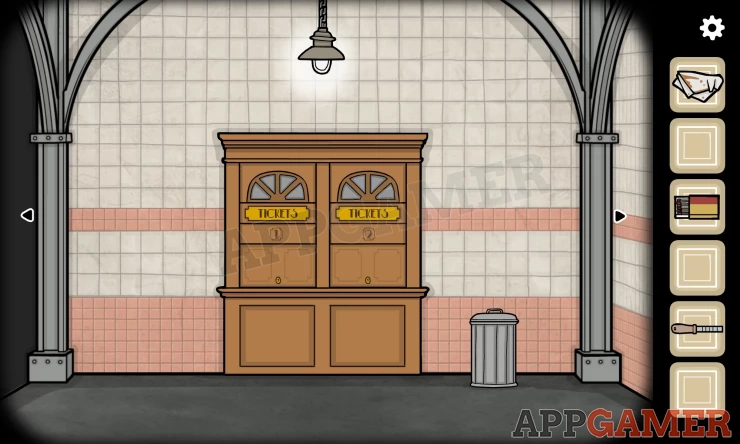
Exit from the baby scene and tap to go left where there is the ticket office and metal bin.

Underground Blossom Walkthrough

Tap the metal bin to zoom in, then tap the lid to slide it open and again to drop it to the floor, drag the dirty diaper to the open bin.

With the diaper in the bin, drag your matches over to the bin and it will ignite the contents.

Underground Blossom Walkthrough

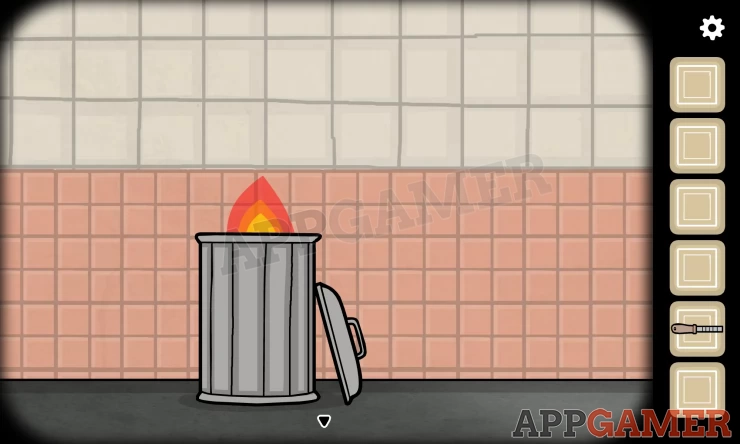
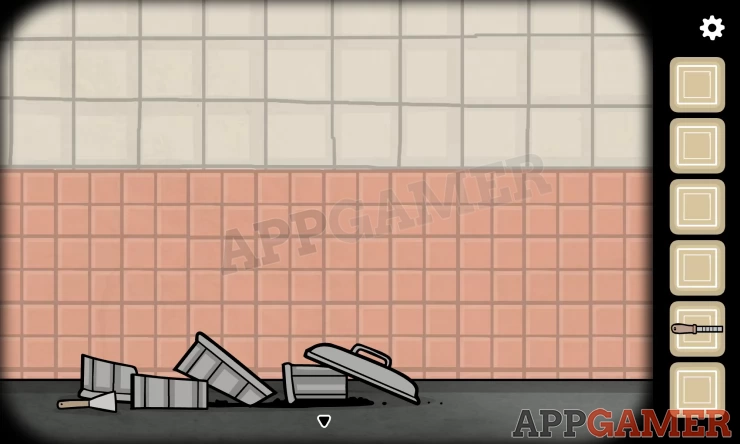
While the bin is on fire, tap it to make it explode and take the scraper from the floor.

Underground Blossom Walkthrough

Get the gold key

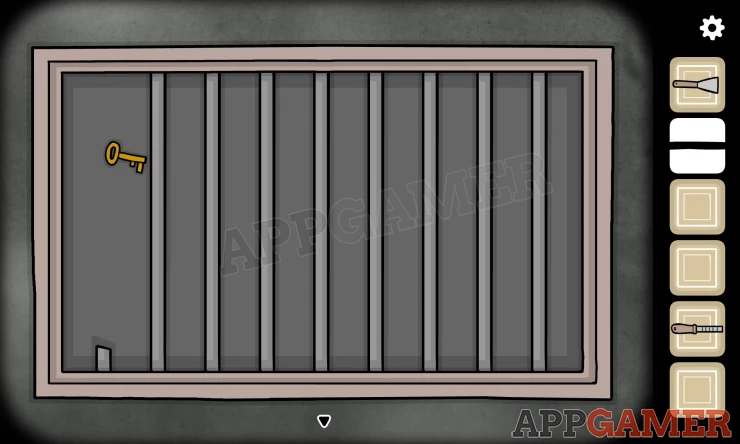
Go back to where the box was on the floor, there is a drain on the floor too, tap that to zoom in, you'll notice that one of the bars is nearly broken, use the file that you found earlier on the bar to break it completely. Tap the broken bar a couple of times to add it to your inventory. Use the broken bar (rod) on the gold key that is also in the drain, this will push it to where you can grab it.

Underground Blossom Walkthrough

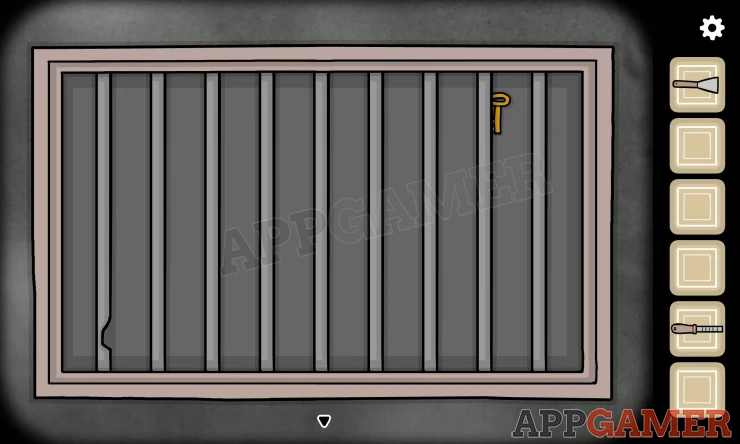
So when you can, tap the gold key to add it to your inventory.

Underground Blossom Walkthrough

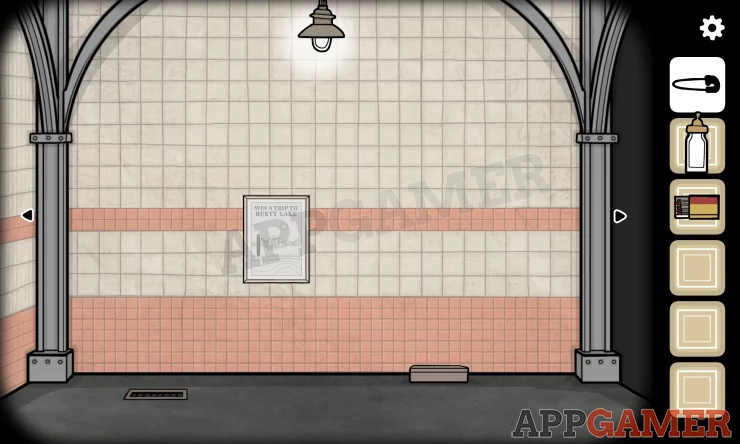
While you are still in this area, use the scraper on the poster that is on the wall. So first of all, tap the poster to zoom in, then tap your scraper, then the poster lots of time to reveal the message 'The Future Will Arrive'.

Underground Blossom Walkthrough

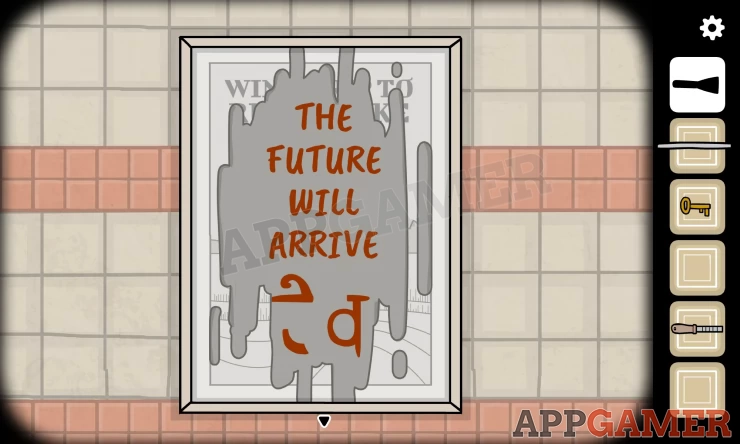
There is also a symbol underneath, which you'll need to take note of.

Get the time for the station clock

Go back to Rose and tap her again, notice the gold item near her waist? Tap that, and select the parts of it that exactly match the symbol on the poster. When you get it correct, it will turn into a clock with the time 10:15

Underground Blossom Walkthrough

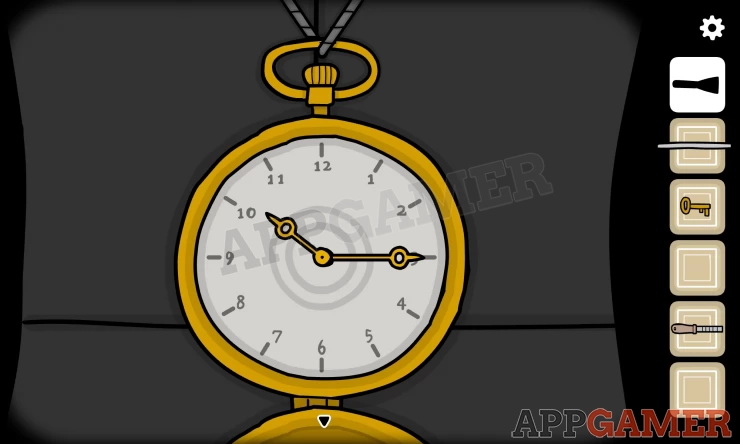
Zoom out, then tap left of right until you get the part of the station with the large clock. Here you rotate the hands until you get the time 10:15. When you have done this a train will arrive with a conductor.

Underground Blossom Walkthrough

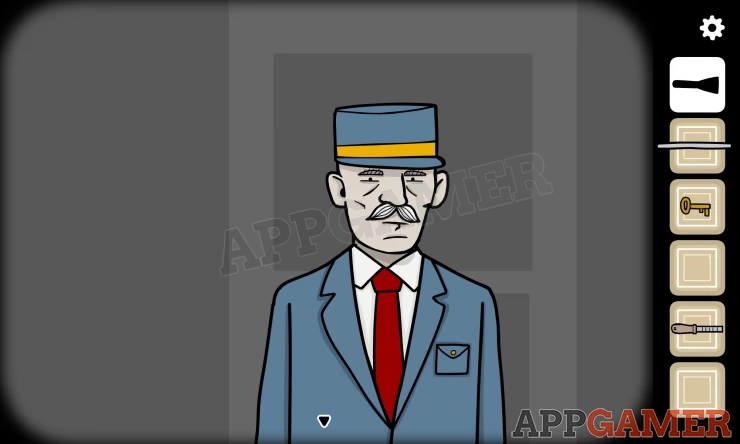
Click the train doors to open them and click on the train conductor to bring him into focus.

Tap his pocket and it will open, tap it again to get the coin that is hidden in there. If you tap his face he'll ask for your ticket, you don't have that yet, but you do have some money now, so head back to the ticket office.

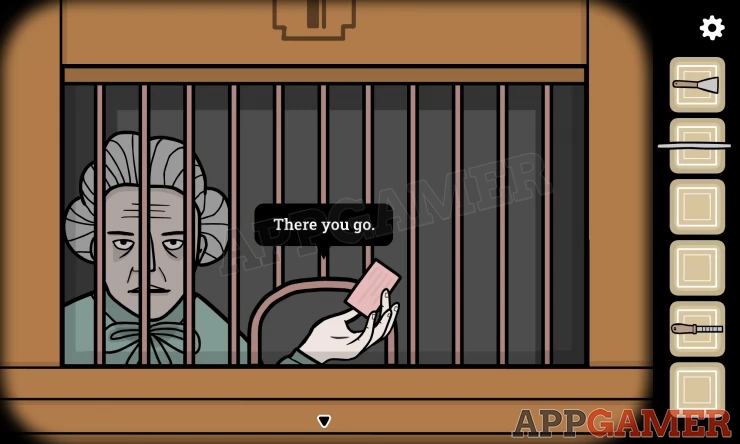
Once you get to the ticket office, tap ticket counter 1 and use the gold key that you picked up earlier on the lock, then drag up to open up the office, there is a lady in there.

You can try tapping her, but it won't work, you'll need something a bit stronger, so use your rod from the broken drain to wake her up by prodding her.

Now she is awake, tap her and she'll ask for your coin, give it to her and she'll give you a ticket.
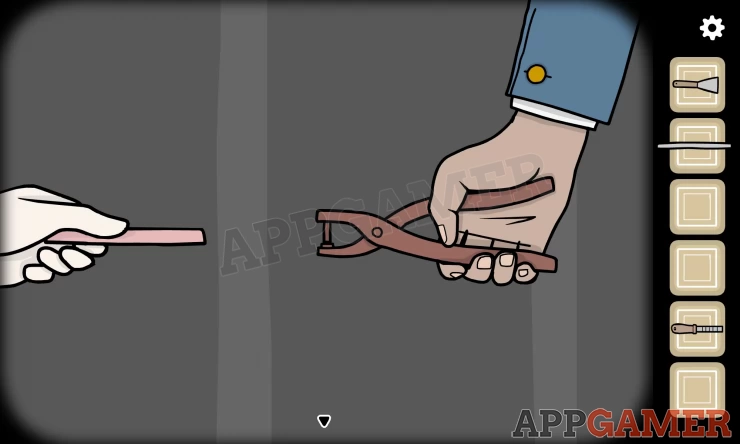
Underground Blossom Walkthrough

Go back to the train conducter and give him your ticket.

When you give him your ticket, his ticket clipper will also appear. You need to tap it to open it up, and drag the ticket to within the clipper. Tap the clipper to validate the ticket.

Underground Blossom Walkthrough

you can now enter the train, tap the doors to close them, and away you go to Child Lane.

Child Lane Walkthrough Chapter 2 Underground Blossom

In no time at all you will have arrived at Child Lane there is a mother and daughter there. Tap to move closer and then tap each of the characters to see what they have to say.

Underground Blossom Walkthrough

To the left of the couple, there is a metal panel, use your scraper on it. It's old gum.... Well she said she wanted candy?!?

Underground Blossom Walkthrough

Go back to the little girl, and give her to old gum. Tap her face while she is chewing and she'll blow a bubble. Use your trusty rod again to pop the bubble.

Underground Blossom Walkthrough

Tap the chewed gum that is on her face and it will go into your inventory.

Tap a couple of scenes to the right and you'll see a man sitting on a bench. On the floor there is a poster, tap it to add it to your inventory.

Underground Blossom Walkthrough

In another scene in chapter 2 there is a poster already on the wall, with an empty space for another next to it. Use the gum on the space within the empty frame then use the poster that is rolled up in your inventory on that empty space, and drag to roll it down. The chewed gum will stick it in place.

Solve the poster puzzles

The poster will now give you clues as to what to do next:

  1. Smile: Click on the smile in the poster.
  2. Sparkling Eyes: Click on the eyes in the poster.
  3. New Bracelet: Click on the bracelet in the poster.
  4. New Hair: Click on the hair in the poster.
  5. Large Eyes: Click again on the eyes.
  6. Bigger Smile: Click again the lips.

The final command is a surprise, and this is not one for kids, so be cautious.

You'll see an emergency number come up: 53114 (this may be different in your game)

Underground Blossom Walkthrough

You don't have the key to the phone box just yet though.

Next you have to solve the second poster puzzle.

Underground Blossom Walkthrough

Click it will say Holidays from small to big, so you have to click the items in the poster from smallest to biggest (except for the man in the poster) as follows: drink, hat, kite, camel, airplane, pyramid, sun.

If you've done it right, you can get the key from the top left corner of the poster.

Find the missing mosaic piece and fix the mosaic

Back at the starting scene of this chapter there is a glass mosaic that is not in the right order, tap it to zoom in, there is a missing piece, the little girl has this.

Look for the little girl again in all of the scenes of chapter 2, she will be hiding behind objects, you'll need to do this a few times until eventually you will find her holding the missing mosaic piece.

Underground Blossom Walkthrough

If this does not work, then you'll also not to make an interaction with the man on the bench, tap on his head to listen to him.

Underground Blossom Walkthrough

When you have the missing mosaic piece, tap to add it to your inventory then go back to the glass mosaic that needs fixing and add the missing piece.

Once you have dragged the missing piece onto the mosaic you can now tap the tiles to try to get it looking as it should. So, either clicking on them if using a mouse or swiping on them will change the image if using a mobile device.

Once you have correctly completed the mosaic puzzle a crank will be revealed from a secret compartment, which you should tap on to move it to your inventory.

Underground Blossom Walkthrough

Now you have the crank head to the closed newstand, tap to zoom in and use the crank on the hole at the left of the newstand. With the crank in place, turn it round to open up the shutters.

Underground Blossom Walkthrough

Tap the newspaper to put it in your inventory and go back to the man sitting on the bench who is interested in news.

Underground Blossom Walkthrough

Zoom in to the man on the bench and use the newspaper on him, he will read it. But you ave to arrange the headlines in the newspaper so they match the photos.

You can then take the coin from his pocket.

Use the phone to get the time

Head to the phone booth and use the key to open it up, then use the coin on the slot. You can now use the phone.

Underground Blossom Walkthrough

You have to dial the number from the poster earlier, 53114 (unless your number is different).

If you've done it wrong, just exit out of the dialer, and go back in and try again.

Underground Blossom Walkthrough

If you've done it right, the game will zoom out.

To use the dialer just tap it to zoom in then select the number you want and spin it round to the right until it reaches the marker towards the bottom right of the dialer, then select the next number and do the same again.

You should click the earpiece on the end of the cable to listen to the message. You'll need to click it a few times to hear the whole thing, but basically the clue is to 'look in the eyes of the bird'.

Find the Bird Statue

Next head back to the man reading the newspaper, to the left of him there is a statue of a person with a bird's head, zoom in there and click on it's eyes.

Then click on the lower part of the statue and use the rod to lever open the bottom part. You'll then see the code 8827.

There is a case to the right of the men on the bench with the newspaper, tap that and enter the code 8827 in the combination lock.

It will open the case and you can take the camera.

Head back to the little girl, and give her the camera. She'll take a few photos and scream, you then need to scroll through the rooms to find her mother. You'll see a scary character behind her.

You'll see the mother taken away on the train, but there is a purse now on the floor, tap and and take the items which are the nut driver, gold timepiece and a note which you can read.

Get the Glass Panel

Scroll back through the rooms to the one with the phone box. On the wall in the same room there is a panel, and you can use your nut driver on it to open it up.

When it is open, you can take the blue glass panel.

Develop the Photos

Find the little girl again, she should be hidden in the base of the statue, tap her, and you should be able to take a roll of film from the floor.

Head back to the Photo Service booth and drop the roll of film in there. Then tap the photo service sign hanging down from the booth.

Find the station clock hanging from the ceiling. If it is pointing the XII, roll the hand round until it points to IIII which would be 20 minutes ahead.

Head back to the photo booth and you'll be able to take the developed photos.

In one of the photos you'll see the time 4:05, you'll need this info later.

Rotate the Mosaic Pieces

Head to the room with the phone, and above the Child Lane sign, put you glass mosaic piece. You now need to rotate the pieces so that the picture looks correct and everything matches up.

Once done, you can take the clock hand from the panel that opens up.

Now head back to the clock hanging from the ceiling, use the clock hand that you just got on it. And rotate the hands so the time is 4:05. This means pointing the long arm to the I and the shorter one to the IIII.

The train will arrive at the station, when the doors open tap the conductor and he will ask for your ticket.

In the room with the man reading the newspaper there is a ticket machine on the wall, tap that.

Chapter 2 Ticket Machine Puzzle

You now have to solve the puzzle based on shapes.

Above the ticket machine there is a mosaic picture and also to the right there is another. In another toom with the photo booth there are two more mosaic pictures that need to be examined for clues too.

The clue you need is in those four pictures.

To solve it you just need to light up 7 squares to make a H shape, then click on the left middle and right middle squares to form a X shape, then click the orange button and you'll get your ticket.

Now you have your ticket, go back to the conductor on the train and give it to him.

This concludes Chapter 2: Child Lane of this Underground Blossom walkthrough.

The train will now move on to it's next destination, School Street.

School Street Walkthrough Chapter 3 Underground Blossom

When you arrive at school street you can interact with the girl, she says someone has stolen her photos.

On the floor in the same room you can take the peanuts from the packet, and tap the piece of paper a number of times until it turns into and plane which you can take and put in your inventory.

Find the tin can on the floor in the room with 4 school children standing together and use the nut driver on it, it should open and you can take the sausage.

Now find the boy standing on his own with glasses and tap on his book to help him.

If you open the book you will see faces, names, and descriptions. Based on he descriptions and some detective work you have to arrange the photos so that they match the correct name, here's how to do it.

Who's Who?

Here are the instructions to help you work out who is who in the photos.

  • Head back to the group of four kids, tap on the tall blonde haired boy and give him the peanut.
  • Tap the girl with red hair, and look in her pockets you'll find a diamond earring.
  • Give the brown haired girl on the right the paper airplane.
  • Head back to the room with the three kids standing together and the boy apart from them.
  • Tap the girl with the single diamond ear ring and check her pockets, you'll see a note clue.
  • Then tap the blonde haired girl to the left and give her the sausage.

So now you should know more or less who is who, tap on the boy's book again, and you can start to rearrange the photos based on the the information you've found.

Interact with the boy on his own again he'll ask for a peanut. So go back to all of the other school children and take back the peanut, sausage and paper plane.

Give the boy with the book the peanut, he'll then ask for the other two items, give them to him too.

He gives you a worm.

Look above and there is a bird in the rafters. Click there and give the bird the worm.

The bid will fly away and an egg will drop to the floor. When it lands it is actually a school bag, click it and take a look at the items on the floor.

Unlocking the Book

There is a puzzle here, basically you have to unlock the orange book. To do this measure each of the three other items and enter their length as a code in the book.

The code 637 should unlock the book and you'll find the missing photos inside which you need to take back to the girl that you saw when you arrive at School Street station.

She tells you that you train will arrive at 2:45.

Find the station click and rotate the hands so you get the time 2:45.

You'll need a ticket, so go back to the ticket machine where the girl is, and select the ticket machine.

Chapter 3 Ticket Machine Puzzle

Starting from the bottom right, you need to follow the instructions in each of the buttons, but making sure that you only select buttons that have not yet been clicked.

So, in situations where you have a choice of direction, select the direction that takes you to the button that you've net pressed yet.

One direction arrow means take a step one button in that direction, two arrow, means jump one square and hit the second one in that direction and three arrows in the same direction means jump two squares in that direction and hit the third one.

One clue you may need is that when you arrive at the top left corner, take the option that moves you one square to the right.

If you are stuck for decisions, see where the next step will take you and work out if that path keeps you following buttons that have not been pressed yet.

Once you have clicked the final button, and arrive at all of the squares, you'll get your ticket.

Head back to the station clock and you should see the train and be able to give your ticket to the conductor.

This complete the School Street walkthrough, the train will now move on to the next stop which is Bird Bridge Station.

Bird Bridge Walkthrough Chapter 4 Underground Blossom

When you arrive you can interact with the young woman on the bench and then tap o the case on the floor at the back of the room and take the pencil and piece of sausage.

Give the girl on the bench the pencil and then take the line that is drawn.

Head to the room with the food and drinks shop and tap on the drain cover on the floor. Tap it again to remove the cover.

A stick will appear and you can use the line on the stick.

Now head to the room with the large poster of the woman singing, tap it and she'll start to sing.

When she is done, tap the man with the trumpet and he will start to play too. Eventually a fish will appear from inside the trumpet and fall on the floor. Tap the fish and take the hook that comes from it's mouth.

Go back to the room with the drain, and use the hoot on the line and then use the piece of sausage on the hook.

Put the makeshift rod into the hole and you'll get a rat. Tap it and it'll run off to find it's hole in the wall. Follow him to it.

When he goes in the hole, you'll see a note, tap it, and from the note you'll gt a time of 5:00.

Find the station clock and rotate the arms so the clock says 5:00. That means pointing the smaller arm to the V and the longer one to the XII.

The train will then arrive. On interaction with the group, you'll be told you need the man with the red hat, scroll across the rooms until you find the man with the red hat and click him.

You then need to find the person with the brown case. Find him and it will start a number of interactions which are as follows.

  • In his pocket you'll find some glasses which you can take.
  • Find the man with the yellow hard had and give him the glasses.
  • Follow his instructions which tells you to go to the tall man, smiling.
  • Find the guy with the big grim interact with him and check his pocket, you'll find a tie. Then you need to find the person that needs a tie.
  • You'll find a man in a suit without a tie, give it to him.
  • You now have to find the man with the green tie and talk to him.
  • He'll tell you to basically find his twin brother, so look for a guy that looks just like him, but without the green tie.
  • Tap his pocket and take the lighter.
  • That is the last interaction with the group. As you scroll through the rooms now, you'll see a few people left, but the person to interact with first is the casually dressed man in the green jacket who tells you to buy the woman a coffee, and a sandwich for him.

Getting Some Crumbs

The man will give you some money.

Go to the shop at the station, give him one $10 note and tap the coffee sign, then give him the other $10 note and tap the sandwich sign. You should now have the items.

Give the man the sandwich, but he's not happy with it. Inspect the sandwich and move the ingredients around, you'll find 5 worms hidden in there.

You have to find them all and remove them before the man will eat the sandwich.

When he is finished, he'll give you some crumbs.

Now find the woman and and give her the coffee.

When she is finished you can find and take a cigarette from the bottom of the coffee cup.. Ugh!

The Suspicious Man

Go back to the shop and tap on the man with the hat looking suspicious to the side of the shop. He'll ask you for a cigarette, give it to him.

You then need to use the lighter on the cigarette in his mouth.

He'll ask you for the time but before you know it you've been robbed, there is an envelope on the floor, take the paper clip.

Connecting the Loudspeaker

In the same room there is an electrical cupboard. Use the paper clip on the lock there.

  • Here you have to connect the wires a certain way. Top left corner to bottom right corner. Bottom left corner to top right corner and middle left to top middle.
  • That should give you the green light. Now follow the cable back to the room with the girl and tap the loudspeaker which will start to work.
  • Go back to the man with the trumpet, and interact with him again so he plays once more. A bird will eventually fly out of his trumpet.
  • Head back to the room with the loudspeaker where you will find the woman, man and bird.
  • Tap the woman and she will call for the bird to come to her, then you need to feed it the breadcrumbs.
  • Go back to the man with the trumpet and tap him again, he'll play some more and you'll get a ticket.
  • Head back to the room with the woman and tap on the book that is beside her on the bench. Click to scroll through the pages and at the end, you'll get a time 'The long hand points to the tree while the short hand almost catches the dark soul.'
  • So head back through the book and look for the items mentioned in the clue. You'll see that there is a tree with the number 9, IX.
  • And you'll see the picture of the dark soul is the number 4, IIII.
  • Head to the station clock and sent the time to 3:45. So this means rotating the short hand so it end up just before the IIII and the long hand so it points directly to the IX.

The train will arrive and you can give the conductor your ticket. This completes the Bird Bridge station walkthrough, the train then heads to the next destination, Sorrow Cross.

Sorrow Cross Walkthrough Chapter 5 Underground Blossom

The train arrives now at Chapter 5, Sorrow Cross. Interact with the woman to hear more of the storyline, and she says that Bob must go and that his train leaves at 4.

  • Behind the couple there is a bench with a box under it, tap it to open it up and take the clock hand.
  • Find the station clock, add the clock had to it and set the clock the 4 o'clock.
  • A train will arrive and Bob will leave, tap him to hear more of the story.
  • When he has left pick up the wallet on the ground. From if you can take the money, coin and there is a card for 'The White Door - Mental Health and Fishing'

Vending Machine

Find the vending machine and use the coin in it. You then need to select the items that add up to exactly 100. There is only one combination to do this and it's the 20, 45 and 35.

  • Turn the dials under each one.
  • Examine them when the pop out of the bottom of the vending machine, put the rocket ino tthe bag with the bike on it.
  • Put the boat in the bag with the bike on it.
  • Put the rabbit back in the bag with the dog on it.
  • Some more items will come out of the bags.
  • Basically, each time you need to sort through the items and put them in the correct bag as to whether they are an animal, a vehicle, or a food or drink item.
  • One hint you may need and that is to put the fish in with the animals and not the food.

When you have completed a few rounds of this you'll get a corn cookie which you can tap on to add it to your inventory.

Pass through the rooms in the station and find the pigeon, give him the corn cookie.

Then you'll see a load of bits on the floor, you'll have to sort them so that the small yellow ones are closest to the pigeon. Then put the green after the yellow ones, then tap the bird and he'll eat some then fly away.

If he doesn't then bring the red ones closer than the white ones.

You then need to find the bird in a couple of locations and click it, until finally the train kills it!

You then have to search through it's remains and take the key.

Encounter with the Thief in the Cell

Head to the cell which is in the same location as the vending machine and use the key on the cell door.

Talk the the thief that took your stuff in the earlier chapter and then you have to leave the $10 note in the box under bench in the room where the woman is.

You then have to go to the platform, find the clock, and set it to 9 o'clock.

Head back to the place where you left the money, click to open the packet and you can take the iron saw.

Use the iron saw to break the lock on the cupboard in the same room and take the painting panel.

Painting Puzzle

Go to the room with the bin in it, there is a large painting on the wall. Use your painting panel on the slot at the bottom.

Then you have to move the central image and find images from the outer circle. When you have a match, click the central image and keep going until you have found them all.

  • Each time you get one correct, an image will be added to the central picture.
  • You have to be quite accurate, and you have to get all 12 to progress to the next part.
  • When done, you'll something like a shot or a hit, then you can zoom out and the contents of the bin will be strewn across the floor.
  • There are two notes there which will give you a clue... Make Pairs. So that's what you have to do.
  • Pair up each item with it's logical pair to complete this puzzle.
  • When you completed you'll get a letter and a pill which you can add to your inventory.
  • Give the pill to the woman and she will tell you more of the back story of this game.

As she says part of the story you need to figure out what to do for each sentence.

  • 'I dream of my mother, she holds me as a baby'

    Find her mother and the baby, and put the baby in her arms.

  • 'I dream of poor Bob, he holds his broken heart'

    Find the heart and give it to Bob. Just drag the heart through the rooms to do this.

  • 'I dream of myself as a little girl, and my mother. While she hold my hand, I see her face.'

    Give the hand to the mother and the head to the little girl.

  • 'I dream of the detective. He is there with a large fish.'

    Give the fish to the detective.

  • 'I dream of a bird holding a rat, and then I see the corrupted soul with the head of my mother'

    Take the heart from Bob and give him the rat. Give the mother's head to the demon like corrupted soul figure with his hand out.

  • 'I dream of you my feathered friend. Holding a branch full of blossom'

    Give the blossom branch to man in the suit with the bird's head.

  • 'I dream of my mother, she has grown old. She holds a black cube.

    Give the black cube to the old lady.

At the end of the scene you can take the metro ticket from the lady who is now lying on the floor.

Also on the floor there is a picture of the mother, there you can take the brush. Tap the brush to turn use it, and then head to the remains of the pigeon at the platform and tap the large splodge of red blood on the floor, the brush will now look like it has red paint on it.

Go back to the picture of the mother, select the brush and cover the painting with it, this should reveal the time 19:55

You now have to go back to the platform clock and set the time to 7:55.

The train will arrive and you can give your ticket to the conductor. This completed Chapter 5, Sorrow Cross. Our walkthrough continues with the train heading off to the next stop which is Soul Street.

Soul Street Walkthrough Chapter 6 Underground Blossom

Our complete guide to Underground Blossom continues with our Chapter 6, Soul Street walkthrough.

When you arrive at the station, head to the right and find the puzzle on the wall with the black and white dots.

The idea is to move the form one side to the other. You do this by moving he white dots, whenever you see the butterly, put the a white stone on top of the black holr that it comes out of.

To complete the puzzle, the butterly must fly through the hole in the top right of the puzzle. Try to use a different white stone for every move.

Head back to where you entered this level and you will see a hand reach for the butterfly.

You'll then be instructed to find the mother's timepiece.

The shadowy figure will give you a locker key to help you on your way.

Head to the right and take the crowbar that is next to the lockers. Then use the key to open locker number 7, or wahtever locker opens for you and take the pincers.

Head back to the room with the black and white dots and you'll see a double door that is locked. Use the pincers to unlock the door and open it.

Finding the Thief

Tap on the figure in the shadows to zoom in. It's the thief.

  • Tap the tape on his mouth and again to remove it. The piece of tape will now be in your inventory.
  • Outside the room is a box, use the crowbar to open it up and take the key to locker 6.
  • Go back to the lockers and open locker 6 and take the bucket.
  • In the same room is a large orange barrel, use the crowbar on it, when the oil comes out, use the lighter on the oil.
  • Go back to where you entered the level, with the shadowy figure and tap on the electrical box at the back of the room, tap it again to remove the front panel.
  • Tap the wires leading up from the box and use the tap on the wires to try to fix them together.
  • On the box, turn the first two buttons so their switch faces up and the third one so it is facing to the left.
  • Head back to the room where you exploded the oil barrel and tap the panel on the back wall, it should raise up and reveal a valve that you can take.
  • Turn the dial at the top of this unit if you need to raise up higher the shutters.

Using the Water

Go back to the room where the thief is being held, and out side there is a pipe, use the valve on the pipe, turn the valve and some water will come out.

  • Use the bucket to collect some water.
  • Use the bucket of water on the head of the thief. Get some more water from the puddle on the floor and use it on the fire from the oil barrel.
  • From the ashes, you can take the iron wire.
  • Get a third bucket of water, head to the right and look for a drain on the floor. Use the crowbaron the drain to open it, and put the water in the drain.
  • You'll get a clothespin when it fills with water, take that.

Interacting with the Thief

Go back to the thief and put the clothespin on one nipple and the paper clip on the other. If you can, pull each one when you put them on him. Give each one a really good pull and you should complete an achievement here.

Head back to the room where you entered this level, inspect the wires again, and you need to use the iron wire on the wires that are heading towards the right. Just a little bit up from the circuit box itself.

Now adjust the dials so they are facing the directions as follows:

  1. up
  2. right
  3. up
  4. left
  5. right

Go back to the thief in the room and pull the handle that is above his head to give him an electric shock.

That seems to be enough for him to give you the information that you need.

He tells you that the key is behind the hand of the dead woman.

The dead woman is actually a poster on the wall, so find that and then tap on the hand to reveal a key that you can take. There is also another piece of tap, which you also need to take.

Locker 8

This key will open locker 8.

Inside the locker you'll find a case, to open it you'll need the code. To get the code you have to look at both of the arms of the thief and examine his tatoos.

Use the piece of tape on the broken part of the cable which leads to the light above the shadowy figure.

The set the dials on the control panel as follows:

  1. up
  2. right
  3. up
  4. up
  5. right

This will activate the light and show you some symbols on the wall.

Go back to the lockers and enter the code 4195 to open it and you can take the golden timepiece.

Give the golden timepiece to the shadowy figure on the floor. Then tap the parts of the symbol on the timepiece that correspond to the orange markings on the wall behind her.

The timepiece will start to spin and eventually stop at 5:15 before breaking.

Head to the platform to the find the train. The shadowy figure will talk to you if you interact with her.

You both get on the train, and this time it looks like without a ticket!

The train then takes us to the final part of our Underground Blossom walkthrough, Chapter 7, The Lake.

The Lake Walkthrough Chapter 7 Underground Blossom

We are now at the final chapter of the game, this guide will help you wrap up the remaining things to do to complete this enthawling game by Rusty Lake.

When you arrive at the lake, search for the shadowy figure and interact with her when you find her.

She instructs you to look behind you for the tree, so tap down, then twice to the left or right and you should see a small tree in the clearing.

Interact with the women that are either side of the tree as the final part of this story unfolds.

At the end of the cinematic sequence and after hearing the yound woman speak, head back to the train and board it.

This concludes the game and brings to a close our complete Underground Blossom Walkthrough of all 7 Chapters.


Comments & Replies

AppGamer - Mobile Game Guides and News since 2008.

AppGamer.com is owned by Web Media Network Limited, UK company number 3783771.

© 2023 Web Media Network Limited, 86-90 Paul Street, London. EC2A 4NE. United Kingdom.

All rights reserved. No part of this website or its content may be reproduced without the copyright owner's permission.

This site is not affiliated in any way with Google, Apple or any video game publishers.

About Us | Contact
Privacy Policy | Terms of Service

Promote your Game
 
Game Guides