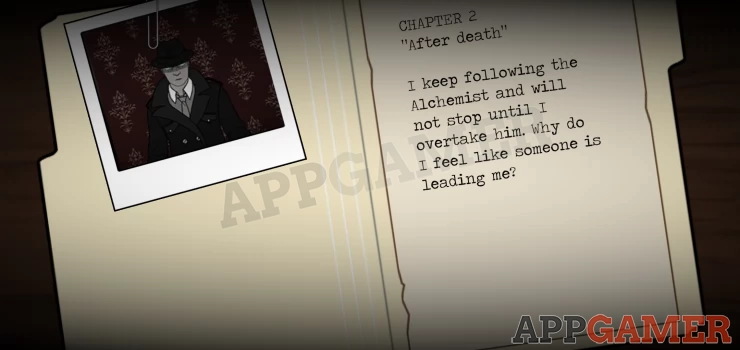
Chapter 2 - After Death
More Strange Case: The Alchemist
Strange Case: The Alchemist is an escape room style game from Labeledman.
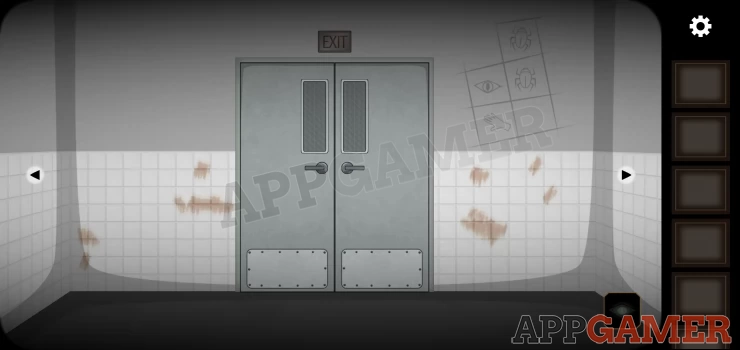
After completing Chapter 1 you are now in a laboratory environment. The second chapter is called 'Afterlife'. You have an EXIT door in front of you but that is not an option. Take note of the drawings on the wall to the right.
Looking around there are various doors to explore.
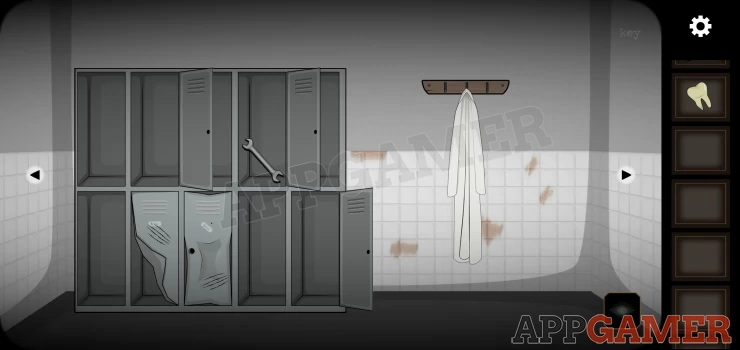
First turn around to the opposite view to see some lockers and a coat hanging.
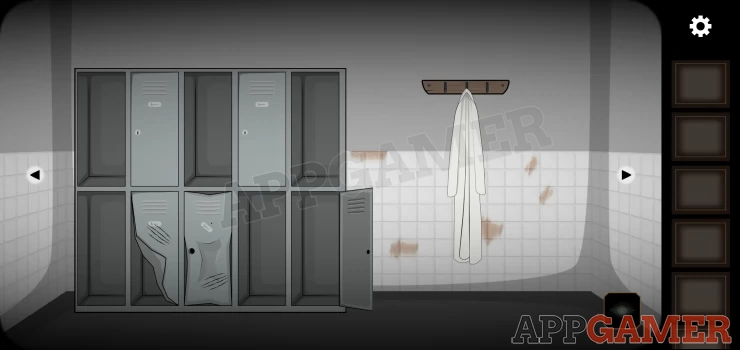
Tap the coat and a key will fall from it, collect this.
Now turn ON the Ghost Vision.
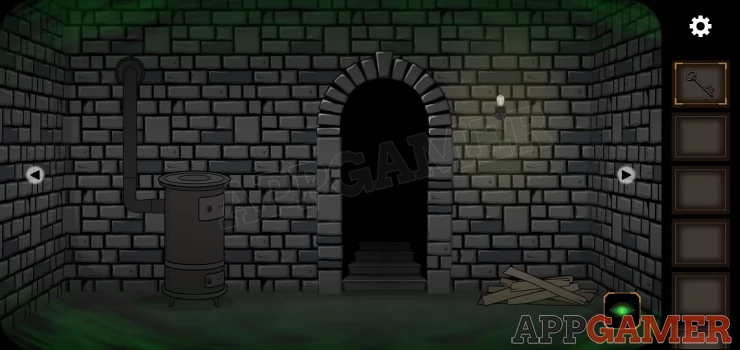
You cannot go though that doorway. Collect the wood from the floor on the right.
Then view the stove on the left and collect some matches from it.
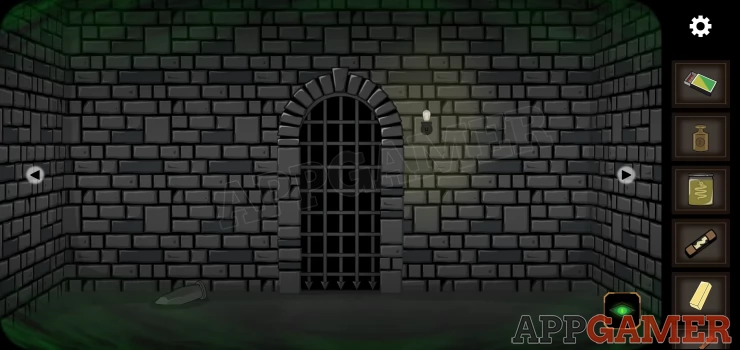
Turn left to see 2 doorways, one blocked by rocks.
Go through the left doorway.
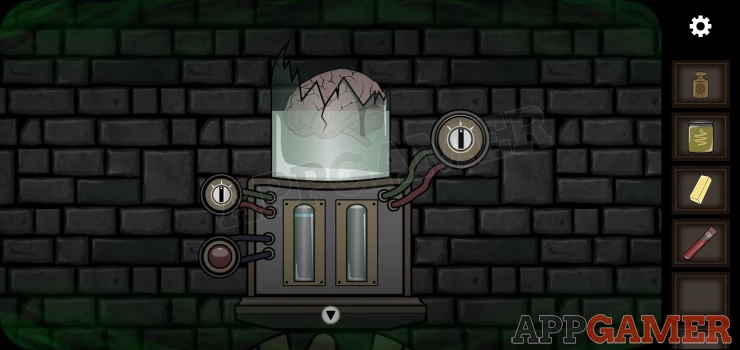
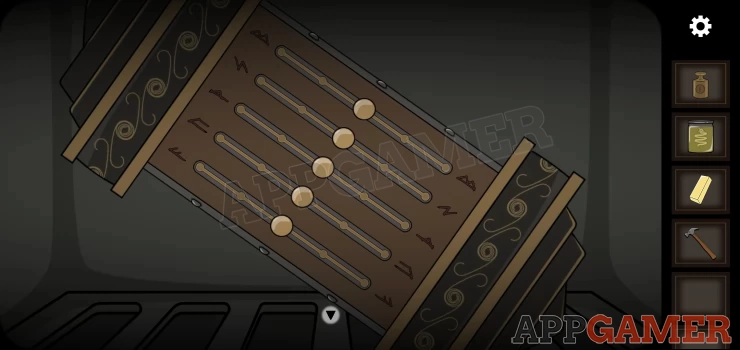
View the machine in the center. This has a puzzle.
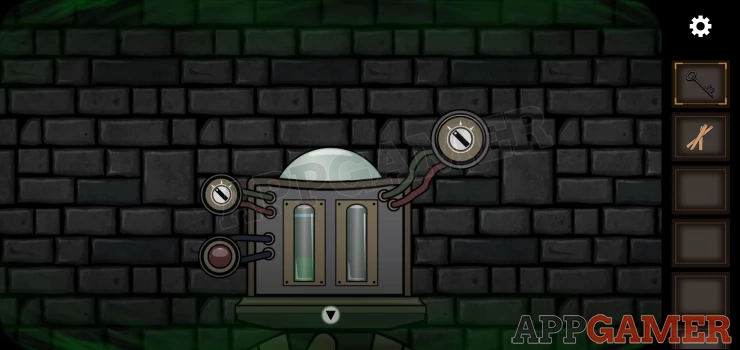
Hint you need to fill the green tube up to the blue line If you go over then it will empty.Set the top 2 dials to control the level of the red tube. When you press the button the green tube will fill by the same height as shown on the red tube.
Solution: Set the dials to positions 1 and 2, then fill twice. Next set dials to position 2 and 2 and fill once.Show
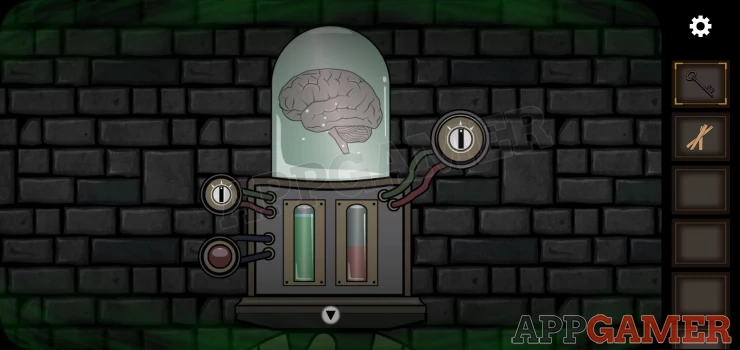
A brain in a jar will rise up.
Turn OFF the Ghost Vision. You will be in a room with a desk and a fridge
View the poster on the wall for a clue.
Then also view the papers on the desk.
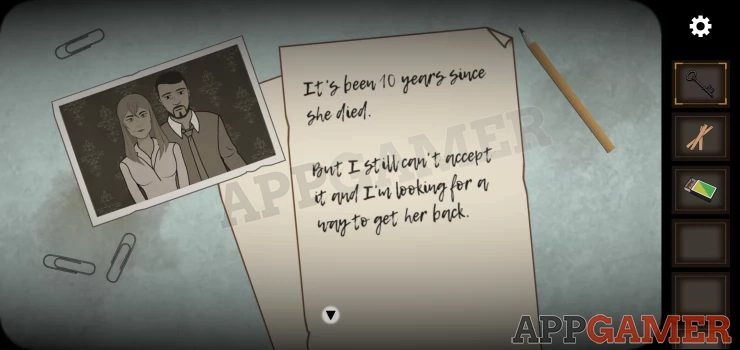
Tap the photo to turn it over and see another clue. 17:10Show
To the right is a set of scales. You can collect a 'plummet' weight.
Now open the fridge
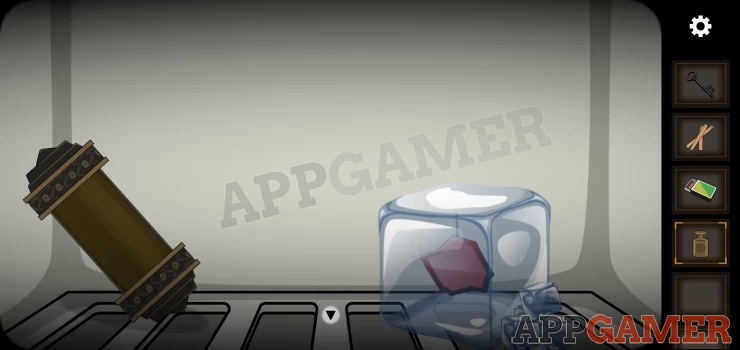
Collect the ice cube. There is also a puzzle scroll that we will come back to.
Finally use the key on the cabinet door below the desk. Collect a screwdriver.
Now back up and turn ghost vision back ON. In the first room turn right to see the stove again. Open the stove and add the wood to it. then use the matches to light it
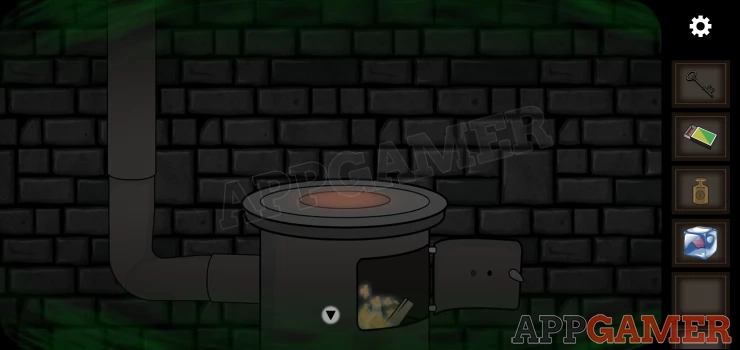
Place the ice cube on top to melt it and then collect a 'piece of red glass'
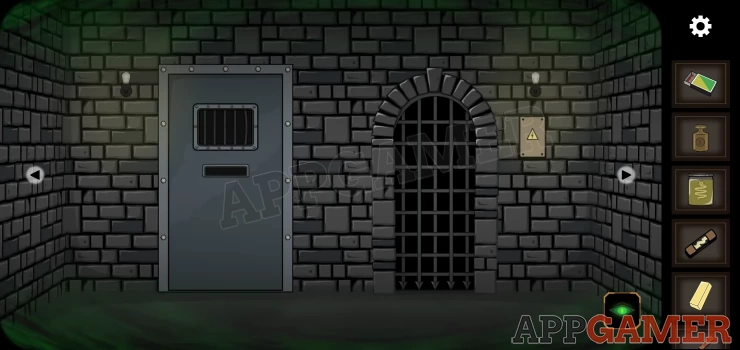
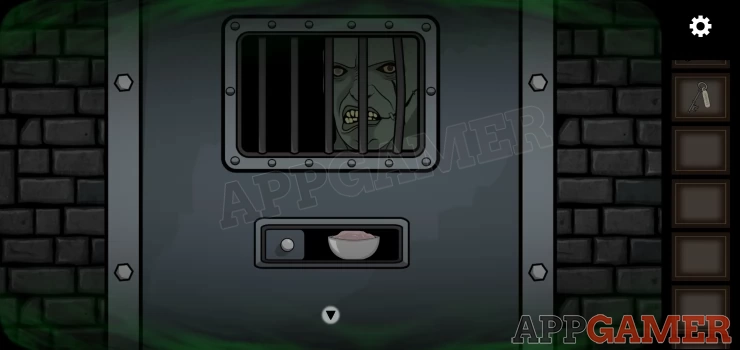
Turn OFF the Ghost Vision, then turn to the left to see 2 doors, the one on the right has a stethoscope symbol and a keypad.
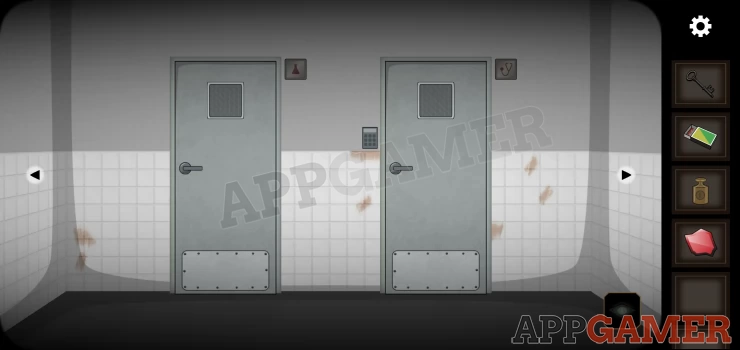
View the key pad, you now need to find the code.
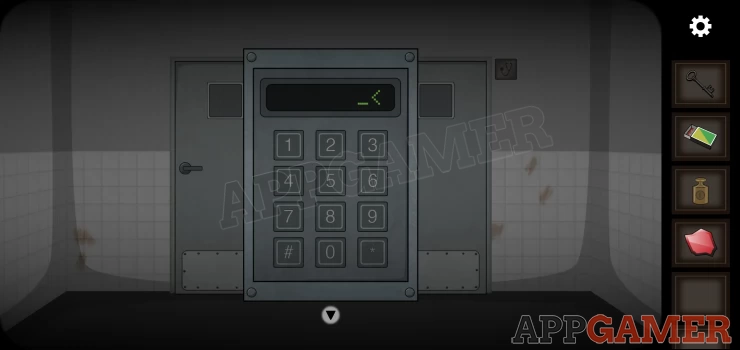
Hint: use the red glass.
Solution: place the red glass on the keypad and move it around to see the buttons that need to be pressed. start with the largest print.Show
Code: 1607Show
Enter the room to see an examination table and an X-ray.
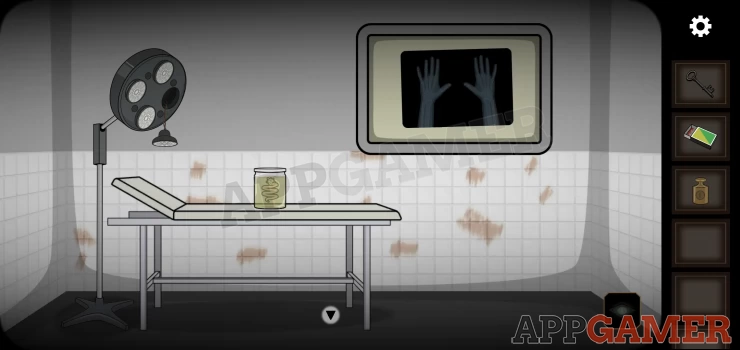
Collect the 'jar with nasty' from the table. Then tap to view the lamp.
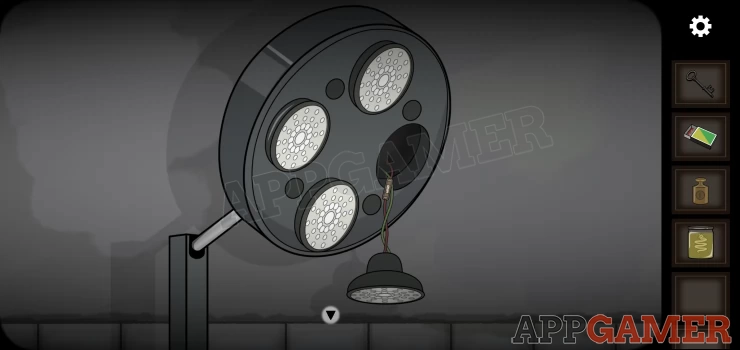
Collect the fuse from the exposed wire.
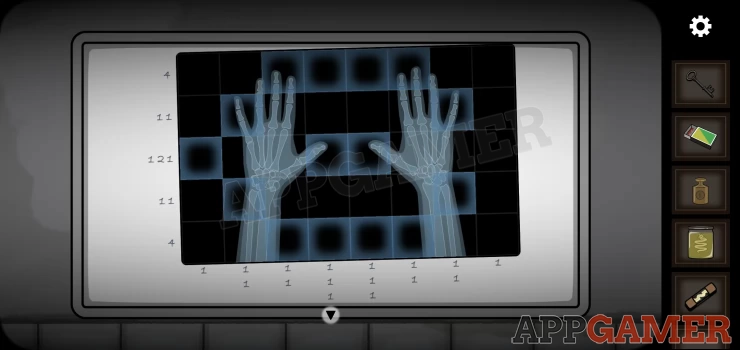
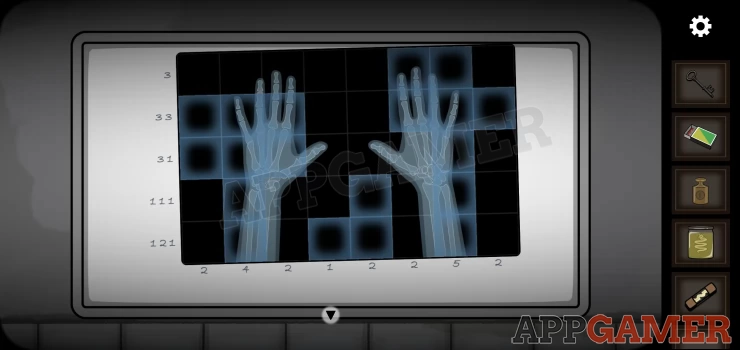
Now view the X-ray on the wall. This is a puzzle.

Hint: you nee to tap to highlight the squares. The numbers on the rows and columns tell you how many to highlight, when there are more than one number e.g. 3 1 1 then you need to highlight '3 gap 1 gap 1' somewhere on that row.
Solutions: There are 3 levels to this.
Step 1: One step missing - you need to also tap the top right to complete it.Show
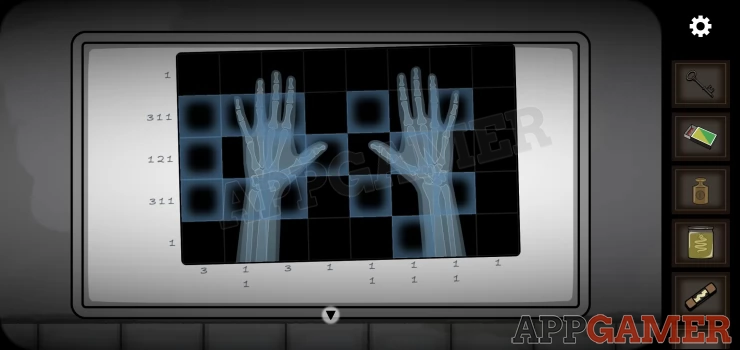
Step 2: This one is symmetrical, you need to also tap the center right box.Show
Step 3: As before to complete this tap the top right box to highlight it.Show
This will reveal a safe with a 4 digit code.
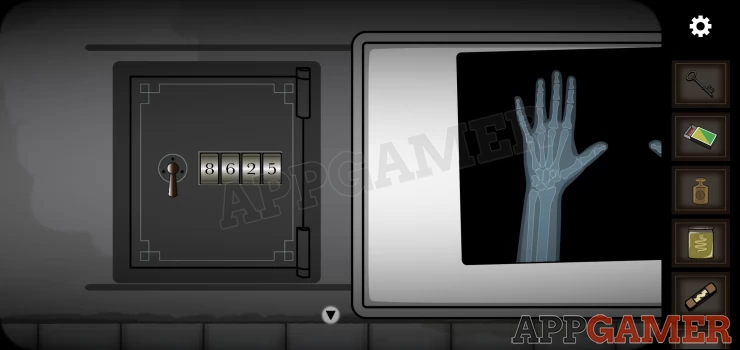
Hint: we found a clue for this before.
Solution: use the code on the back of the photoShow
Code: 1710Show
Collect a gold bar
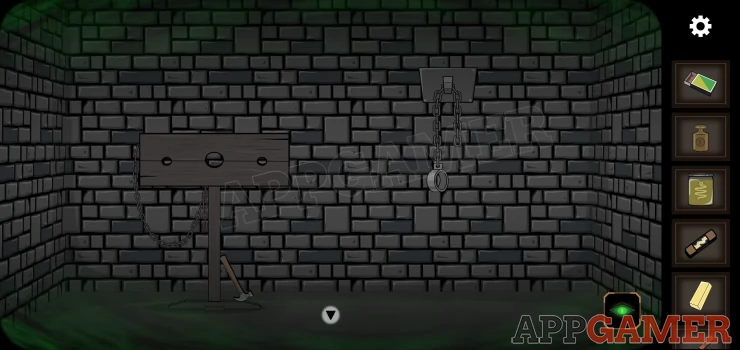
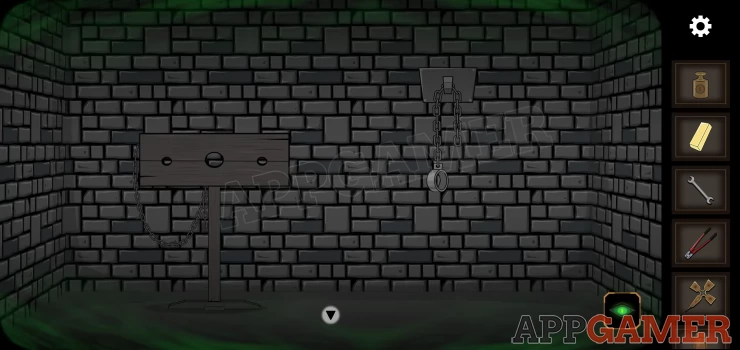
In the same room turn ON the Ghost Vision. There are stocks
Collect the hammer from the ground
Back out to the center room and then enter the doorway on the left, you will see the machine with the brain in the jar. View this.
Use the hammer to break the jar and collect the brain.
Back out of the room and turn to the left to see this single door way.
Collect the stone from the ground.
Now turn left again to see these 2 doors.
Tap to view the electrical box on the right. Then use the screwdriver to open the cover.

Remove the broken fuse from the slot at the top, then add the one you have collected to activate the puzzle.
You now need to rotate the 3 cable selectors to complete the circuit, moving each one though will move one of both of the others.
Once complete the gate will rise on the right doorway. Go in
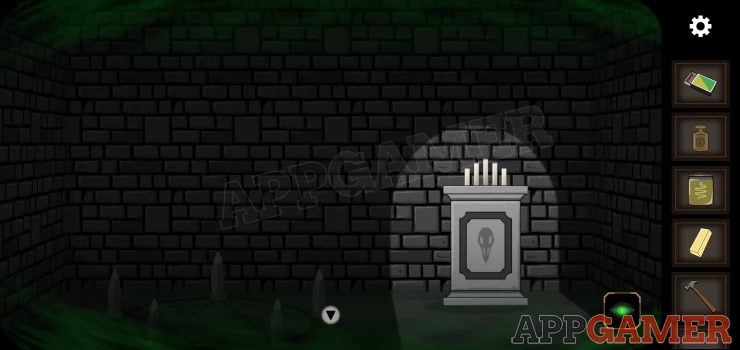
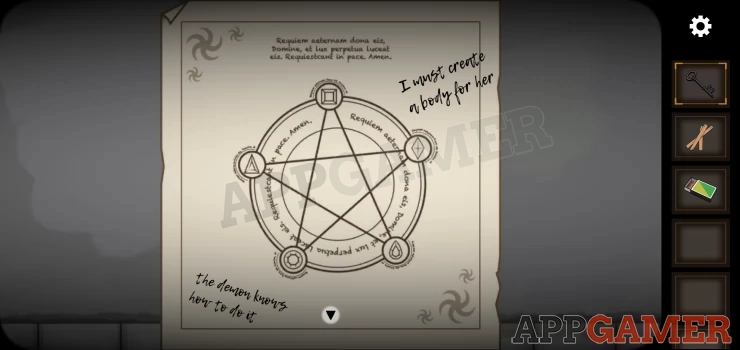
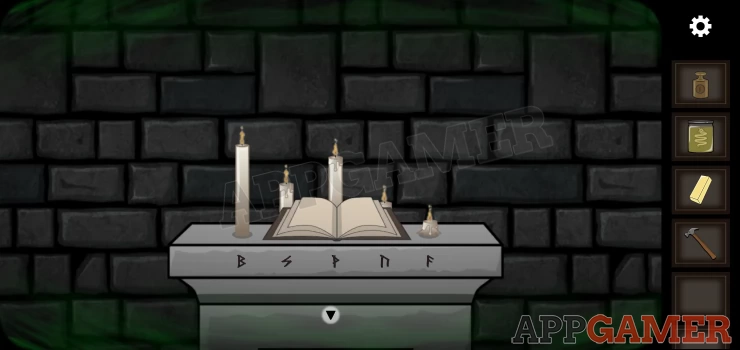
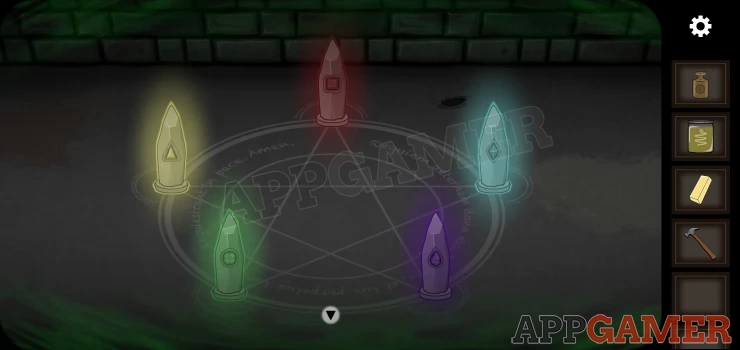
Tap to view the altar on the right with the candles.
Tap to view the book to see a clue.
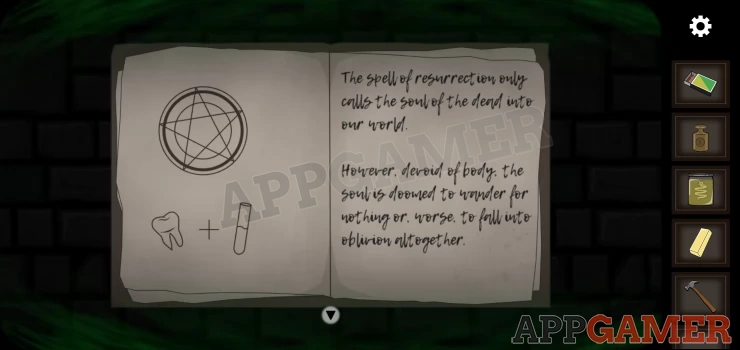
Now use the matches to light the candles. They will quickly burn down giving you another clue. Note the height of the candles and the symbols below each.
Turn OFF the ghost vision. You will be in a room with a medical chair.
Note the drawing on the wall.
Tap to view the table on the right.
First collect the key, then take the scalpel.
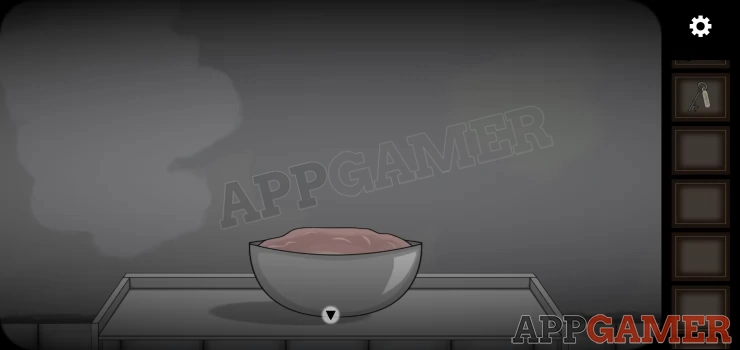
Place the brain in the bowl, then use the scalpel on it to cut the brain and then collect a bowl with minced brain.
Turn the Ghost vision ON.
Back out of the altar room and then tap to view the metal door on the left.
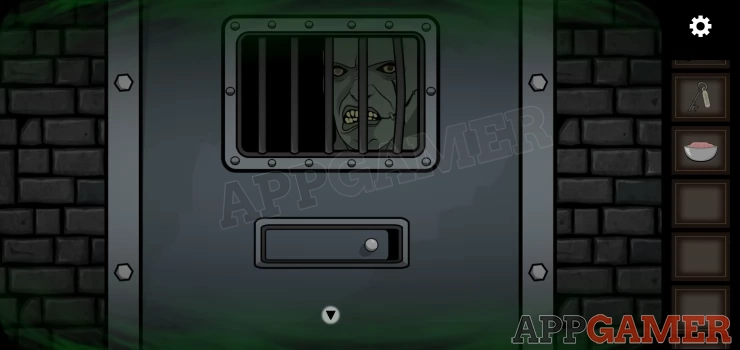
Tap the sliding panel in the door to open it and then place the bowl of brains in it.
Close the panel, the creature will disappear, Open the panel again and you can collect a tooth.
Now return to the room with the fridge, to do this turn twice to face the other direction to see the 2 doors and the pile of rocks. Go in the left doorway and then turn ghost vision OFF.
Open the fridge and then view the puzzle cylinder on the left.
Hint: the symbols match those on the candles.
Solution: set the heights of the 5 sliders to match the heights of the candles. From left to right this is 1, 2, 4, 3, 5 (1 being the lowest position)Show
Once opened collect the flask of blood.
Now back out of the room with the fridge and turn to the right to see the lockers again. Use the key on the locker with the keyhole to open it collect the wrench.
Turn tight and turn Ghost vision ON so that you can enter the altar room again.
View the circle on the ground to the left. Note there is one stone missing.
Add the stone you have collected to it.
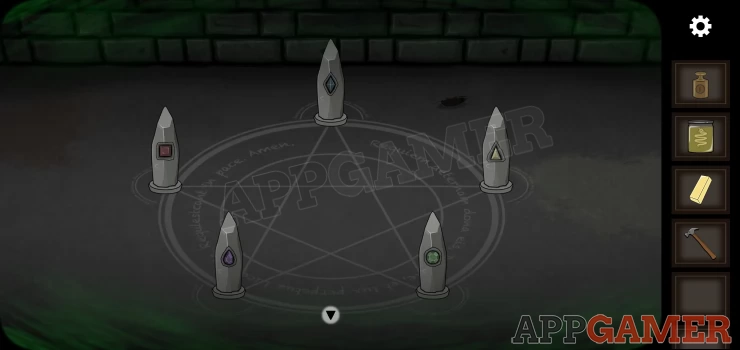
You now need to rearrange the stones, note the symbols on each.
Hint: you have seen a diagram clue for this
Solution: In the room with the fridge you saw a poster with the correct layout.Show
Once done he stones light up. Now add the blood to the center and then finally the tooth.
This will summon a case. open it.
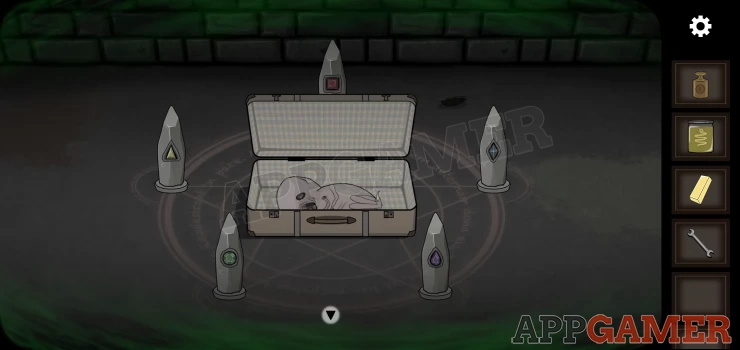
From inside collect bolt cutters, and a gold cross.
Turn the ghost vision OFF
Tap to view the head restrain on the char on the left.
Use the wrench on the bolt head to remove it (you will collect a screw)
Turn the ghost vision back ON.
Back out and turn twice to look behind you (2 doorwars and rocks) then enter the left doorway.

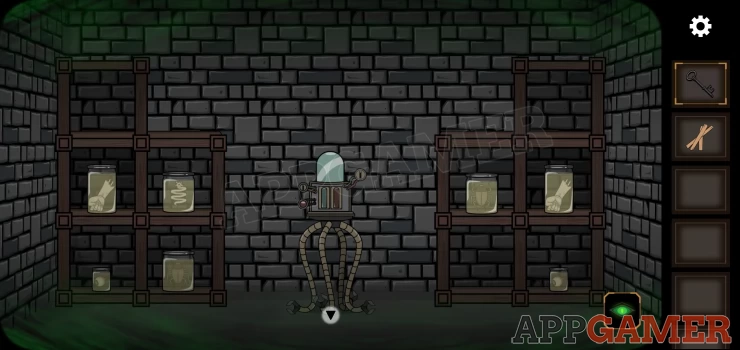
There are 2 sets of shelves on the left and right with jars on them. Add the 'jar with nasty to an empty shelf.
We can then swap pairs of jars to arrange them.
Hint: there are clues on the walls of the other rooms. Look for the drawings in the boxes.
Solution: Show
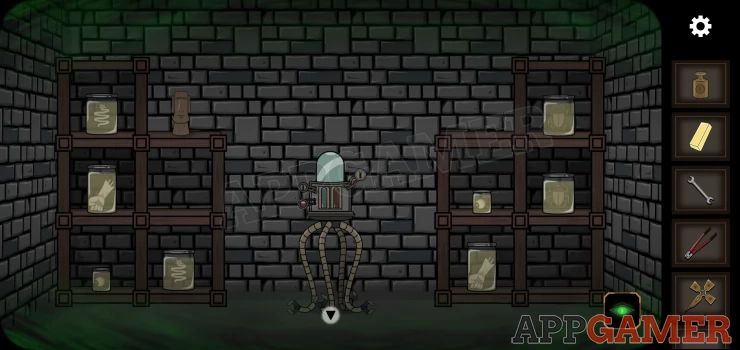
Collect the statuette that appears on the top left.
Back out to the center room, Turn OFF ghost vision. then enter the door on the right. (operating table and X-ray) Turn Ghost Vision ON
Use the bolt cutters on the chain on the right to collect it.
Back out and then enter the doorway on the left. Then Turn ghost vision OFF
You should be in the room with the fridge.
Tap to view the scales on the table.
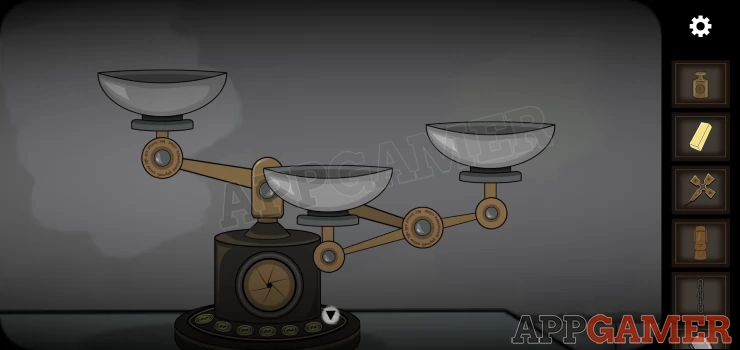
Add to the scales the plummet, the gold bar, the statuette, the chain and the screw.
Hint: you need to make the 3 bowls balance to the same weight. Move the items around to achieve this.
Solution: Show
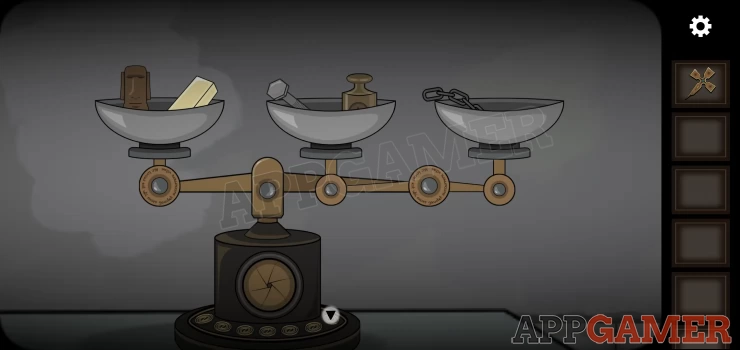
Collect the gold disk from the scales.
Now back out to the center and turn Ghost vision ON.
Turn to the left to see this single gated doorway.
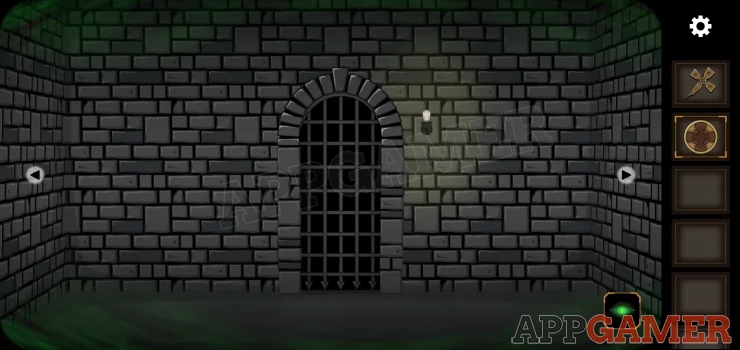
View the gate to see the center lock.
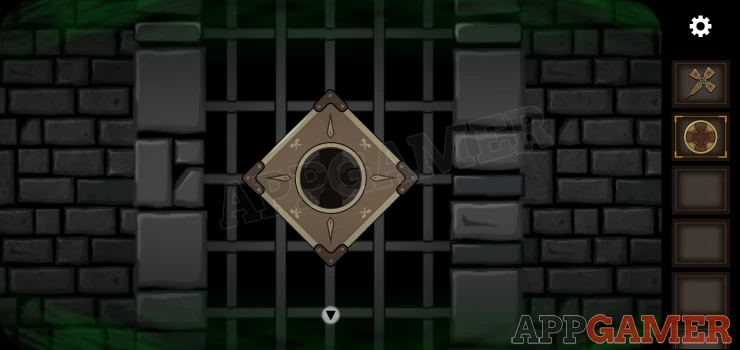
Add the gold disk and then the gold cross. The gate will open.
Tap to go through and complete Chapter 2. Now you can move to Chapter 3
We have questions and answers related to this topic which may also help you: Show all