Chapter 1
Park Escape - Escape Room Game Guide
In the first scene you have to get access to the distribution box to turn on the lights. You'll need the screwdriver which is located in behind the dark glass next to the fuse box. If you tap it, you'll see the screwdriver sitting there on a table.
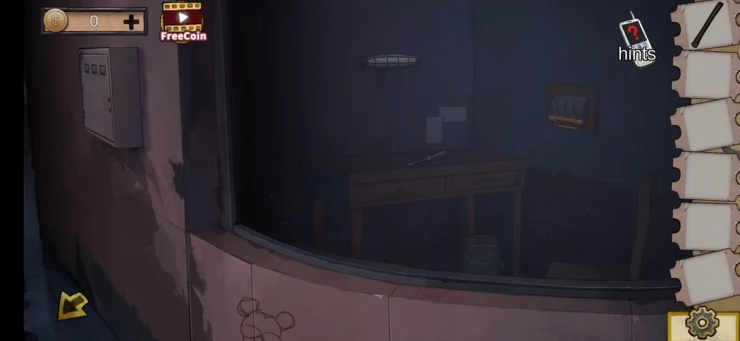
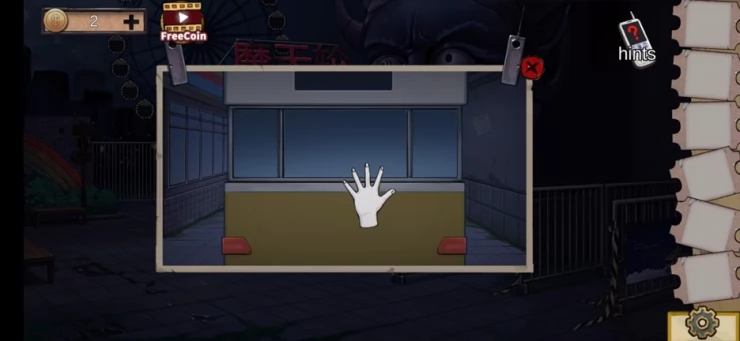
First we need to get access to that room, so tap the manhole cover in the first scene, and pick up the stick, then tap the glass. You should then tap the stick from your inventory to break the glass.
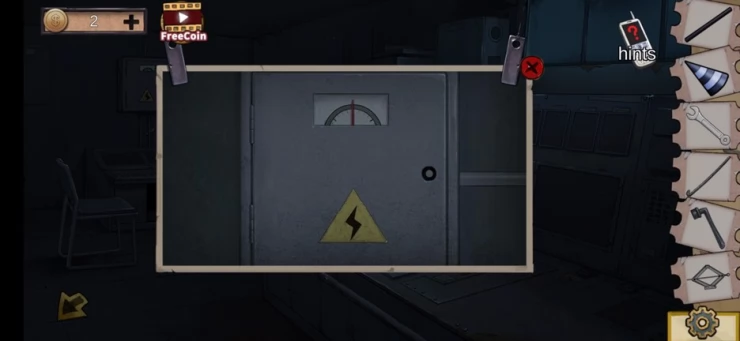
Now you can grab the screwdriver. You'll also see the main control box in that room, it doesn't work yet, you need to now use the screwdriver to fix the distribution box outside the room.
Tap the distribution box and use the screwdriver from your inventory to open it up. There you will see the red and blue wires which are incorrectly attached, tap the bottom red connector and the bottom blue connector to fix the wires and get electricity.
Now go back to look in the room with the broken glass and open the drawer under the table and grab the was, and pull down the lever of the control box to open the gates. Before you leave open the drawer and take the wax block too.
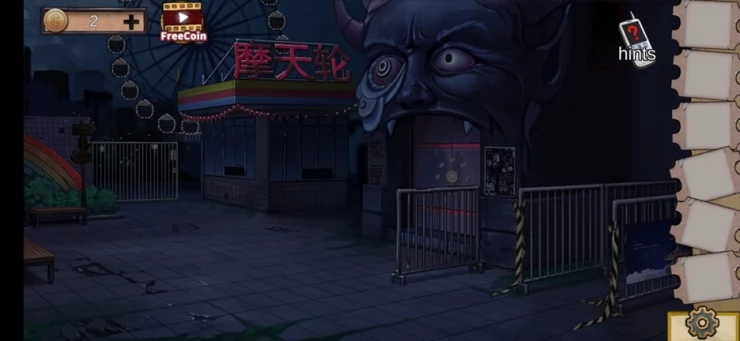
This scene does still offer some mysteries such as the glued down lid and the picture of the children's blocks which we'll revisit later. For now, enter the park by tapping the space where the gate opened.
In this scene look to the left and tap the package diagonally above the far left ticket gate machine. When the image zooms in, tap the package again to lift it so you can take the piece of string.
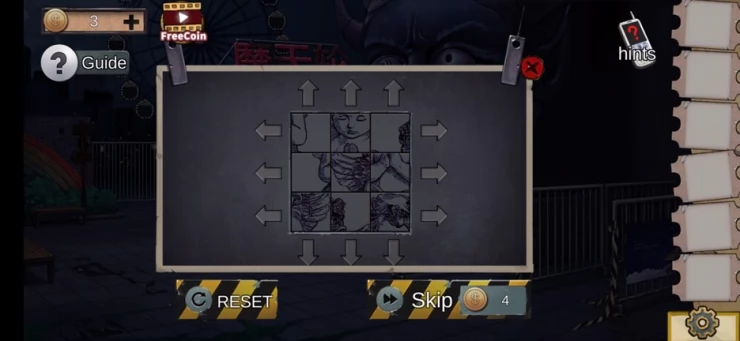
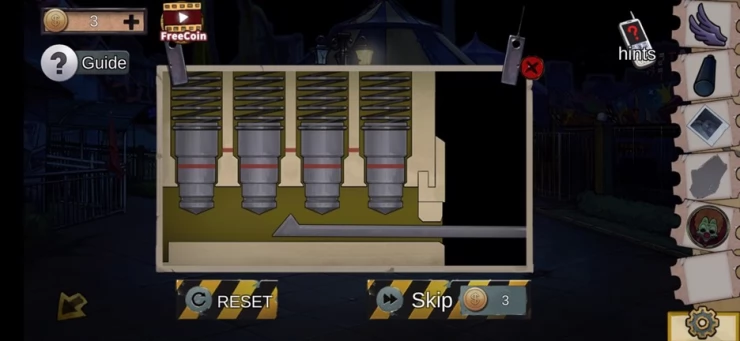
Now tap the box under the number 1, it will open to reveal a puzzle that you have to solve. To solve it, tap each of the pieces so that they move and when they are aligned correctly, you will get a key which will be used later.
Below the box you will see a trash can, tap it to add it to your inventory then when it is your inventory
Next look to the main scene and you'll see a large bag, tap that to zoom in, then tap the zipper, it's stuck. Now tap the wax block that you picked up earlier and tap the zipper again to open the bag.
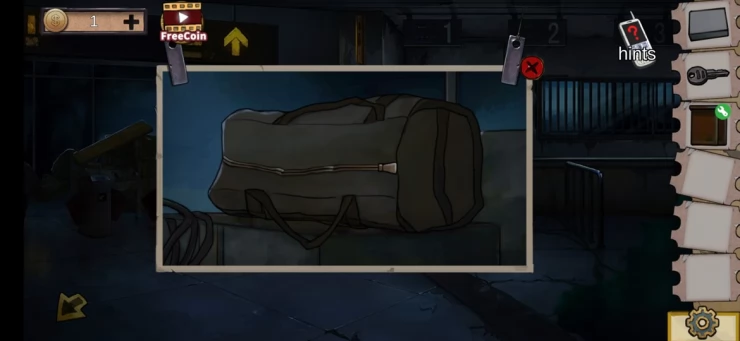
From the now opened bag you can tap in the part of a plier to add it to your inventory. You should also tap in the box behind the plier, to take that too.
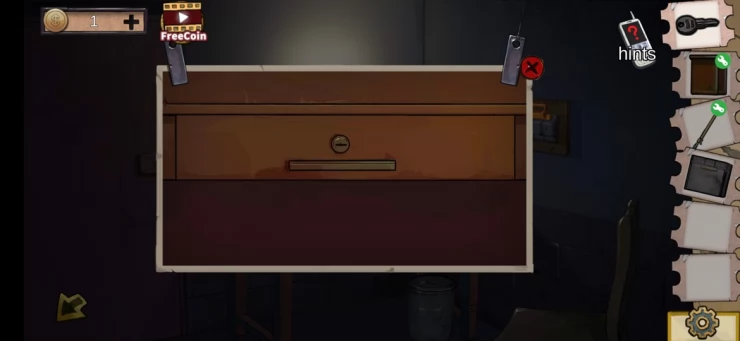
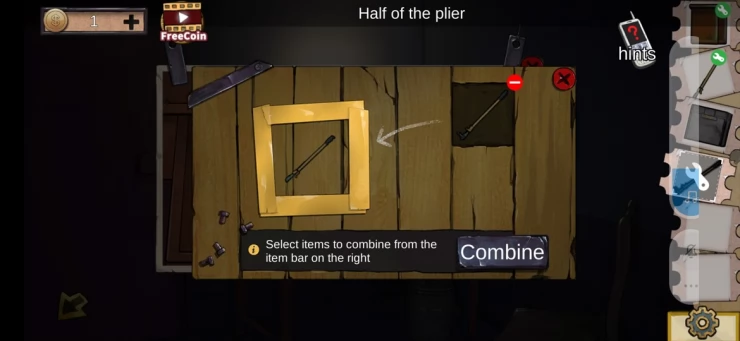
Leave this scene and go back to the broken window, you can now use the key to open the locked drawer, this will reveal the other half of the plier which you can take. You can now combine both parts of the pliers to form a fixed tool.
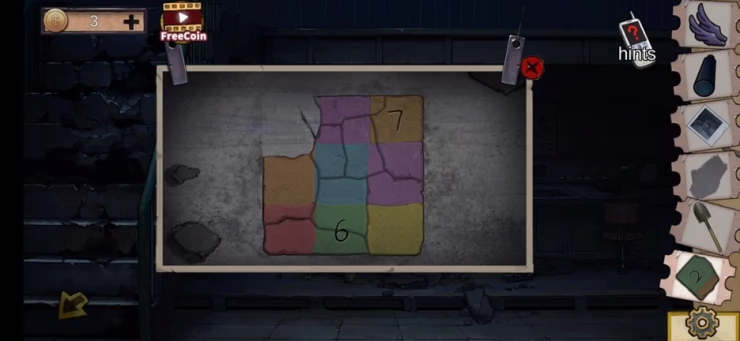
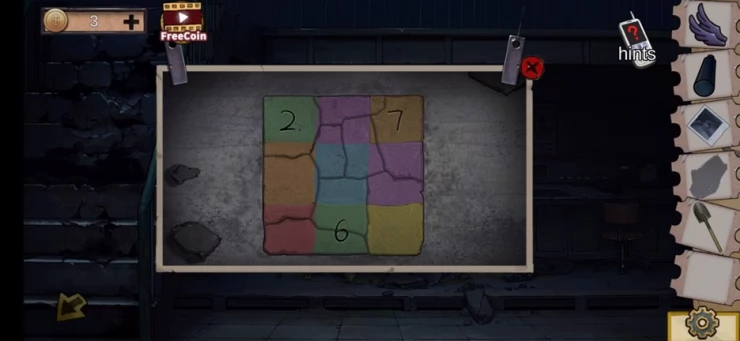
While you are there, tap again at the colored blocks picture on the wall. This will give you the code you need to complete the puzzle on the box.
You should enter the following sequence on the box:
2907 to open the box and reveal it's contents.
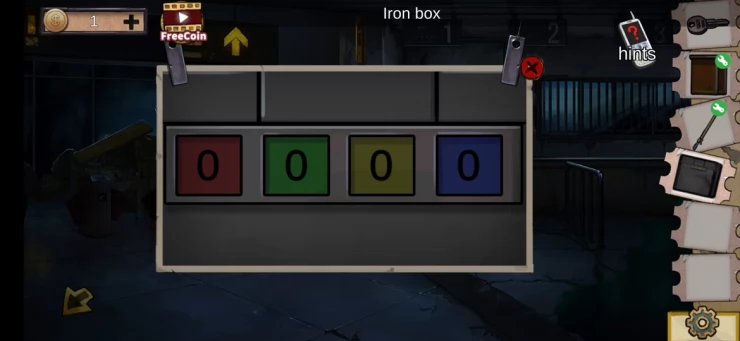
Take the hammer from the box. You should now go back into the main entrance through the open gate.
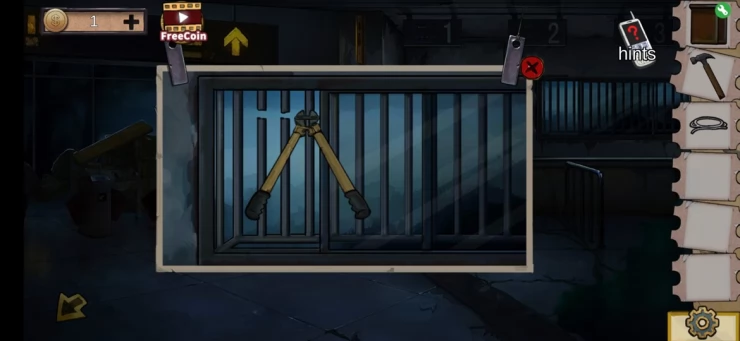
In this scene tap the grated window and then utilize the pliers to cut the bars, you can now enter the park through this opening.
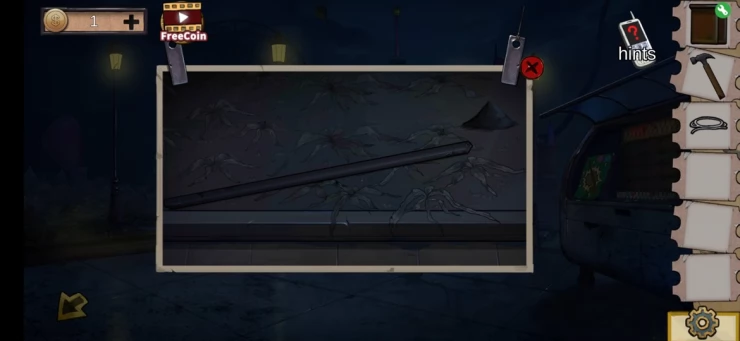
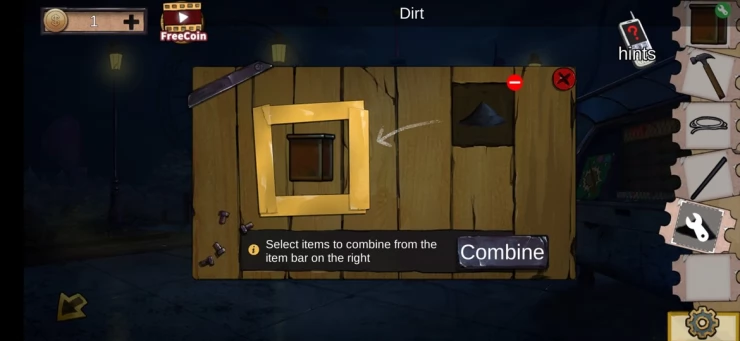
You are in a new scene now, tap under the lamppost and take both the iron bar and the dirt. You can now combine the trash bin and the dirt. Tap the light in the lamp post, and you can select the filled trash bin from your inventory to throw at the light, then where you found the iron bar and dirt you will find a knife which you should take.
Next, on the right of this scene there is a van with a balloon poster on it, tap that and take the tongs that are lying on the shelf in the next scene. Next go back out of this scene and tap the the metal under the poster, you can use the metal rod to pries it open to reveal a box of nails which you should take.
Now go back to the main ticket room and tap that large package again, you can use your knife to open it up and take the laser gun with no battery that is inside.
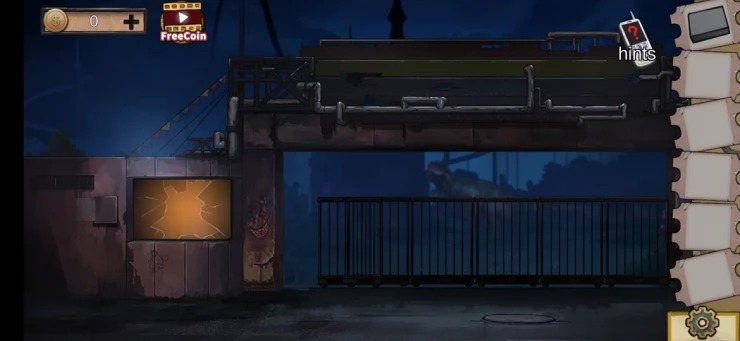
Go back to outside the park and tap the manhole cover and use the iron bar again to open the cover. Tap the hole to enter the sewer.
First thing you need to do is grab those batteries that are on the left and you can then combine them with the laser gun. You know have a working laser gun to use on the balloons.

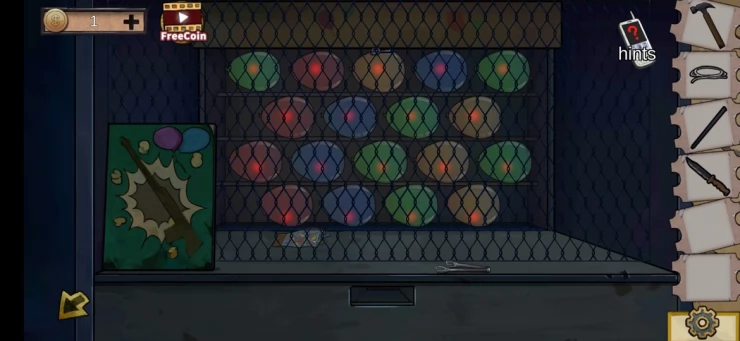
So head back to the van with the balloons poster to solve this next puzzle.
Look out for the balloon with the key on top of it and stop the red lines when it is over that balloon to shoot it and release the key. You can't make any mistakes though as your battery will run out. So if you miss, reset the puzzle and try again.
Don't forget to take the key when it eventually drops in the window slot.
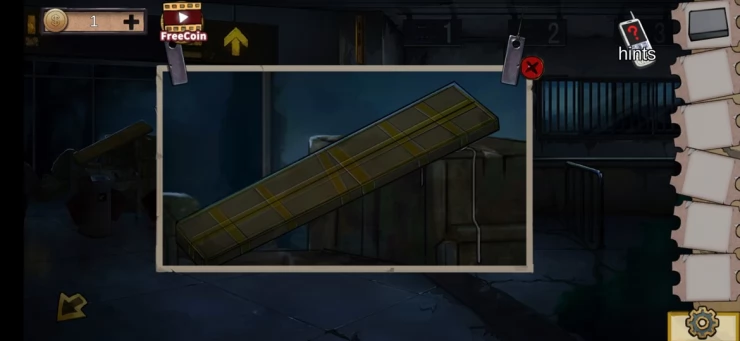
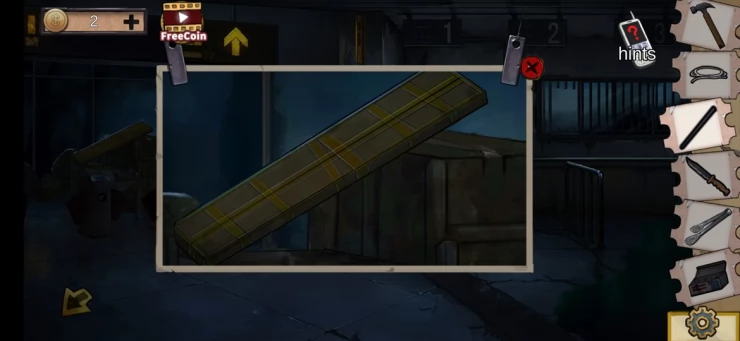
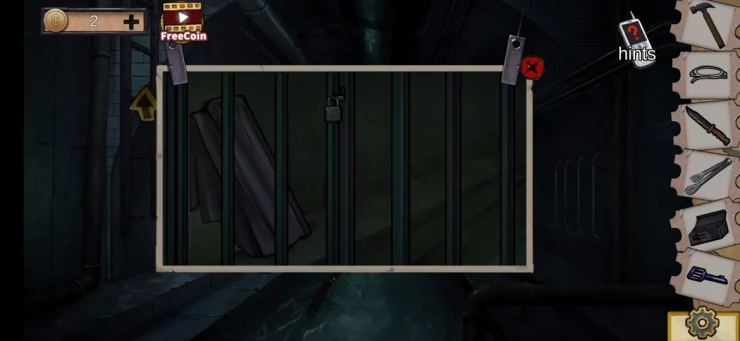
Head back to the sewer and tap the gates in the far end, use your new key to unlock the padlock, tap the item that is behind the now opened gates and take them (the planks).
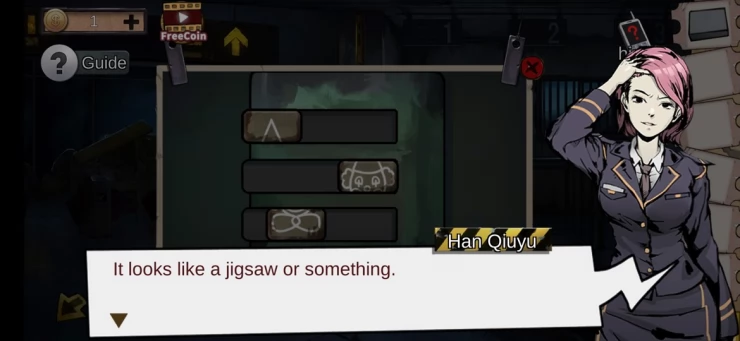
There is also a box with a puzzle on it, but we'll come back to that later. Now head back to the main room with the broken glass.
Tap the trash bin that has it's lid glued down, you can use your knife to pry open the lid and reveal it's contents, you'll need the tongs to get out the paper that is revealed in the bin.
Use the wet paper on the light in the same room, and it will eventually reveal an image, this is the solution to the puzzle in the sewer. So head back to the sewer and apply the same pattern to the puzzle.

To move the stars to different positions, just tap on them until the puzzle in complete and the hook is revealed, which you should take.
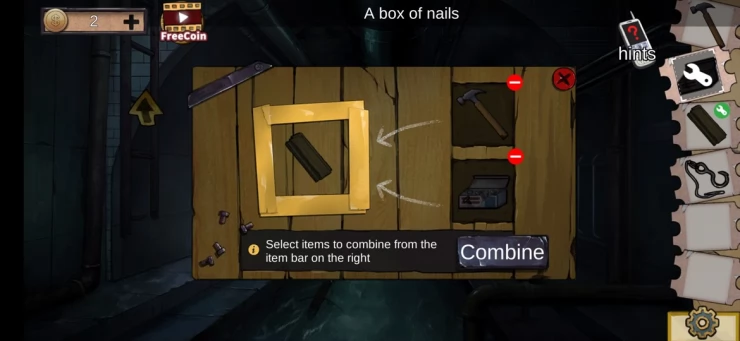
Now you can combine with hook with the string and then combine then planks with the nails and hammer.
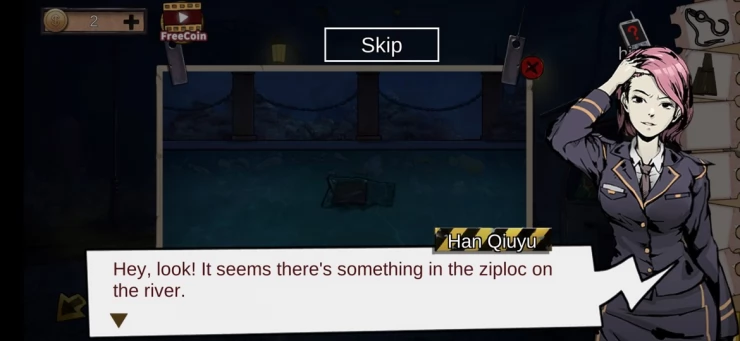
Head back to the inside of the amusement park through the grilled windows and tap the water near the balloon van, use the rope with the hook to get the ziplocked back that is in the water.
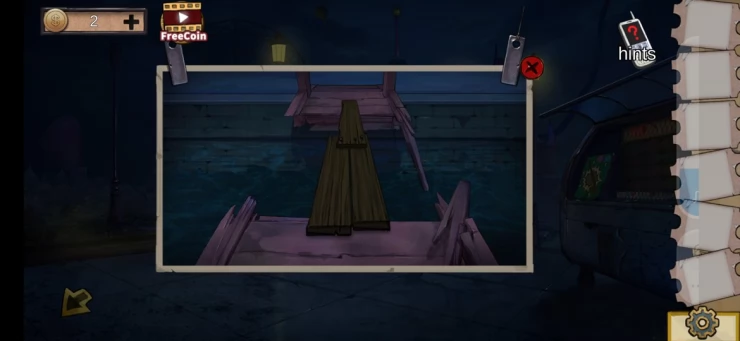
Now tap the bridge above the water, it's broken but you use your nailed board to make a crossing.
This is the end of the first part of the first chapter.
Chapter 1 Part 2
In the next scene you will see a yellow ice cream truck, tap the broken mirror and take the towel. Now tap the tape that is blocking the entrance in the bottom right and enter there, this will take you to the carousel.
Over on the left you will see a light in the floor and just above that there is an iron bar, tap on it to add it to your inventory.
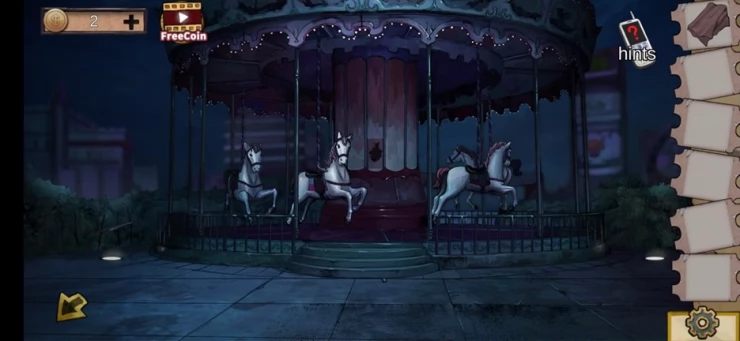
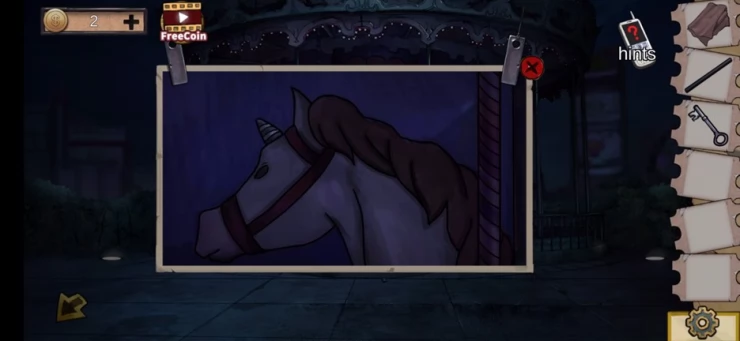
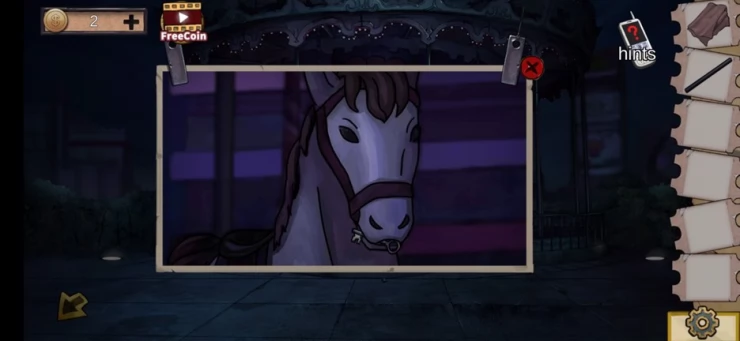
Now tap the horses to see what you can find. You should get a key from the one on the left and a unicorn's horn from the one in the background. You should now go back to the previous scene and use the key on the gates just past the ice cream truck. When the gate opens tap the opening to enter.
Head up the stairs in front of you and tap on the wrench and can of gas which are both easily spottable on the floor after you go up the stairs, now head back to the carousel.
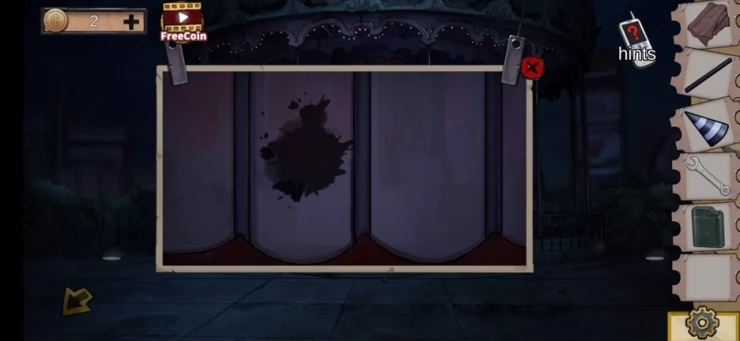
Look for the stain in the middle of the carousel and use the can of gas on the stain, then use the towel, this will remove the stain and reveal a code for the power room under the Ferris wheel.
With the towel activated, use your finger to remove the stain to reveal the code: 49172.
Go back through the gates to the Ferris wheel, but don't go up the stairs. Tap the door to reveal where you put the code you just got (49172) and the door to the power room will open.

Go into the power room, and you'll be able to take a few useful items from there. Look for the hook on the control panel, the handle that is under the chairs and a door that opens below the fuse box which will reveal a car jack. Take all three of those items.
Now use the handle that you have on the fuse box to open it. This will reveal the fuse box puzzle as below, you just have to touch the fuses in a certain order to complete the puzzle.
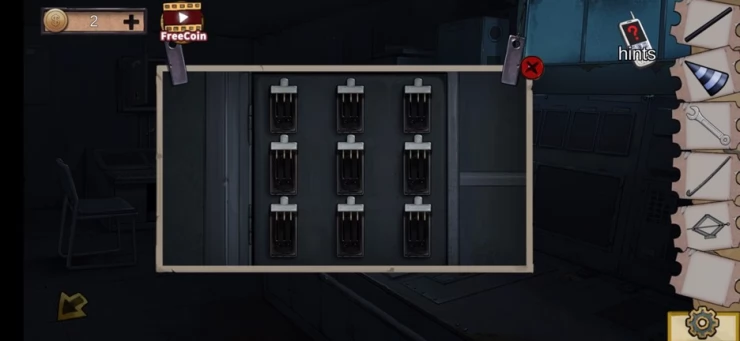
1. Center Fuse
2. Top Left Fuse
3. Bottom Middle Fuse
4. Top Left Fuse
5. Bottom Left Fuse
6. Bottom Right Fuse
7. Top Right Fuse
8. Center Fuse
Once complete, all of the fuses will be set in the same direction and power will be restored to the Ferris wheel.
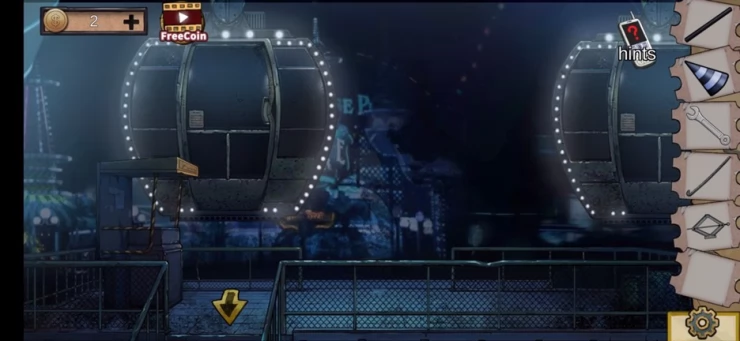
Head out of the room and up the stairs to see the Ferris wheel which now has the lights on. Now tap the control station to the left of the carriages, and use the following sequence on the dials.
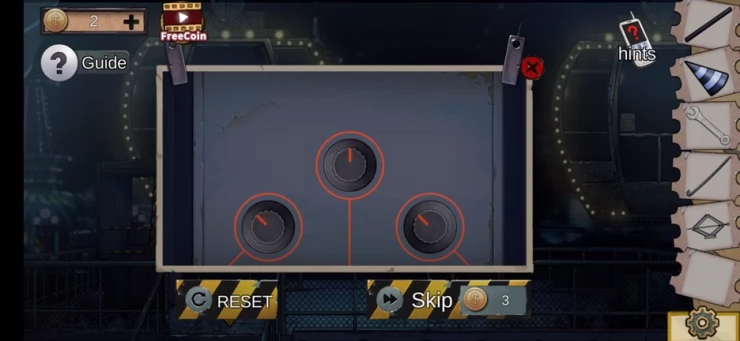
1. Left Dial, press once
2. Middle Dial, press three times
3. Right Dial, press three times
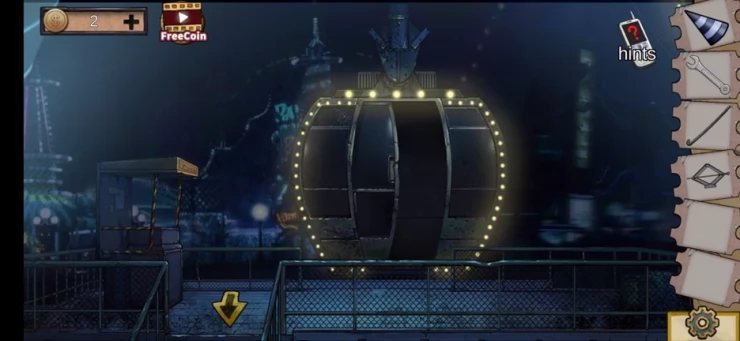
If done correctly, the Ferris wheel will rotate a little and you will have access to a carriage, to the carriage door and use the iron bar to open it. Go inside and you'll find a box which you can open.
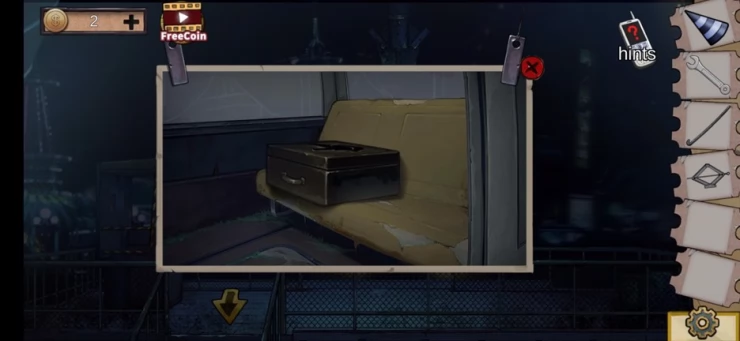
First you will see a carving of a unicorn, add to it the unicorn's horn that you found, then tap the wheel to pick it up and put it in your inventory.
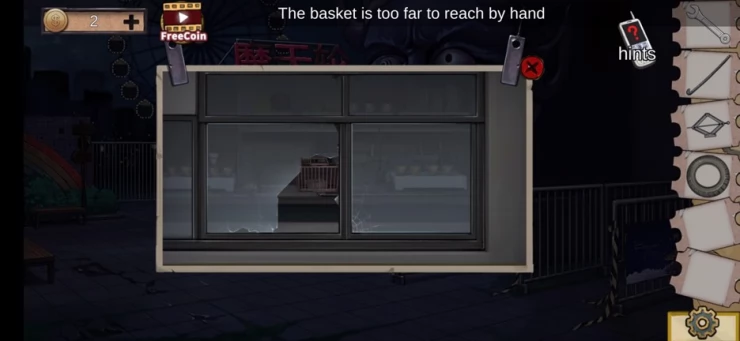
Now head back to the ice cream truck, tap the basket that you can see through the window and use your hook to grab it, that will give you a box of screws.
You notice that the wheel you found fits the ice cream truck, so if you can fix it you may be able to get it to move. Tap the broken wheel, then tap your car jack to raise the truck, then tap your wheel to fit it to the ice cream truck.

After the wheel is on, use the screws, then the wrench to complete the job. You should now be able to tap the truck and push it away.
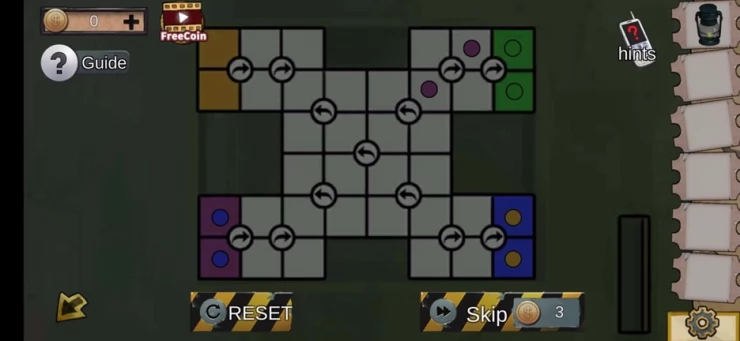
With the ice cream truck now gone, you can access the kiosk that is behind where it was, tap the left front part of the kiosk to access the next puzzle in the game.
Here you have to move the pieces around to complete the puzzle. This can be completed in 19 moves as follows:
Naming each of the arrows on the picture from the top left in a clockwise direction 1-12, here is the combination
1. 12
2. 3 (x2)
3. 12
4. 5
5. 7
6. 11
7. 3
8. 11
9. 3
10. 11
11. 3
12. 5
13. 7
14. 11
15. 7 (x2)
16. 10
17. 7
18. 10
19. 7
On completion of the picture puzzle, the box will open and you can take the screwdriver.
You should now go back to the carousel to take the wings from the horse in the front.

Now, go back to the kiosk and devil face entrance and enter the path where the ice cream truck was.
Here there are three things that you'll need to find and take with you.
1. Handle
Located near the bottom right of the scene on the pavement.
2. Broken Glass
Located on the left part of the streetlamp.
3. Photo
Located just below to the streetlamp to the left.
When you have acquired all of the items, tap the entrance on the left of the screen to take you to the next scene.
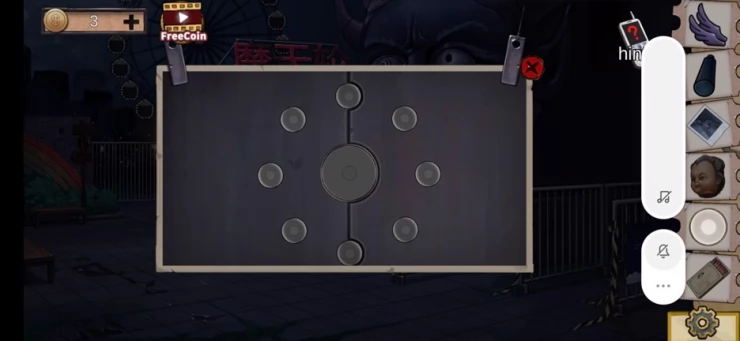
First of all you need to tap the round table in the middle, to complete the puzzle of pieces, there will be a piece missing, but you can find this over on the right of the room, take it, and look out also for the shovel, and take that too.
Look out for the template markers on the table, this will give you the boundaries of the puzzle, if you don't use these, the puzzle won't be recognized even if you have everything in the right place.
You can now complete the puzzle.
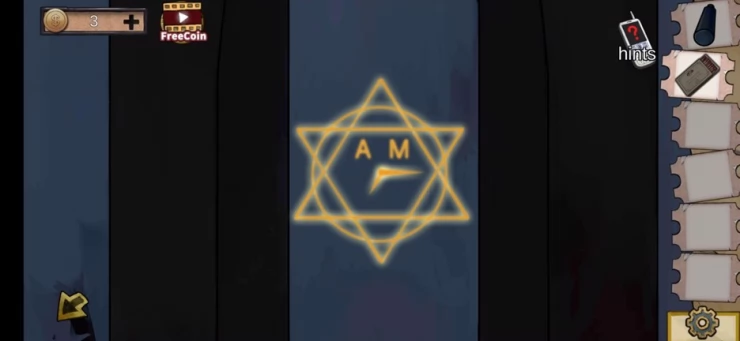
With the puzzle completed tap the main control console where when you zoom in you will see an item behind a glass with some shape buttons, you'll have to enter the following combination to get the coin:
1. Triangle
2. Circle.
3. Square
4. 6 Pointed Star
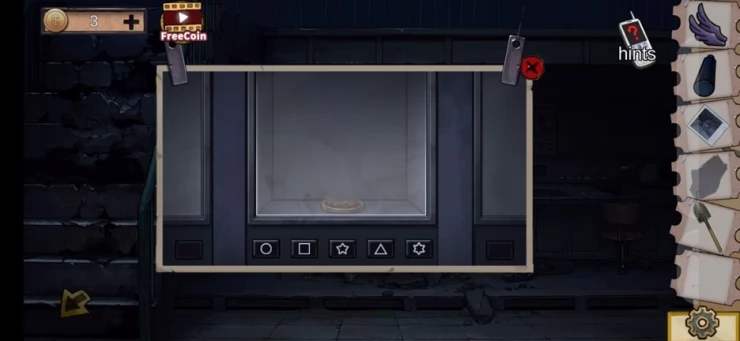

This combination is found when you tap the devils eye in the main entrance scene.
You can now take the clown badge.
Go back to the streetlamp and tap the dirt directly where the streetlamp is and use the shovel on it, this will reveal a lockpick which you should take.
To the right of the streetlamp there is a gate with a lock, use the lockpick to open it, then enter the following combination to complete the puzzle.
Lockpick Puzzle:
There are four locks that you need to touch, and the have to be done in a particular order. If they are called A, B, C and D from left to right then you need to touch them in this order:
1. B
2. C
3. D
4. A
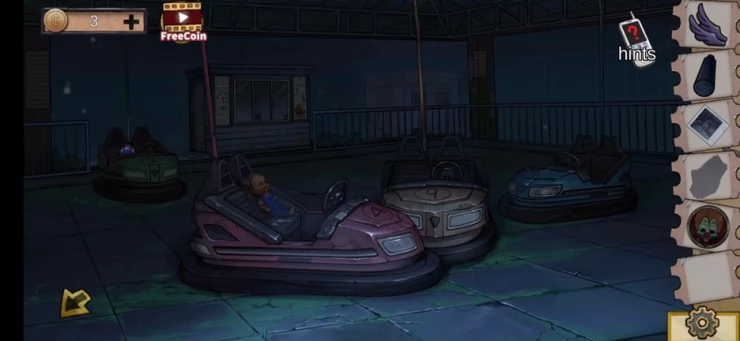
This will bump open the lock and you can enter to where the dodgems are.
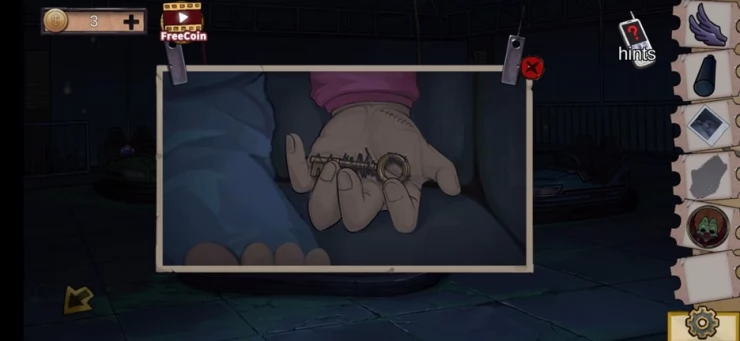
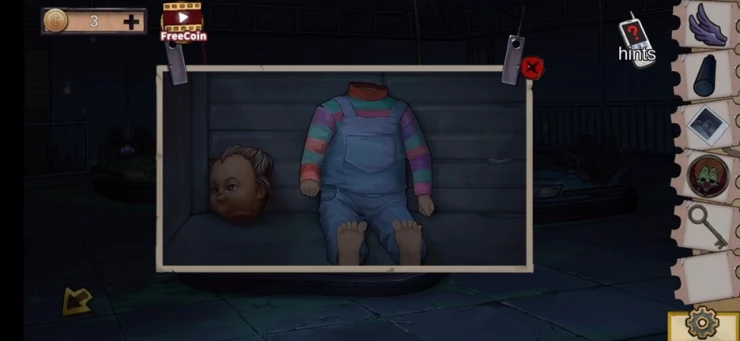
Tap the doll which is on the red bumper car and take the key using the glass to cut the string that is attaching the key to the dolls hand.
Now tap the green bumper car on the left and you'll be able to take the doll's head.
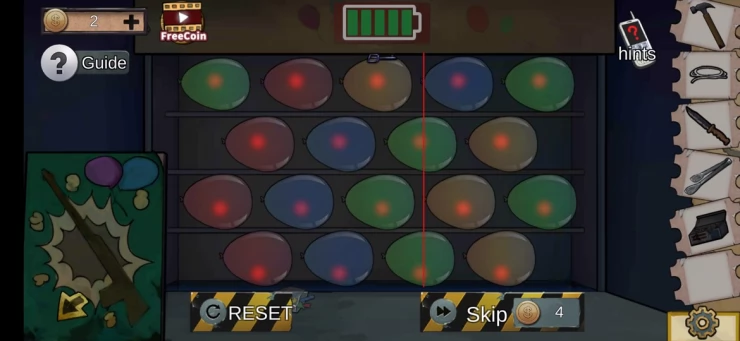
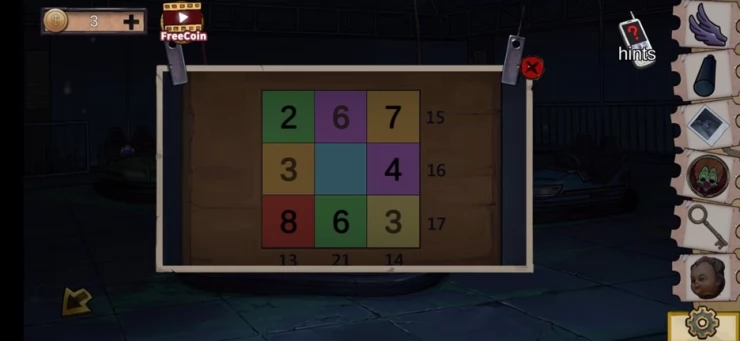
Now tap the left part of the bumper car booth to open the door, and tap the box that falls to the ground, it's another puzzle for you to solve.
This puzzle related to the slate puzzle that you fixed earlier on top of the table. Basically this is a number puzzle where the rows and columns must add up to
to numbers on the outside edges of the puzzle.
The slate puzzle tells you some of the missing numbers and you can enter them right away, the rest you can figure out easily.
Tap the squares on the puzzle to change the numbers.
This is the completed puzzle and the middle number that is missing is 9.
You can now grab the light that is revealed and put it in your inventory, this will be used later in the house of horrors.
Now go back to the room with the slate puzzle om the table and you can use the key from the doll to open the locked cupboard which is behind the table.
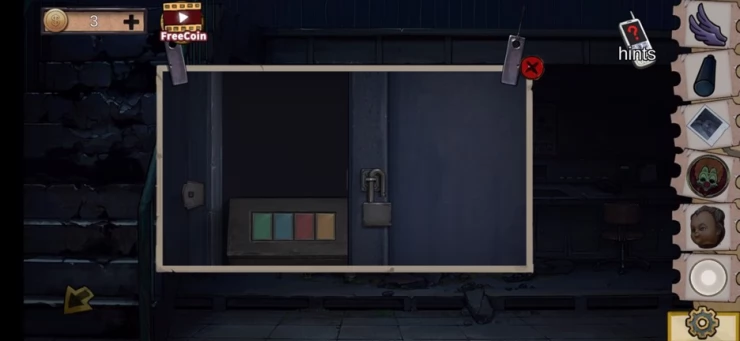
Once it has been unlocked, tap the box with the colored squares to add it to your inventory, then select it from your inventory and tap the colored squares to get the following number combination:
2049
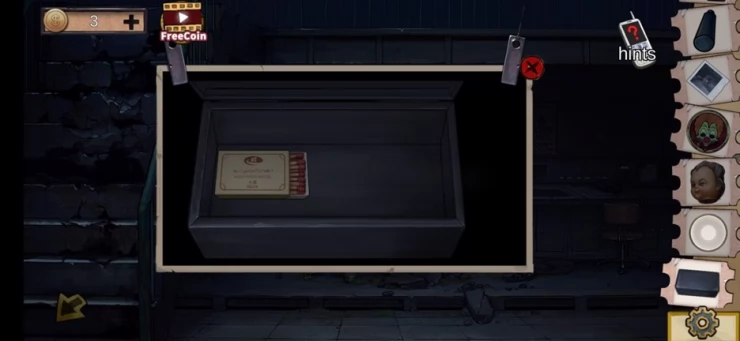
This will then open the box to reveal a matchbox which you should take.
Now go back to the control room of the Ferris wheel where you will see the main console layout. Tap near the red button to access the off and on switch, you can place the clown badge there in the gap.
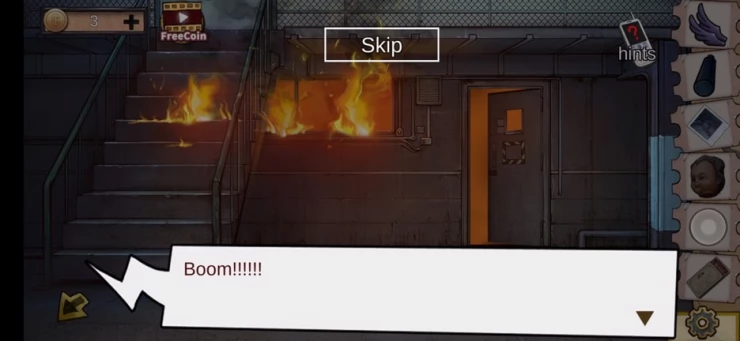
Next tap the switch to turn everything on, it will light up the Ferris wheel, but unfortunately, start a fire in the control room.
Tap the stairs as if you were trying to go up to reveal the pattern of lights of the Ferris wheel, you'll need to use this pattern later in the House of Horrors.
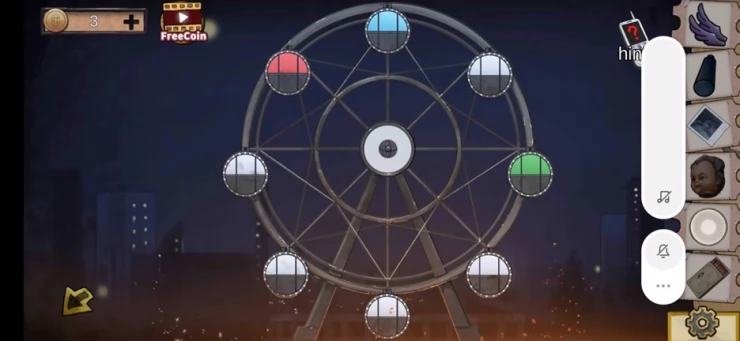
Let's go there now, go back to the entrance at the start of part 2 and tap the door below the devils head to reveal a pattern, tap the light from your inventory, then tap the lights that need to have their colors changed as per the pattern from the Ferris wheel.
Once done, this will open the door and you can go inside. Tap the female statue on the right, you'll see that she is holding a devil baby, you need to give it the dolls head from your inventory.
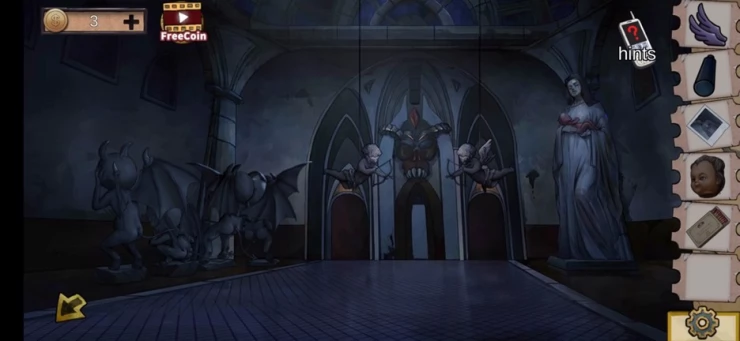
Tap the cupid on the left and apply to it the angel wings, this will reveal an unlighted candle in it's belly area.
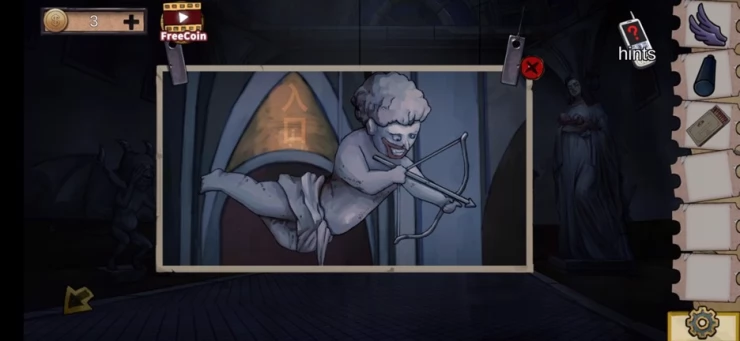
Use the matches to light the candle, and then tap on the other angel to light it's candle also to reveal a light pattern on the doors at the back of the room. Tap the lights on the door at the back of the room, then you can drag them together to reveal a time of 07:15 AM. Now leave the room to continue with the story.
Head to the Carousel, and you'll be informed there is something on the ground, tap around the left of the stairs and you should find some pliers.
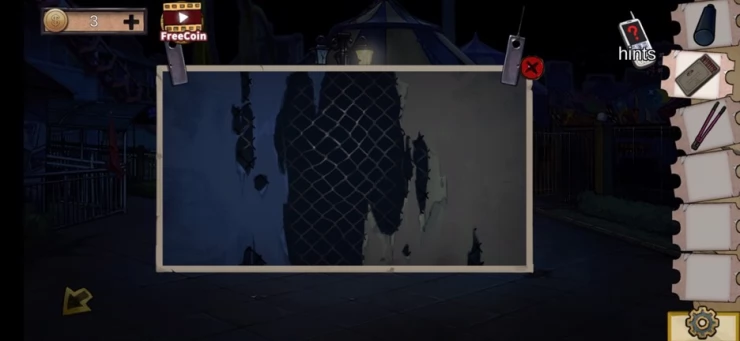
Now go back to the room with the streetlamp and at the back you will see some steel mesh, tap it and use the pliers to open it, you can now go in.
Use the handle on the wheel on the right and tap it to turn it to get a ladder. Tap the new ladder and you'll be able to grab the Iron Plate shaped like a child.
Go back down the ladder and grab the knife from the board, then tap the ladder on the left where you will get to a box which needs a combination. We'll come back to that later.
Now, use the knife on the rope, this will drop a hammer, pick it up. Leave the room and go back to the roller coaster control room which has the round table.
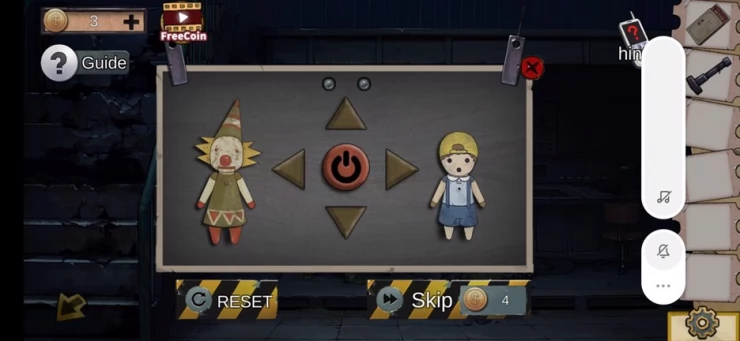
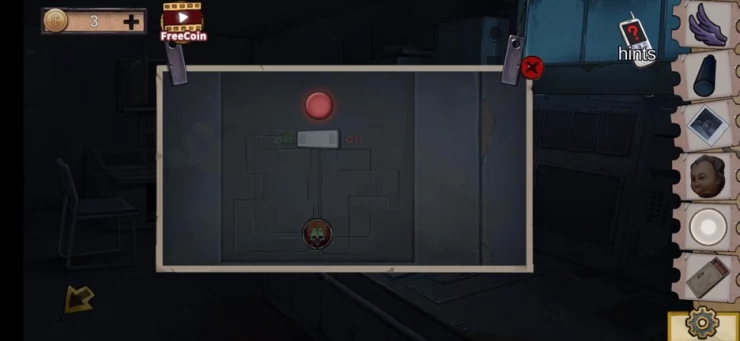
Tap the area under the round table to reveal another puzzle. You will see on the right a space for another object, select the iron plate shaped like a child from your inventory and place it on the puzzle. Tap the red button and the clown on the left will start to move, you have to remember the sequence and tap the corresponding buttons, each time is random, so we can't give a standard solution here.
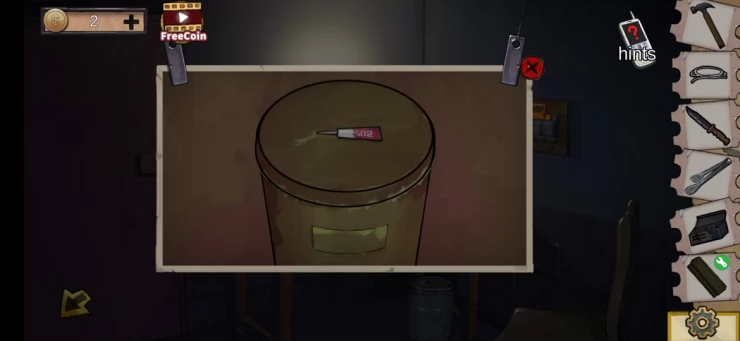
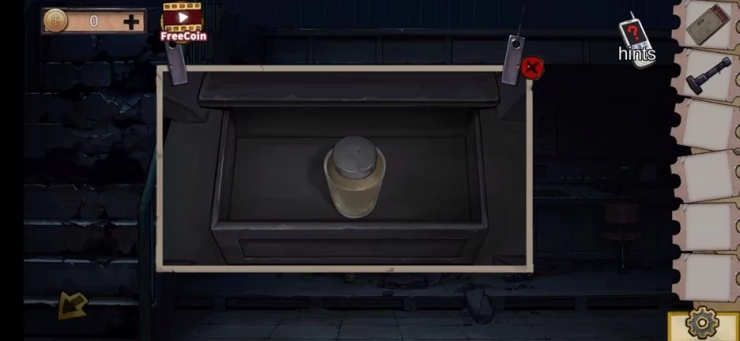
On completion of the puzzle you can take the kerosine from the box.
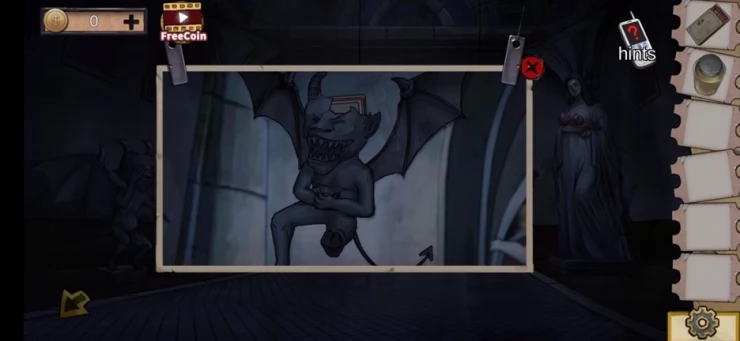
Go back to the house of horrors and find the laughing demon, use the hammer to smash it and take the electronic clock from it's head. Set the clock to 07:15, this will reveal the combination: 45076 which you need to use to open the box at the top of the ladder in the circus tent.
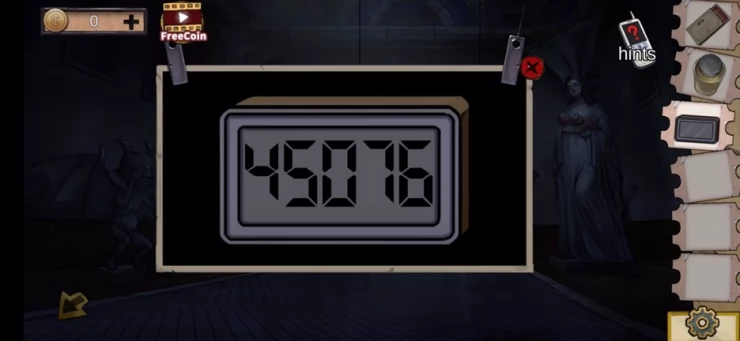
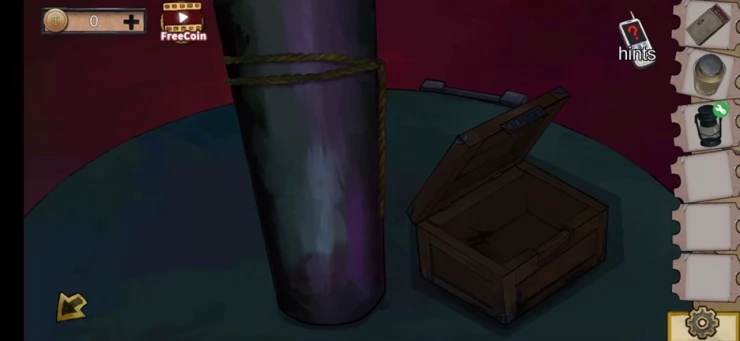
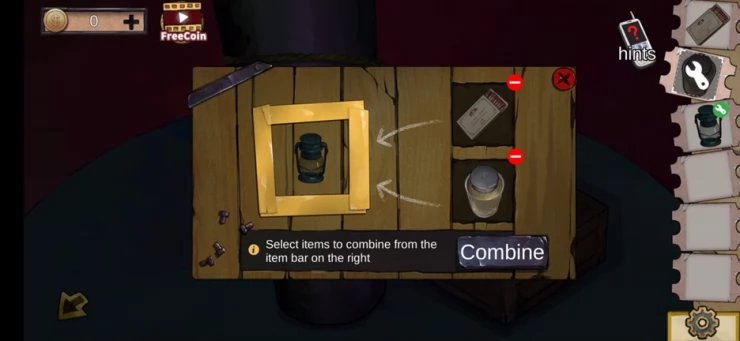
Once you enter the correct combination in the box, you can take the hurricane lamp. Combine this lamp with the kerosine and matches. With the items combined tap the green door at the back of the circus tent to reveal the next puzzle.
You basically have to tap the arrows to move the dots, you have to get each of the dots to the same colored squares, it takes a lot of tapping but is pretty easy to do, just try to complete one dot at a time. The center arrow is critical to take the dots from one side to the other.
Go through the door to complete the chapter.
We have questions and answers related to this topic which may also help you: Show all